| Installation Special Tool(s) | | Engine support bar 21-140 | | | Adapter for 21-140 21-140-01 | | | Adapter for 21-140 303-290-02 (21-140-02) | | | Adapter for 21-140 303-290-03 (21-140-03) | Installation All vehicles | | -
General note. - Renew all snap rings and self-locking nuts.
| | | -
CAUTION:Ensure that the two guide sleeves are installed. Move the transmission into position. | | | -
NOTE:Throttle housing bracket Tighten the flange bolts (left-hand side). | | | -
Tighten the flange bolts (right-hand side). | | | -
Install the drive belt cover. | | | -
NOTE:Do not tighten the nuts. Attach the rear engine mounting. | Vehicles with 1.4L engine Vehicles with 1.25L engine Vehicles with 1.6L engine All vehicles | | -
Tighten two upper flange bolts. | | | -
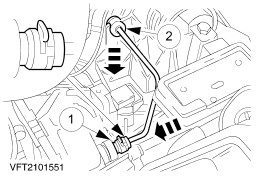
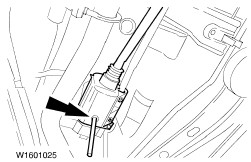
Connect the hydraulic pipe of the clutch operating system. - Fit the spring clip.
NOTE:Make sure the spring clip engages securely. - Press the line into the guide.
| Vehicles with 1.4L engine | | -
Attach the transmission ground cable. | | | -
Install the speedometer drive cable (if equipped). | | | -
Attach the bracket to the throttle body and screw in the starter motor flange bolt. | Vehicles with a one-part intermediate shaft | | -
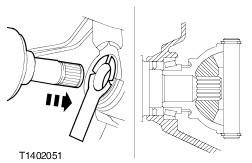
CAUTION:The inner joint must not be bent at more than 18 degrees; the outer joint must not be bent at more than 45 degrees. CAUTION:When installing the intermediate shaft, use the locating sleeve (supplied with each new oil seal) to protect the oil seal. Install the right-hand front drive halfshaft and the intermediate shaft into the transmission. | Vehicles with a two-part intermediate shaft | | -
CAUTION:The inner joint must not be bent at more than 18 degrees; the outer joint must not be bent at more than 45 degrees. CAUTION:When inserting the front drive halfshafts always use the installation sleeve (supplied with every new oil seal) to protect the oil seal. NOTE:Make sure the snap ring engages correctly. Install the right-hand front drive halfshaft with a new snap ring and the intermediate shaft into the transmission. | All vehicles | | -
NOTE:Install a new retaining clip and new nuts. Install the front drive halfshaft intermediate bearing retaining clip. | | | -
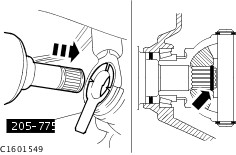
CAUTION:The inner joint must not be bent at more than 18 degrees; the outer joint must not be bent at more than 45 degrees. CAUTION:When inserting the front drive halfshafts always use the installation sleeve (supplied with every new oil seal) to protect the oil seal. NOTE:Make sure the snap ring engages correctly. Install the left-hand front drive halfshaft with a new snap ring into the transmission. | | | -
Top up transmission fluid (WSD-M2C200-C) to 5 - 10 mm below the lower edge of the fill hole. - Tighten the blanking plug.
| | | -
Install the bracket/transmission shield. | | | -
Fit the engine roll restrictor. - Push the engine forwards.
| Vehicles with 1.6L engine | | -
Install the pipe of the power steering fluid cooler. - Push on the A/C compressor electrical connector.
- Install the pipe of the power steering fluid cooler.
- Push on the connector of the power steering pressure switch.
| All vehicles | | -
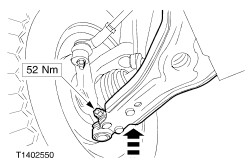
Attach the right and left suspension arms to the spindle carriers (left-hand side shown). | | | -
Push the connector onto the multi-function switch (or reversing light switch if necessary) (multi-function switch connector shown). | | | -
Connect the exhaust pipe. - Remove the boot from the flexible pipe.
| | | -
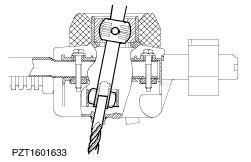
NOTE:If it is not possible to install the shift stabilizer without it being under stress, align the engine/transmission so that it can be installed free of stress. Do not tighten the selector shaft clamp. Attach the gearshift stabilizer and the selector shaft to the transmission. - Gearshift stabilizer
- Selector shaft
| | | -
Adjust the gearshift mechanism. - Engage fourth gear (push the selector shaft from the neutral position up to the stop).
- Lock the gear lever in fourth gear position using the shaft of a twist drill (9 mm diameter).
| | | -
Adjust the gearshift mechanism. | | | -
Tighten the selector shaft bolt. - Remove the drill from the gearshift housing.
| | | -
NOTE:Multipart heat shield Install the heat shield. | | | -
NOTE:Single part heat shield Install the heat shield. | Vehicles with 1.6L engine | | -
Fit the radiator fan. - Connect the plug.
- Slide the radiator fan upwards and insert it into the bracket.
| All vehicles | | -
Connect the plug of the vehicle speed sensor (VSS) (if equipped). | | | -
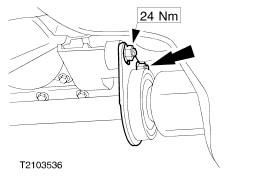
Tighten the rear engine mounting. | | | -
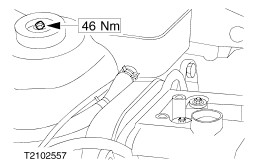
Tighten the left-hand and right-hand suspension strut top nuts (right-hand side shown). - Stop it from turning with an Allen key.
- Tighten by hand with a ring spanner.
- Use a torque wrench to tighten to torque.
| Vehicles with 1.4L engine Vehicles with 1.25L engine | | -
Attach the air intake pipe. | Vehicles with 1.6L engine | | -
Fit the air intake pipe. - Install the ground lead on the battery tray .
| All vehicles | | -
Install the battery box. - Attach the cable bracket.
- Tighten the bolts.
| | | -
Finishing operations. - Check the fluid levels and correct as necessary.
- Check the routing of vacuum hoses and wiring and secure with cable ties.
- Install and connect the battery.
- Reprogram the preset radio stations.
- Carry out a road test to enable the PCM to gather data.
| |