| Removal and Installation Materials Name Specification Windshield Adhesive Kit WSK-M11P57-A1 General Equipment Direct glazing removal/replacement equipment Hot air gun Knife Laminated card Removal WARNING:Refer to: Window Glass Health and Safety Precautions (100-00 General Information, Description and Operation). | | -
Remove the polyurethane (PU) adhesive cap and heat the PU adhesive for a minimum of 30 minutes. | | | -
Remove the C-pillar trim panel. Refer to: C-Pillar Trim Panel (501-05 Interior Trim and Ornamentation, Removal and Installation). | | | -
CAUTION:If the original window glass is to be installed, take care not to damage the electrical connectors and the weatherstrip. NOTE:This step requires the aid of another technician. -
From outside the vehicle, cut the PU adhesive. -
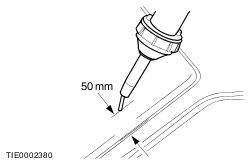
NOTE:Some resistance may be encountered when cutting through the glass locating spacers. From inside the vehicle, cut the PU adhesive to a maximum depth of 50 mm. | Installation | | -
NOTE:Minimum 1 mm bead thickness. NOTE:Make sure that the mating faces are clean and free of foreign material. Carefully trim the remaining PU adhesive from the rear quarter window glass flange. | | | -
Prepare the rear quarter window glass, rear quarter window glass flange and trimmed PU adhesive in accordance with the instructions supplied with the PU adhesive kit. | | | -
NOTE:Make sure that the mating faces are clean and free of foreign material. | | | -
NOTE:Discard the first 100 mm of adhesive as this may have a reduced working time. NOTE:Make sure that any breakage in the continuous bead of adhesive is overlapped by 20 mm. Apply the PU adhesive in a continuous bead of between 8 and 10 mm in height to the rear quarter window glass flange along the bond line. | | | -
NOTE:This step requires the aid of another technician. | | | -
If the ambient temperature falls below 10°C, apply warm air (25°C) continuously for 15 minutes. | | | -
Install the C-pillar trim panel. Refer to: C-Pillar Trim Panel (501-05 Interior Trim and Ornamentation, Removal and Installation). | | |