
EVAPORATOR - RH DRIVE
- Make
- Land Rover
- Model
- Defender 300Tdi Defender
- Section
- EVAPORATOR - RH DRIVE
AIR CONDITIONING
15
REPAIR
EVAPORATOR - RH DRIVE
Service repair no - 82.25.20
Remove
1. Remove heater/cooler unit
See Heater/cooler
unit - RH drive.
2. Suitably support unit on a bench.
3. Remove sealant and release thermostat probe
from low pressure pipe.
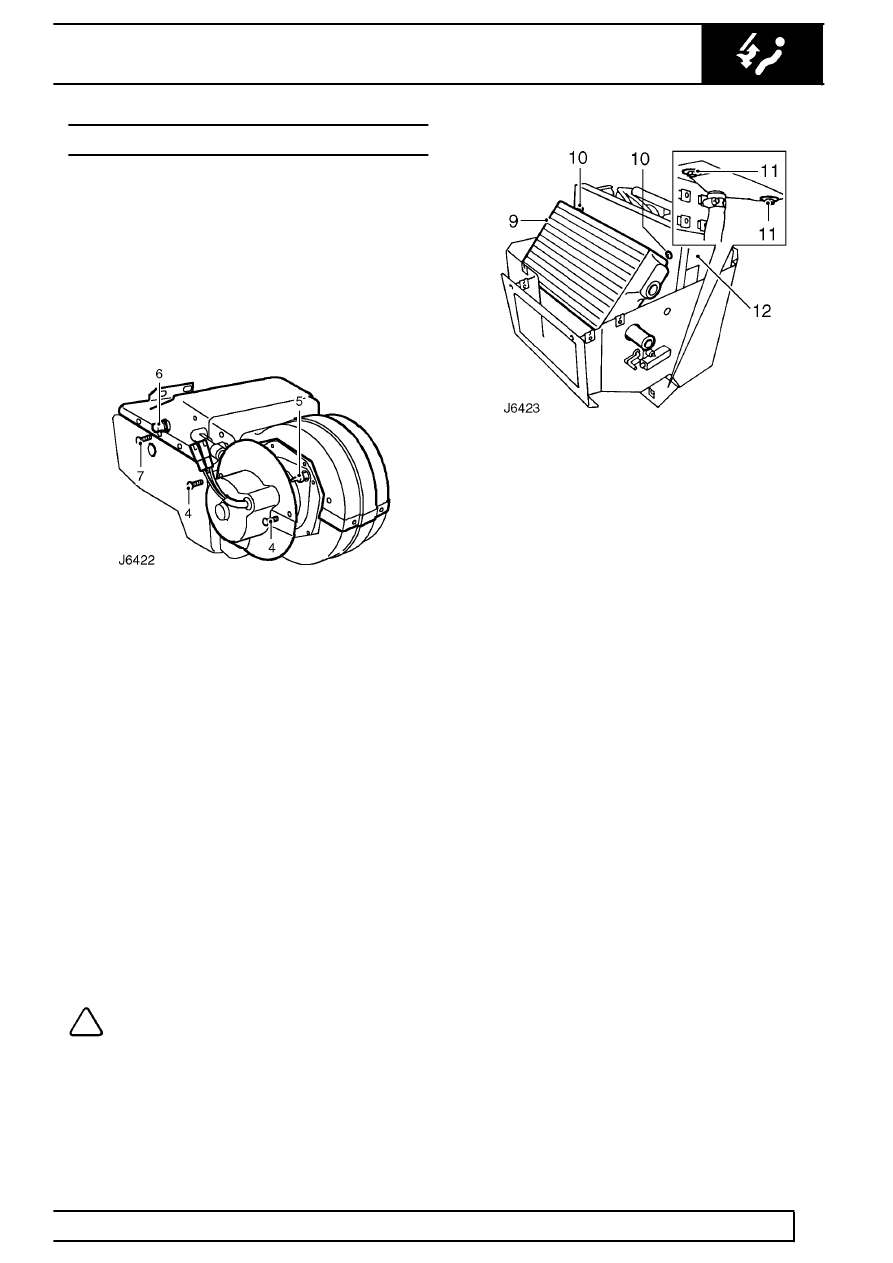
4. Remove 2 screws securing blower motor cover
to main casing.
5. Withdraw cover sufficiently to release motor
Lucar connector and earth eyelet. Remove
cover.
6. Unscrew top adaptor pipe from heater matrix.
7. Remove 18 fixings securing top cover to main
casing and heater/cooler support frame.
8. Carefully break sealing compound around edge
of joint seam and remove top cover from main
casing.
9. Lift out heater matrix.
10. Remove 2 screws securing back of evaporator
to support frame.
11. From underneath, remove 2 nuts and washers
securing evaporator matrix to base of casing.
12. Lift evaporator matrix from casing, complete with
side plates.
13. Remove side plates
14. Clean sealing compound from all joint seams of
main casing and top cover.
NOTE: The evaporator matrix is supplied
complete with the expansion valve.
However, a faulty expansion valve can be
serviced separately,
See Expansion valve - RH
drive.
Refit
15. Locate side panels to new evaporator lower
fixing studs.
16. Fit evaporator, with side plates, into main casing.
Ensure both studs are located through bottom of
casing and secure.
17. Apply sealing compound around joint seam of
main casing.
18. Fit top cover to main casing.
19. Fit thermostat probe to to low pressure pipe and
apply sealant.
20. Fit top adaptor pipe to heater matrix.
21. Fit Lucar connector and eath eyelet to blower
motor.
22. Fit blower motor cover.
23. Fit heater/cooler unit assembly into engine
compartment
See Heater/cooler unit.
Parts & tools for this job For Land Rover Defender
- TOOLA/C manifold gauge setSearch: AC manifold gauge set
- TOOLUV leak detection kitSearch: AC UV leak detection kit
- PARTCabin filterSearch: Land Rover Defender cabin filter
Links open Amazon search results in a new tab. As an Amazon Associate I earn from qualifying purchases.