
IMMOBILISATION SPIDER
- Make
- Land Rover
- Model
- Defender 300Tdi Defender
- Section
- IMMOBILISATION SPIDER
86
ELECTRICAL
6
REPAIR
IMMOBILISATION SPIDER
Service repair no - 86.77.03
Remove
1. Remove LH front seat cushion.
2. Release retaining clip and remove battery
access cover.
3. Slacken battery lead clamp bolts.
4. Turn starter switch ’on’.
5. Turn starter switch ’off’ and remove key.
6. Disconnect battery leads.
NOTE: Operation 6 needs to be carried out
within 15 seconds to avoid activating
battery backed-up alarm sounder, if fitted.
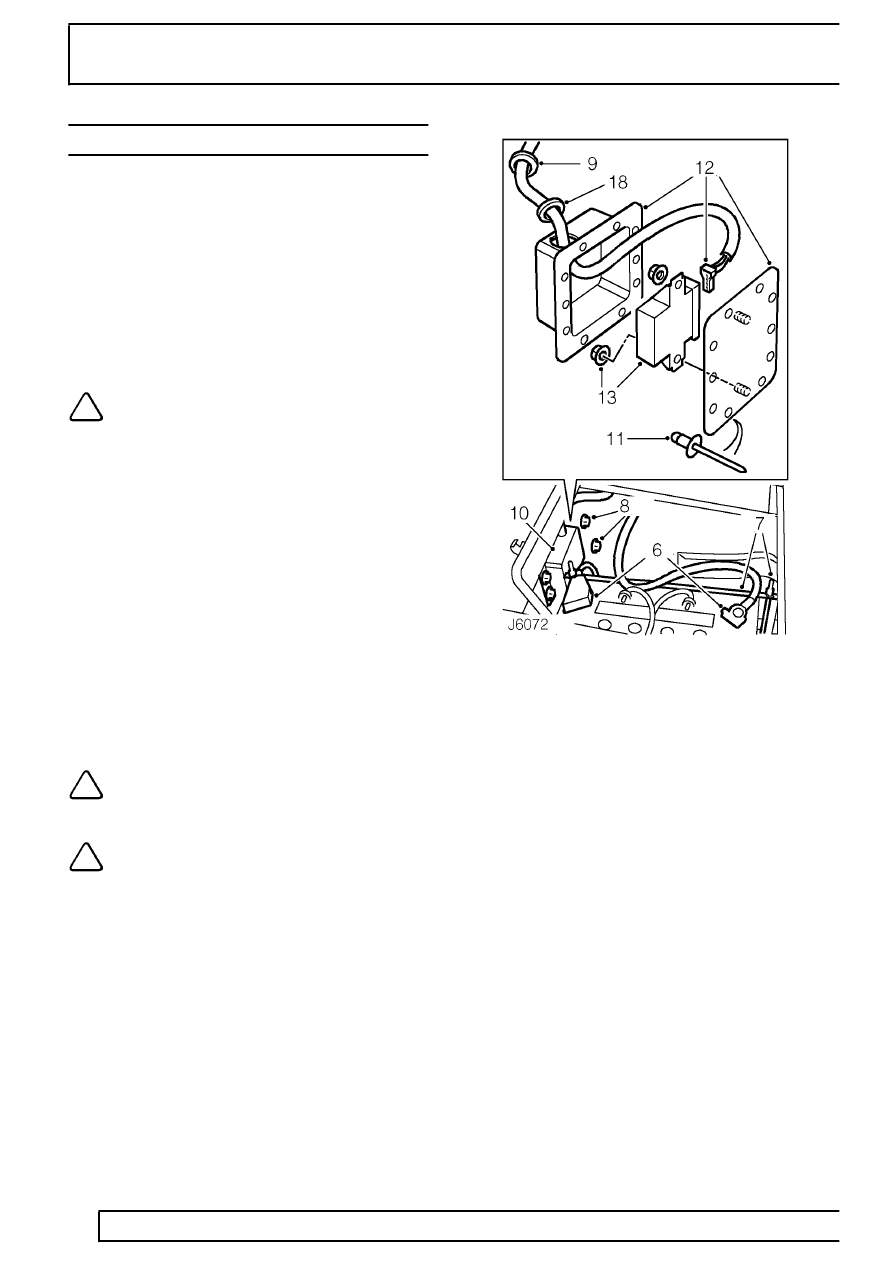
7. Remove battery clamp and ’J’ bolts.
8. Remove 4 nuts securing immobilisation spider
housing box to fixing studs on front face of
battery box.
9. Remove grommet securing spider harness to
corner face of battery box.
10. Carefully pull harness into battery box, lift spider
housing box and place on front edge of seat
base.
11. Using a suitable sheet to protect inside of
vehicle, grind heads off 6 monobolts securing lid
to spider box housing.
12. Detach lid from housing and disconnect spider
harness plug.
13. Unscrew two nuts and remove immobilisation
spider from lid studs.
NOTE: If spider box lid and/or sealing
gasket is damaged during operation 11 a
new lid will need to be fitted.
NOTE: A new immobilisation spider must
be initialised using TestBook.
Refit
14. Fit immobilisation spider onto lid studs and
secure with retaining nuts.
15. Reconnect harness plug to spider and ensure it
fully ’clicks’ home.
16. Position lid and spider assembly into box
housing so that harness plug is furst away from
harness entry.
17. Secure lid to spider box housing with monobolts.
18. Refit harness grommet into spider box, if
disturbed on removal procedures, and ensure
harness covering is fully inserted through
grommet to make water tight seal.
19. Push excess harnes cable through corner face
of battery box and fit grommet.
20. Fit spider housing box to fixing studs and secure
with four nuts.
21. Fit ’J’ bolts and clamp to secure battery,
22. Reconnect battery leads.
23. Fit battery access cover.
24. Fit LH seat cushion.
25. Test immobilisation and alarm system.
Parts & tools for this job For Land Rover Defender
- TOOLDigital multimeterSearch: automotive digital multimeter
- PARTAssorted fuse kitSearch: car fuse assortment kit
- TOOLWire crimper and connector kitSearch: wire crimper connector kit
Links open Amazon search results in a new tab. As an Amazon Associate I earn from qualifying purchases.