
Timing Belt: Specifications (page 9 of 11)
- Make
- Mitsubishi
- Model
- Montero
- Engine
- V6-3.8L SOHC
- Year
- 2005
- Section
- Timing Belt
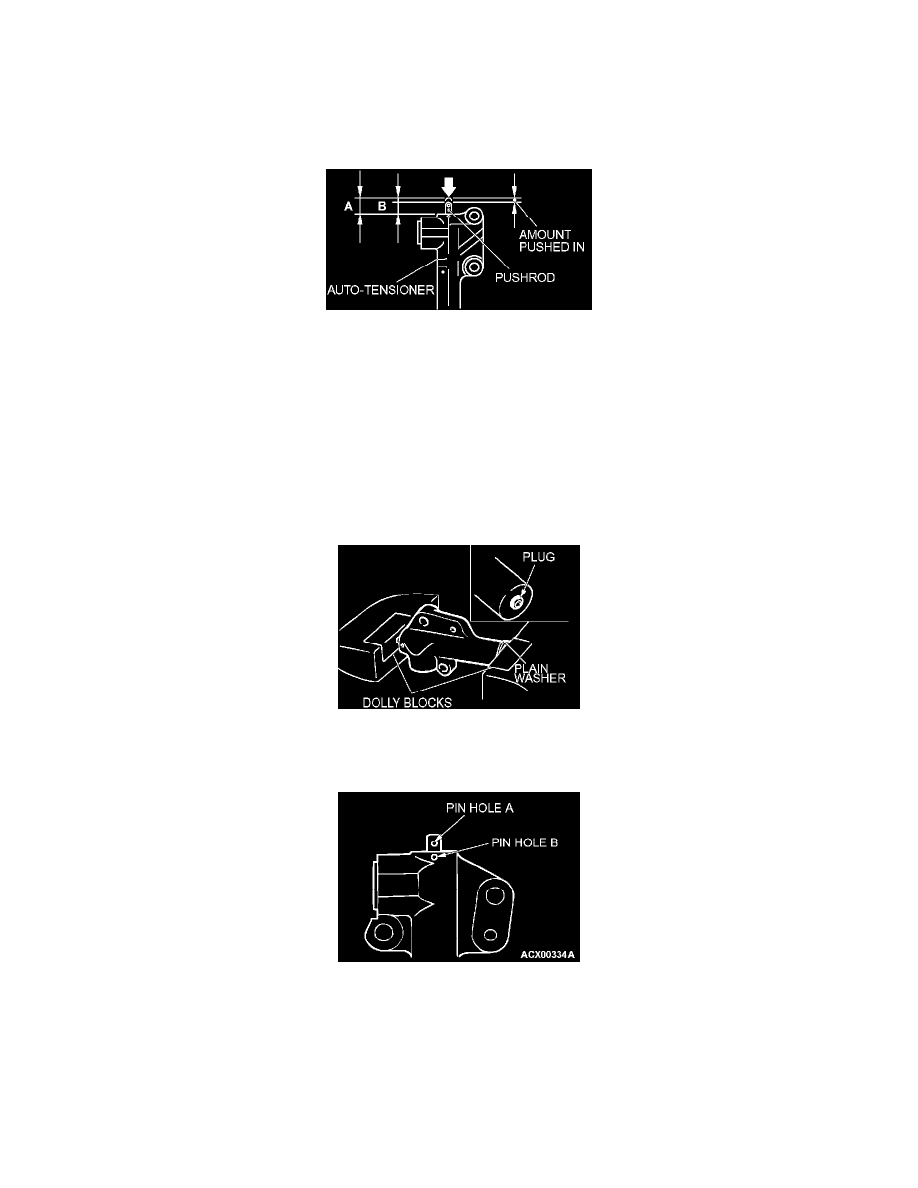
9. Wait for at least five minutes, and then check that the auto-tensioner pushrod extends within the standard value.
Standard value (A): 4.8 - 5.5 mm (0.19 - 0.22 inch)
10. If no, repeat the operation in steps (5) to (9) above.
11. Check again that the timing marks of each sprocket are aligned.
>>B<< AUTO-TENSIONER INSTALLATION
1. While holding the auto-tensioner by hand, press the end of the pushrod against a metal surface (such as the cylinder block) with a force of 98 -
196 N (72 - 145 pound) and measure how far the pushrod is pushed in.
Standard value: Within 1 mm (0.04 inch)
A: Length when no force is applied
B: Length when force is applied
A - B: Amount pushed in
CAUTION:
^
Place the auto-tensioner perpendicular to the jaws of the vice.
^
If there is a plug at the base of the auto-tensioner, insert a plain washer onto the end of the auto-tensioner to protect the plug.
2. If it is not within the standard value, replace the auto-tensioner.
3. Place two dolly blocks in a vice as shown in the illustration, and then place the auto-tensioner in the vice.
CAUTION: Never compress the pushrod too fast, or the pushrod may be damaged.
4. Slowly compress the pushrod of the auto-tensioner until pin hole A in the pushrod is aligned with pin hole B in the cylinder.
5. Insert the setting pin into the pin holes once they are aligned.
NOTE: If replacing the auto-tensioner, the pin will already be inserted into the pin holes of the new part.
CAUTION: Do not remove the setting pin from the auto-tensioner.
6. Install the auto-tensioner to the engine.
>>C<< CRANKSHAFT PULLEY INSTALLATION
Pinch or Ctrl + scroll to zoom. Double-tap to reset.
Parts & tools for this job For 2005 Mitsubishi Montero 3.8L
- PARTTiming belt kitSearch: Mitsubishi Montero 2005 3.8L timing belt kit
- TOOLEngine timing tool setSearch: Mitsubishi engine timing tool set
- TOOLTorque wrenchSearch: 3/8 inch torque wrench
Links open Amazon search results in a new tab. As an Amazon Associate I earn from qualifying purchases.