
Cruise Control: Diagrams (page 123 of 131)
- Make
- Pontiac
- Model
- G8
- Engine
- V8-6.0L
- Year
- 2009
- Section
- Diagrams
Note: You must perform the following procedures in the listed order. Repeat the procedure if any wire strands are damaged. You must obtain a
clean strip with all of the wire strands intact.
1. Open the harness by removing any tape:
*
Use a sewing seam ripper, available from sewing supply stores, in order to cut open the harness in order to avoid wire insulation damage.
*
Use the DuraSeal splice sleeves on all types of insulation except tefzel and coaxial.
*
Do not use the crimp and DuraSeal splice sleeve to form a splice with more than 2 wires coming together.
2. Cut as little wire off the harness as possible. You may need the extra length of wire in order to change the location of a splice.
Adjust splice locations so that each splice is at least 40 mm (1.5 in) away from the other splices, harness branches, or connectors.
3. Strip the insulation:
*
When adding a length of wire to the existing harness, use the same size wire as the original wire.
*
Perform one of the following items in order to find the correct wire size:
-
Find the wire on the schematic and convert the metric size to the equivalent AWG size.
-
Use an AWG wire gage.
-
If you are unsure of the wire size, begin with the largest opening in the wire stripper and work down until achieving a clean strip of the
insulation.
*
Strip approximately 7.5 mm (0.313 in) of insulation from each wire to be spliced.
*
Do not nick or cut any of the strands. Inspect the stripped wire for nicks or cut strands.
*
If the wire is damaged, repeat this procedure after removing the damaged section.
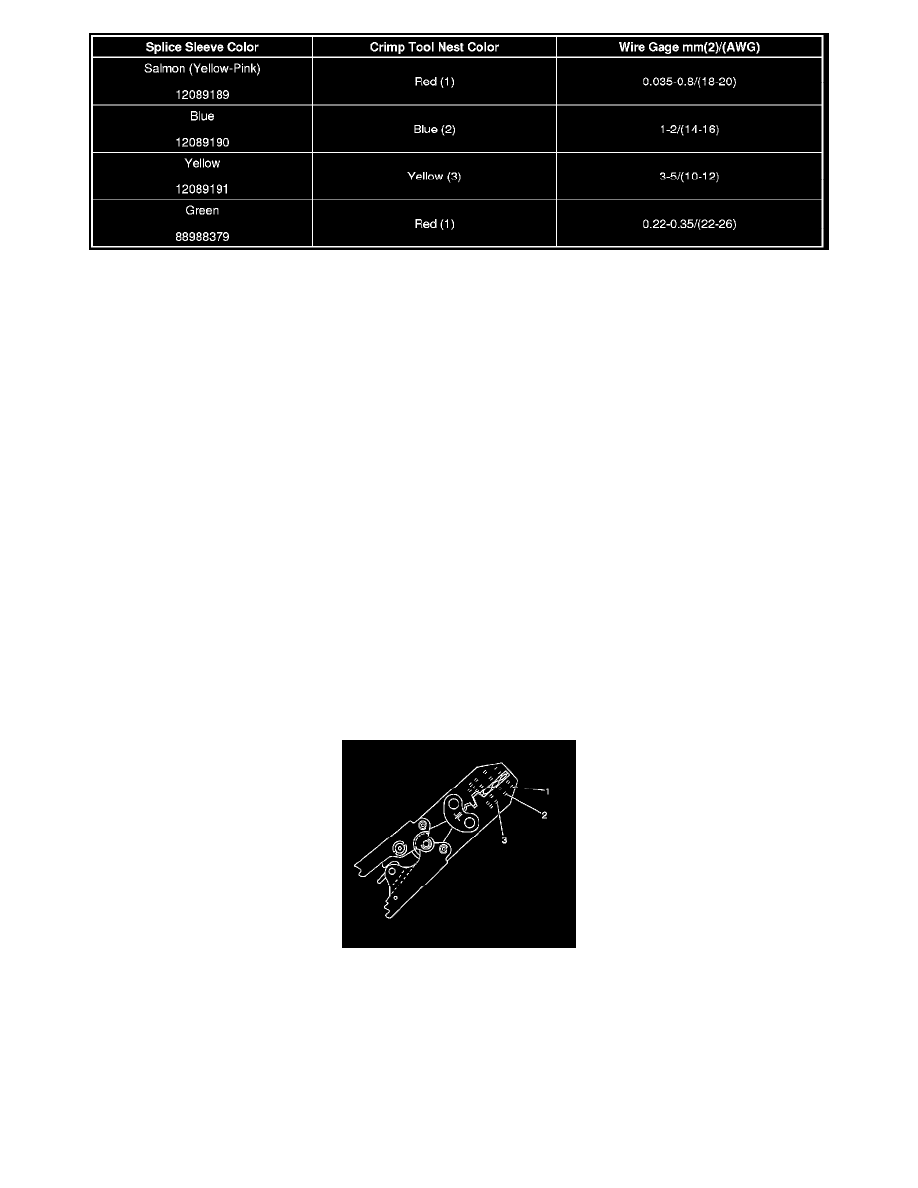
4. Select the proper DuraSeal splice sleeve according to the wire size. Refer to the above table at the beginning of the repair procedure for the color
coding of the DuraSeal splice sleeves and the crimp tool nests.
5. Use the Splice Crimp Tool from the J-38125 to crimp DuraSeal splice sleeve. In order to position the DuraSeal splice sleeve in the proper color
nest of the Splice Crimp Tool. The crimp tool has three nests, (1) is for the salmon and green splice sleeve, (2) is for the blue splice sleeve, and (3)
is for the yellow splice sleeve.
Pinch or Ctrl + scroll to zoom. Double-tap to reset.
Parts & tools for this job For 2009 Pontiac G8 6.0L
- TOOLOBD2 scannerSearch: OBD2 scanner
- TOOLDigital multimeterSearch: automotive digital multimeter
- TOOLBack-probe test leadsSearch: back probe test leads
Links open Amazon search results in a new tab. As an Amazon Associate I earn from qualifying purchases.