
Brakes (Brake bleed): Adjustments
- Make
- Rover
- Model
- 200 Workshop Manual
- Year
- 1995–1999
- Section
- Adjustments › Brake bleed
BRAKE BLEED
Service repair no - 70.25.02
The following procedure covers bleeding the complete system but where only the primary or secondary circuit have been disturbed in isolation, it should only be necessary to bleed that system. Partial bleeding of the hydraulic system is only permissable if a brake pipe or hose has been disconnected with only minor loss of fluid.
CAUTION: Never reuse fluid that has been bled from the brake system. Do not allow fluid level in master cylinder to fall below ’MIN’ mark during bleeding. Do not fill reservoir above ’MAX’ mark.
CAUTION: Do not allow brake fluid to contact paint finished surfaces as paint may be damaged. If spilled, remove fluid and clean area with clean warm water.
Bleed
- Raise front and rear of vehicle.
WARNING: Support on safety stands.
- Check all pipe and hose connections are tight and there are no signs of leakage.
- Top-up fluid level in brake reservoir to ’MAX’ mark. See INFORMATION, Capacities, fluids and lubricants.
CAUTION: Use only new brake fluid of the recommended grade.
Bleed sequence.
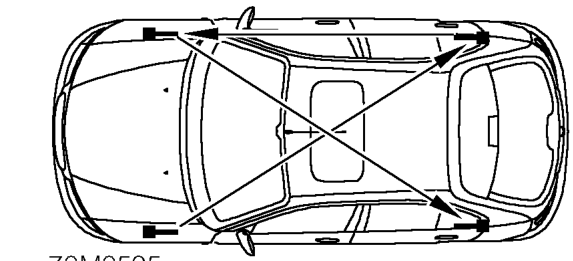
LH front. RH rear. RH front. LH rear.
- Attach bleed tube to LH front brake caliper bleed screw, submerge free end in a clear container containing brake fluid.
NOTE: Bleed brakes with engine running and handbrake in OFF position.
- Apply pressure to brake pedal several times, then apply steady pressure.
- Loosen bleed screw to release brake fluid and air.
- Depress brake pedal steadily through its full stroke and allow to return unassisted. Repeat procedure until a flow of clean air-free fluid is purged into container then, whilst holding pedal at end of downward stroke, tighten bleed screw to 10 Nm on calipers and 7 Nm on wheel cylinders.
CAUTION: Maintain brake fluid level above ’MIN’ mark during this procedure.
- Top-up brake fluid level.
- Repeat procedure at each wheel in the sequence shown.
CAUTION: Braking efficiency may be seriously impaired if wrong bleed sequence is used.
- Remove bleed tube. Apply brakes and check for leakage.
- Remove stand(s) and lower vehicle.
- Road test vehicle. Check brake pedal for short firm travel when brakes are applied.
Parts & tools for this job For 1995 Rover 200
- TOOLBrake bleeder kitSearch: one man brake bleeder kit
- FLUIDBrake fluidSearch: brake fluid
- TOOLBrake line flaring toolSearch: brake line flaring tool
Links open Amazon search results in a new tab. As an Amazon Associate I earn from qualifying purchases.