
Leon Mk1
| Cover of the gearbox casing and 5th gear |
| Assembly chart |
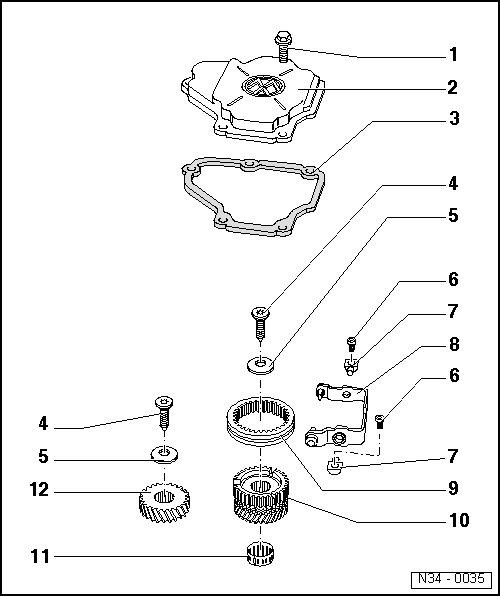
| 1 - | Hexagonal bolt, 10 Nm |
| q | For the cover of the gearbox casing |
| 2 - | Cover of the gearbox casing |
 Note!
Note!| t | If the cover of the gearbox casing is mounted with the gearbox already mounted in the vehicle, the oil level must be checked for the gearbox in the following way: |
| t | Loosen the top of the oil level control in the gearbox. |
| t | Refill with oil for gearboxes until achieving the proper level. Type of oil and amounts for filling → Chapter Technical data; Identification initials, assigning of groups, reductions, filling amounts. |
| t | Tighten the inspection cover for the oil level in the gearbox. |
| t | Tightening torque: 25 Nm. |
| t | Turn on the engine, engage a gear and leave it running for 2 minutes. |
| t | Stop the engine and refill with oil for gearboxes until achieving the proper level. |
| 3 - | Seal |
| 4 - | Torx Bolt M10, 80 Nm |
| q | Replace |
| q | A collar at the head of the bolt keeps the plate spring in the right position. |
| 5 - | Plate spring |
| q | Position for assembly → Chapter |
| 6 - | Bolt. 25 Nm |
| q | For attaching the anchor bolts for the fork for 5th gear to the gearbox casing |
| 7 - | Anchor bolt for the 5th gear fork |
| 8 - | Fork for the 5th gear |
| 9 - | Movable sleeve for 5th gear |
| q | Position for assembly → Chapter |
| q | Adjustment → Chapter |
| 10 - | Synchroniser unit and pinion for 5th gear |
| q | Check for wear → |
| 11 - | Needle bearing |
| 12 - | 5th gear pinion |
| q | Position for assembly → |