seat Workshop Repair Guides

SEAT Workshop Service and Repair Manuals

Dismantling and assembling reverse gear clutch -K2- > < Dismantling and assembling freewheel with -B1- piston
Automatic gearbox 099 four-wheel drive
Dismantling and assembling 1st to 3rd gear clutch -K1-
 
W38-0003

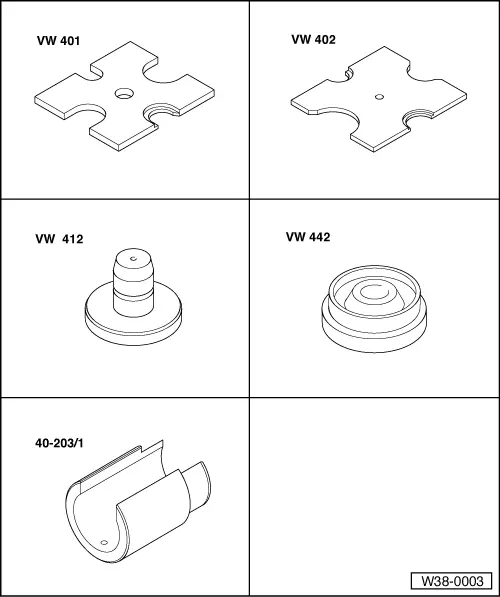
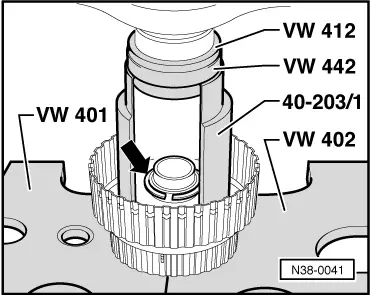
Special tools and workshop equipment required

  • ◆ VW 401 Thrust plate
  • ◆ VW 402 Thrust plate
  • ◆ VW 412 Press tool
  • ◆ VW 442 Thrust pad
  • ◆ 40-203/ 1 Tube, split
 
N38-0046

Only when cleaning or carrying out visual check the clutch must be dismantled.

On some gearboxes the clutches -K1- and -K3- may be pressed together.

Pressing -K1- off -K3-

Pressing -K1- onto -K3- => Page 37-84

  • Supporting ring
    • ◆ 4-piece, unclip from inner plate carrier
    • ◆ Inserting =>Fig. 2
  • Inner plate carrier
    • ◆ Inserting =>Fig.4
    • ◆ Assembling =>Fig.2
  • Circlip
    • ◆ Different thicknesses
    • ◆ Mark after removing and insert in same position
 
N38-0046
  • Thrust plate
    • ◆ Smooth side faces inner plate
    • ◆ Insert together with inner plate carrier => Fig.2
  • Inner plate
    • ◆ Quantity=> Page 00-3
    • ◆ Installing=> Fig.2
    • ◆ Before installing place plates in ATF for 15 minutes
  • Outer plate
    • ◆ Quantity=> Page 00-3
    • ◆ Installing=> Fig.2
    • ◆ Always 1.5 mm thick
  • Outer plate
    • ◆ Always 2 mm thick
    • ◆ Installing=> Fig.2
  • Corrugated washer
  • Circlip
    • ◆ Removing and installing =>Fig.1
 
N38-0046
  • Piston cap
    • ◆ Sealing lips are vulcanised to cap
    • ◆ Moisten sealing lips with ATF before installing
    • ◆ Turn cap slightly when installing
  • Intermediate spring ring
    • ◆ With spring supporting shell and compression springs
  • Piston
    • ◆ Sealing lips are vulcanised to piston
    • ◆ Moisten sealing lips with ATF before installing
    • ◆ Turn piston slightly when installing
  • Clutch housing
    • ◆ Before inserting the inner plate carrier corrugated washer (item 8), insert inner and outer plates in the clutch =>Fig.3
 
N38-0041

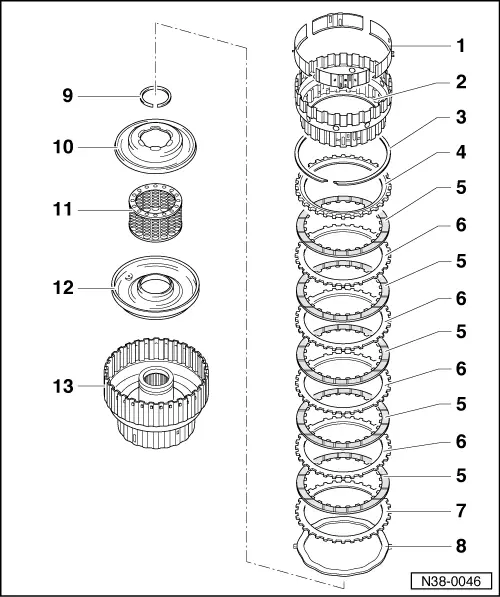
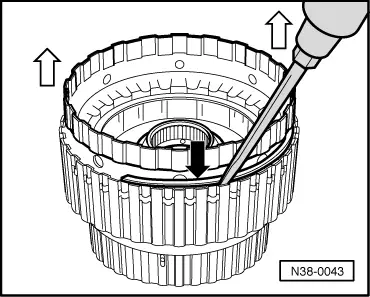
→ Fig.1    Removing and installing circlip

  • ‒ Press piston cap with intermediate spring ring down far enough for the circlip (arrow) to be inserted in the groove.

 
N38-0003

→ Fig.2    Fitting thrust plate and plates onto inner plate carrier

  • ‒ Install thrust plate -a- with smooth side facing inner plate and stepped side towards inner plate carrier.
  • ‒ Install 3 inner plates -b- and 2 outer plates -c- (1.5 mm).
  • ‒ Clip in supporting ring with step (arrow).
  • ◆ Locate locating lugs correctly.
  • ◆ Installing corrugated washer and further plates in clutch housing => Fig. 3.
 
N38-0042

→ Fig.3    Installing corrugated washer and inner and outer plates in clutch housing

  • ‒ First insert corrugated washer.
  • ‒ Insert 2 mm thick outer plate.
  • ‒ Insert remaining inner and outer plates (1.5 mm).

 
N38-0043

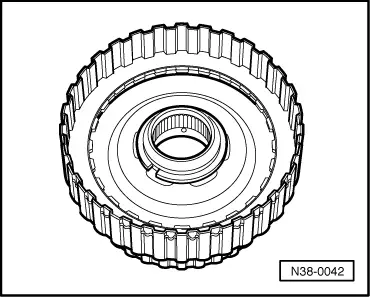
→ Fig.4    Inserting inner plate carrier and installing circlip (arrow).

  • ‒ Lift inner plate carrier slightly to install circlip.

Dismantling and assembling reverse gear clutch -K2- > < Dismantling and assembling freewheel with -B1- piston