seat Workshop Repair Guides

SEAT Workshop Service and Repair Manuals

Removing and installing rear window > < Rear door window
Undamaged windscreen: removing
  WARNING
When removing a screen you must wear protective goggles and leather gloves.
–  Remove windscreen wiper arms → Electrical system; Rep. gr.92.
   
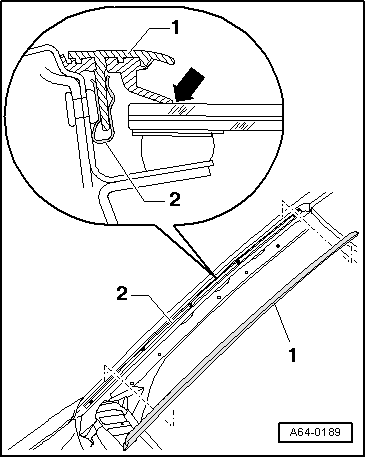
–  Remove water drain pipe -1- from retaining clips -2- on both sides.
–  Remove the panel below the windscreen → Chapter.
–  Remove the sun visor from both left and right → Bodywork, interior fitting work; Rep. gr.70.
–  Remove the sun visor from the middle → Bodywork, interior fitting work; Rep. gr.70.
–  Remove the interior rear-view mirror: → body, interior assembly work; Rep. gr.68.
–  Remove the top A-pillar trim → Bodywork, interior work; Rep. gr.70.
–  Remove the rain sensor and light detection -G397- → Electrical system; Rep. gr.92.
  A64-0189
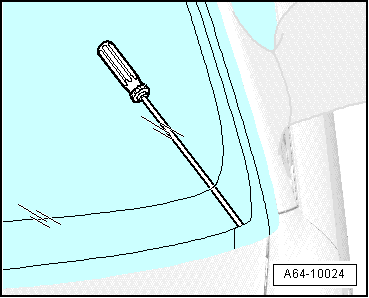
–  From inside out and at the bottom left corner of the panel apply -VAG 1351- the adhesive through the cutter.
–  Mount the end of the cutting thread -357 853 999 A- in the opening of the cutting tool. -VAG 1351-
–  Pull the cutting tool -VAG 1351- in the direction of the vehicle interior.
  A64-10024
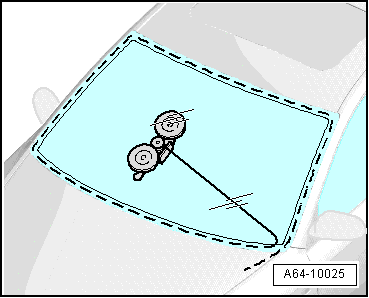
–  Apply the coil guide -VAG 1654A- as shown in the figure and attach the end of the cutting thread -357 853 999 A- to the coil guide -VAG 1654A-
–  Pass the cutting thread -357 853 999 A- under the entire perimeter of the windscreen.
  A64-10025
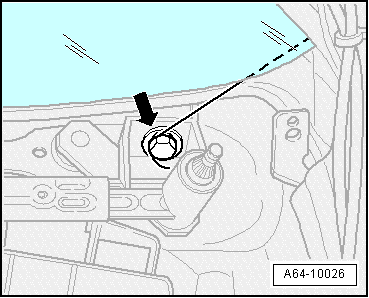
–  Wrap the end of the cutting thread -357 853 999 A- tightly around the fastening screw -Arrow- of the wiper linkage.
–  Insert the protective film -VAG 1474/13- between the windscreen and instrument panel.
  A64-10026
–  Cut the first section up to about mid disc.
  Note
Press the cutting wire -357 853 999 A- during the cutting process in the direction of disc.
  A64-10025
–  Attach the coil guide -VAG 1654A- and the castors with counter-holder -VAG 1474/1- as shown in the picture and cut further.
  Note
Press the cutting wire -357 853 999 A- during the cutting process in the direction of disc.
–  Insert the protective film -VAG 1474/11- between the windscreen and instrument panel.
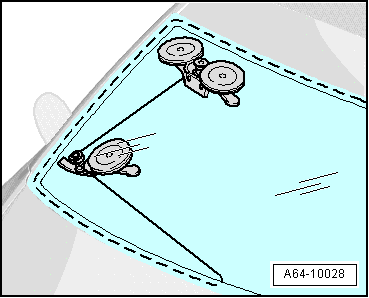
  A64-10028
–  Attach the coil guide -VAG 1654A- and the castors with counter-holder -VAG 1474/1- as shown in the picture and cut further.
  Note
Press the cutting wire -357 853 999 A- during the cutting process in the direction of disc.
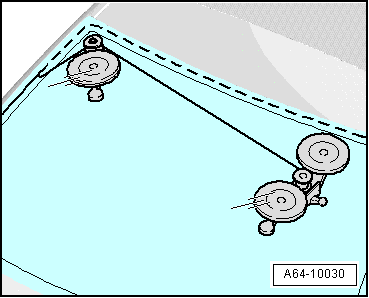
–  Repeat the schedule on the top left corner and bottom left corner of the windscreen.
–  Cut the windscreen completely.
–  Remove the windscreen with thesyphon -VAG 1344-
  A64-10030

Removing and installing rear window > < Rear door window