seat Workshop Repair Guides

SEAT Workshop Service and Repair Manuals

Gear selection mechanism > < Electric/electronic components and assembly positions
Removing and installing oil sump
Consult the equivalence table for tools and equipment according to applicability among Seat / VW / Audi / Skoda → Chapter.
Special tools and workshop equipment required
   
t  Extractor -SAT 1100-, see equivalent → Anchor
  W00-2708
t  Torque wrench kit -SAT 8010-, see equivalent → Anchor
t  Protective glasses
Removal:
l  Engine off
  WARNING
If the oil sump has been removed or if gear oil is needed, do not start the engine or tow the vehicle.
  Note
t  Cleaning norms when working in the gearbox → Chapter.
t  General repair instructions. → Chapter
t  Pay attention to the notes relative to the semi-automatic gearbox 02E → Chapter.
t  Lubricate the o-rings and seals with gear oil. Other lubricants can cause malfunctions in the hydraulic gear control.
  WARNING
Take all the necessary precautionary measures when disconnecting the battery → Electrical system; Rep. gr. 27
  L00-10226
–  With ignition switched off, disconnect earth connection -arrow- from the battery → Electrical system; Rep. gr.27.
  A27-0191
–  Remove central soundproofing, bolts -1 ... 3-.
–  Unbolt the two bolts holding the support onto the front section of the gearbox oil sump.
  Note
The threaded bolts are welded to the oil sump in the front section of the gearbox.
–  Press out the threaded bolt support from the gearbox oil sump and place it above.
  A10-1565
–  If there is one, remove the protective plate located in the lower section of the gearbox -arrows-.
–  Fit the tray oil extractor -SAT 1100- beneath gearbox.
  WARNING
Wear eye protection.
–  Empty the gearbox oil → Chapter.
  A37-0665
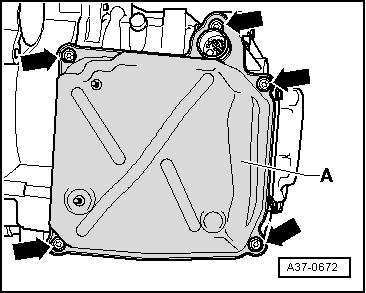
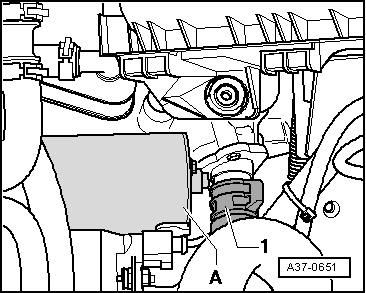
–  Release the bayonet lock -1- of the 20-contact connector from the gearbox, by turning and disconnecting.
–  Touch the vehicle earth with the hand (without gloves) to release static energy.
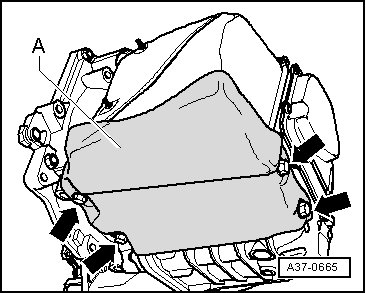
  WARNING
The person who is going to touch or remove the mechatronic system for the automatic DSG gearbox - J743- should first release static energy by touching an earthed object, e.g. the vehicle earth.
The gearbox connector contacts should never be touched with the hands, as this may damage the control unit and, therefore, the Mecatronic unit as a result of a discharge of static energy
  A37-0651
–  Unscrew the 5 screws of the oil sump -arrows- diagonally.
–  The bolts must be replaced.
  Note
There is still gear oil in the sump as it is not possible for all the oil to drain out.
–  Remove the oil sump together with the oil sump gasket.
  A37-0672
Installing
Installation is carried out in the reverse sequence; note the following:
–  Replace the O-rings -B- of the 20 contact connector of the mecatronic system for the automatic DSG gearbox - J743-.
–  Moisten the O-rings with gear oil.
–  Clean the gasket and seal surfaces and remove all traces of oil.
–  Ensure that the sump gasket is correctly fitted.
–  Check that no cable or tube is snagged when fitting the oil sump.
  A37-0673
–  Tighten the 5 new bolts of the oil sump -arrows- in diagonal pairs and in stages.
  A37-0672
ComponentNm
Oil sump to gearbox housing
5 bolts M6 (tighten in diagonal pairs and in stages)
10

–  Replace the seal of the drain plug.
   
–  Undo the drain plug -A-.
  N34-10673
ComponentNm
Drain plug to gearbox, M2445

–  Fill with gear oil → Chapter
Replace the check plug seal after checking gear oil.
–  Connect battery → Electrical system; Rep. gr.27.
–  Take all the necessary precautionary measures when connecting the battery → Electrical system; Rep. gr. 27
Tightening torques
   
ComponentNm
Drain plug to gearbox, M2445
Check plug to gearbox, M2445
Oil sump to gearbox housing
5 bolts M6 (tighten in diagonal pairs and in stages)
10


Gear selection mechanism > < Electric/electronic components and assembly positions