seat Workshop Repair Guides

SEAT Workshop Service and Repair Manuals

Renewing components > < Connecting A/C service station
Adapters to create rinsing circuits
t  In the following table are the various adapters, which are necessary to connect the air conditioning service station to the refrigerant circuit for purposes of rinsing and to bridge the removed receiver or reservoir and expansion valve (vehicle-specific).
t  Using a filling hose with 5/8 -18 UNF connections (short version, e.g. filling hose -VAS 6338/31-), join both adapters, which were installed in place of the reservoir or receiver (included in adapter case SEAT passenger vehicle set -VAS 6338/1-).
t  If a rinsed refrigerant circuit is not going to be reassembled straight after rinsing, leave the adapters on the connections and seal the connections at the adapters using the sealing caps -VAS 6338/30- (from adapter case SEAT passenger vehicle set -VAS 6338/1-).
t  Depending on the type of A/C compressor and the period of production, different joining and sealing techniques have been applied in the refrigerant circuit → Heating, air conditioning.
   
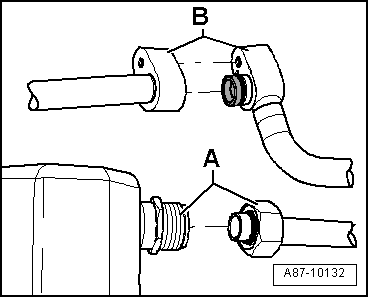
Block or threaded connections
Threaded connection -A-
Block connection -B-
  A87-10132
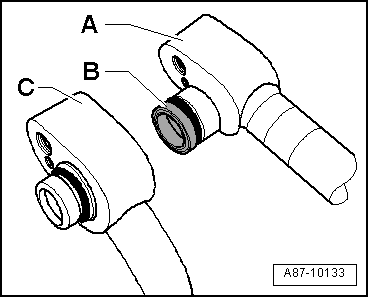
Block connections with various types of seals
Block connection with radial sealing connection -A- (with guide made from plastic or metal -B-)
–  Block connection with axial sealing connection -C-
Fox 2005; Lupo 1999
  A87-10133
VehicleAdapters required for refrigerant lines to A/C compressorAdapters required for refrigerant lines to receiverMiscellaneous
Fox 2005 ►
t  Low pressure side adapter -VAS 6338/12-
t  High pressure side adapter -VAS 6338/2-
–  Remove drying cartridge and seal receiver.
–  After rinsing, install a new drying cartridge.
–  Install adapter -VAS 6338/34- in place of expansion valve (or a drilled out expansion valve → Anchor)
–  After rinsing, install a new expansion valve.
Lupo 1999 ► to vehicle chassis number 70000
t  Low pressure side adapter -VAS 6338/12-
t  High pressure side adapter -VAS 6338/2-
t  Adapter -VAS 6338/28-
t  Adapter -VAS 6338/29-
–  After rinsing, install a new receiver.
–  Install adapter -VAS 6338/19- in place of expansion valve (or drilled out expansion valve e.g. 6N0 820 679 C → Anchor)
–  After rinsing, install a new expansion valve.
Lupo 1999 ► from vehicle chassis number 70001
t  Low pressure side adapter -VAS 6338/12-
t  High pressure side adapter -VAS 6338/2-
t  Adapter -VAS 6338/7-
Receiver
–  Can be flushed through.
–  After rinsing, install a new receiver.
–  Install adapter -VAS 6338/19- in place of expansion valve (or drilled out expansion valve e.g. 6N0 820 679 C → Anchor)
–  After rinsing, install a new expansion valve.

Polo 1995; Polo 2004; Caddy 1996
   
VehicleAdapters required for refrigerant lines to A/C compressorAdapters required for refrigerant lines to receiverMiscellaneous
Polo 1995 ► to vehicle chassis number 50000Adapter -VAS 6338/14-
t  Adapter -VAS 6338/28-
t  Adapter -VAS 6338/29-
–  After rinsing, install a new receiver.
–  Install adapter -VAS 6338/19- in place of expansion valve (or drilled out expansion valve e.g. 6N0 820 679 C → Anchor)
–  After rinsing, install a new expansion valve.
Polo 1995 ► from vehicle chassis number 50001Adapter -VAS 6338/14-Receiver
–  Can be flushed through.
–  After rinsing, install a new receiver.
–  Install adapter -VAS 6338/19- in place of expansion valve (or drilled out expansion valve e.g. 6N0 820 679 C → Anchor)
–  After rinsing, install a new expansion valve.
Polo 2002 ►
t  Low pressure side adapter -VAS 6338/12-
t  High pressure side adapter -VAS 6338/2-
–  Remove drying cartridge and seal receiver.
–  After rinsing, install a new drying cartridge.
–  Install adapter -VAS 6338/34- in place of expansion valve (or a drilled out expansion valve → Anchor)
–  After rinsing, install a new expansion valve.
Caddy 1996 ►
t  Low pressure side adapter -VAS 6338/4-
t  High pressure side adapter -VAS 6338/2- or adapter -VAS 6338/14-
t  Adapter -VAS 6338/28-
t  Adapter -VAS 6338/29-
–  After rinsing, install a new receiver.
–  Install adapter -VAS 6338/19- in place of expansion valve (or drilled out expansion valve e.g. 6N0 820 679 C → Anchor)
–  After rinsing, install a new expansion valve.

Caddy 2004; Golf 1992; Vento 1992
   
VehicleAdapters required for refrigerant lines to A/C compressorAdapters required for refrigerant lines to receiverMiscellaneous
Caddy 2004 ►
t  Low pressure side adapter -VAS 6338/12-
t  High pressure side adapter -VAS 6338/3-
Receiver
–  Can be flushed through.
–  After rinsing, install a new receiver.
–  Install adapter -VAS 6338/18- in place of expansion valve (or a drilled out expansion valve → Anchor)
–  After rinsing, install a new expansion valve.
Golf 1992 ► Vento 1992 ►Adapter -VAS 6338/14-
t  Adapter -VAS 6338/28-
t  Adapter -VAS 6338/29-
–  After rinsing, install a new receiver.
–  Install adapter -VAS 6338/19- in place of expansion valve (or drilled out expansion valve e.g. 6N0 820 679 C → Anchor)
–  After rinsing, install a new expansion valve.

Golf 1998; Vento 1999; Golf 2004; Golf Plus 2005
   
VehicleAdapters required for refrigerant lines to A/C compressorAdapters required for refrigerant lines to receiverMiscellaneous
Golf 1998 ► Vento 1999 ►
t  Low pressure side adapter -VAS 6338/7-
t  High pressure side adapter -VAS 6338/2-
–  Join two adapters -VAS 6338/2- with hose -VAS 6338/31- together.
–  After rinsing, install a new receiver.
–  Install adapter -VAS 6338/19- in place of expansion valve (or drilled out expansion valve e.g. 6N0 820 679 C → Anchor)
–  After rinsing, install a new expansion valve.
Golf 2004 ►
t  Low pressure side adapter -VAS 6338/12-
t  High pressure side adapter -VAS 6338/3-
Receiver
–  Can be flushed through.
–  After rinsing, install a new receiver.
–  Install adapter -VAS 6338/18- in place of expansion valve (or a drilled out expansion valve → Anchor)
–  After rinsing, install a new expansion valve.
Golf Plus 2005 ►
t  Low pressure side adapter -VAS 6338/12-
t  High pressure side adapter -VAS 6338/3-
Receiver
–  Can be flushed through.
–  After rinsing, install a new receiver.
–  Install adapter -VAS 6338/18- in place of expansion valve (or a drilled out expansion valve → Anchor)
–  After rinsing, install a new expansion valve.

Jetta 2006; New Beetle 1999; New Beetle Cabrio 2003; Eos 2006; Bora 1999
   
Jetta 2006 ►
t  Low pressure side adapter -VAS 6338/12-
t  High pressure side adapter -VAS 6338/3-
Receiver
–  Can be flushed through.
–  After rinsing, install a new receiver.
–  Install adapter -VAS 6338/18- in place of expansion valve (or a drilled out expansion valve → Anchor)
–  After rinsing, install a new expansion valve.
New Beetle 1999 ►; New Beetle Cabrio 2003 ►
t  Low pressure side adapter -VAS 6338/7-
t  High pressure side adapter -VAS 6338/2-
–  Join two adapters -VAS 6338/2- with hose -VAS 6338/31- together.
–  After rinsing, install a new receiver.
–  Install adapter -VAS 6338/19- in place of expansion valve (or a drilled out expansion valve → Anchor)
–  After rinsing, install a new expansion valve.
Eos 2006 ►
t  Low pressure side adapter -VAS 6338/12-
t  High pressure side adapter -VAS 6338/3-
Receiver
–  Can be flushed through.
–  After rinsing, install a new receiver.
–  Install adapter -VAS 6338/18- in place of expansion valve (or a drilled out expansion valve → Anchor)
–  After rinsing, install a new expansion valve.
Bora 1999 ►
t  Low pressure side adapter -VAS 6338/7-
t  High pressure side adapter -VAS 6338/2-
–  Join two adapters -VAS 6338/2- with hose -VAS 6338/31- together.
–  After rinsing, install a new receiver.
–  Install adapter -VAS 6338/19- in place of expansion valve (or a drilled out expansion valve → Anchor)
–  After rinsing, install a new expansion valve.

Touran 2003; Phaeton 2003; Passat 1994
   
VehicleAdapters required for refrigerant lines to A/C compressorAdapters required for refrigerant lines to receiver/reservoirMiscellaneous
Touran 2003 ►
t  Low pressure side adapter -VAS 6338/12-
t  High pressure side adapter -VAS 6338/3-
Receiver
–  Can be flushed through.
–  After rinsing, install a new receiver.
–  Install adapter -VAS 6338/18- in place of expansion valve (or a drilled out expansion valve → Anchor)
–  After rinsing, install a new expansion valve.
Phaeton 2003 ►
t  Low pressure side adapter -VAS 6338/12-
t  High pressure side 12 and 6-cyl. petrol engine adapter -VAS 6338/2-, high pressure side 10 and 6-cyl. diesel engine adapter -VAS 6338/3-
–  Join two adapters -VAS 6338/6- with hose -VAS 6338/31- together.
–  After rinsing, install a new reservoir.
–  Restrictor removed and refrigerant lines reinstalled.
–  After rinsing, install a new restrictor.
Passat 1994 ►Adapter -VAS 6338/14-
t  Adapter -VAS 6338/28-
t  Adapter -VAS 6338/29-
–  After rinsing, install a new receiver.
–  Install adapter -VAS 6338/19- in place of expansion valve (or drilled out expansion valve e.g. 6N0 820 679 C → Anchor)
–  After rinsing, install a new expansion valve.

Passat 1997; Passat 2006; Alhambra 1996
  Note!
On vehicles with a 2nd evaporator (Alhambra), the front and rear refrigerant circuit must be rinsed separately. The front refrigerant circuit must be sealed with adapter -V.A.G 1785/1-, adapter -1785/3- and sealing caps -VAS 6338/30-.
   
VehicleAdapters required for refrigerant lines to A/C compressorAdapters required for refrigerant lines to receiver/reservoir and 2nd evaporatorMiscellaneous
Passat 1997 ►
t  Adapter -V.A.G 1785/7-
t  Adapter -V.A.G 1785/8-
t  Low pressure side adapter -VAS 6338/12-
t  High pressure side adapter -VAS 6338/2-
t  Adapter -VAS 6338/9-
t  Adapter -V.A.G 1785/8-
t  Hose -VAS 6338/31-
–  After rinsing, install a new reservoir.
–  Restrictor removed and refrigerant line reinstalled.
–  After rinsing, install a new restrictor.
Passat 2006 ►
t  Low pressure side adapter -VAS 6338/12-
t  High pressure side adapter -VAS 6338/3-
–  Remove drying cartridge and seal receiver.
–  After rinsing, install a new drying cartridge.
–  Install adapter -VAS 6338/18- in place of expansion valve (or a drilled out expansion valve → Anchor)
–  After rinsing, install a new expansion valve.
Alhambra 1996 ►
t  Low pressure side adapter -VAS 6338/7-
t  High pressure side adapter -VAS 6338/2-
–  Remove drying cartridge and seal receiver.
–  After rinsing, install a new drying cartridge.
t  Low pressure line for 2nd evaporator adapter -V.A.G 1785/7-
t  High pressure line for 2nd evaporator adapter -V.A.G 1785/5-
t  Adapter -V.A.G 1785/3- with sealing cap -VAS 6338/30- to seal front refrigerant circuit.
t  Adapter -V.A.G 1785/1- with sealing cap -VAS 6338/30- to seal front refrigerant circuit.
–  Install adapter -VAS 6338/35- in place of front and rear expansion valves (or a drilled out expansion valve → Anchor)
–  After rinsing, install a new expansion valve.

Touareg 2003
  Note!
On vehicles with a 2nd evaporator, the front and rear refrigerant circuit must be rinsed separately. The front refrigerant circuit must be sealed with sealing adapter -VAS 6338/5- and sealing adapter -VAS 6338/11-.
   
VehicleAdapters required for refrigerant lines to A/C compressorAdapters required for refrigerant lines to receiver and 2nd evaporatorMiscellaneous
Touareg 2003 ► to vehicle chassis number 50000
t  Low pressure side adapter -VAS 6338/12-
t  High pressure side adapter -VAS 6338/2-
t  Engine code BJN 6.0 ltr. to vehicle identification number 20000 on high pressure side adapter -VAS 6338/3-
–  Remove drying cartridge and seal receiver.
–  After rinsing, install a new drying cartridge.
t  Low pressure line for 2nd evaporator adapter -VAS 6338/3-
t  High pressure line for 2nd evaporator adapter -VAS 6338/4-
t  Sealing adapter -VAS 6338/5- for front refrigerant circuit.
t  Sealing adapter -VAS 6338/11- for front refrigerant circuit.
–  Install adapter -VAS 6338/17- in place of front expansion valve (or a drilled out expansion valve → Anchor)
–  After rinsing, install a new expansion valve.
–  Drill out expansion valve at 2nd evaporator. → Anchor.
–  After rinsing, install a new expansion valve.
Touareg 2003 ► from vehicle chassis number 50001
t  Low pressure side adapter -VAS 6338/12-
t  High pressure side adapter -VAS 6338/2-
–  Remove drying cartridge and seal receiver.
–  After rinsing, install a new drying cartridge.
t  Low pressure line for 2nd evaporator adapter -VAS 6338/3-
t  High pressure line for 2nd evaporator adapter -VAS 6338/4-
t  Sealing adapter -VAS 6338/5- for front refrigerant circuit.
t  Sealing adapter -VAS 6338/11- for front refrigerant circuit.
–  Install adapter -VAS 6338/17- in place of front and rear expansion valves (or a drilled out expansion valve → Anchor)
–  After rinsing, install new expansion valves.

Transporter 1991
  Note!
On vehicles with a 2nd evaporator, the front and rear refrigerant circuit must be rinsed separately. The front refrigerant circuit must be sealed with sealing adapter -VAS 6338/5- and sealing adapter -VAS 6338/11-.
   
VehicleAdapters required for refrigerant lines to A/C compressorAdapters required for refrigerant lines to receiver and 2nd evaporatorMiscellaneous
Transporter 1991 ► to 12. 1995
t  A/C compressor 2D0 820 805 B and 701 820 805 Q adapter -VAS 6338/54-
t  Adapter -VAS 6338/20- for receiver.
t  Adapter -VAS 6338/29- for receiver.
t  Adapter -VAS 6338/26- with sealing cap -VAS 6338/30- to seal front refrigerant circuit.
t  Adapter -VAS 6338/27- with sealing cap -VAS 6338/30- to seal front refrigerant circuit.
t  Adapter -VAS 6338/57- for refrigerant line of 2nd evaporator.
t  Adapter -VAS 6338/58- for refrigerant line of 2nd evaporator.
–  After rinsing, install a new receiver.
l  If the receiver is attached beneath the condenser, it can be rinsed.
–  After rinsing, install a new receiver.
–  Install adapter -VAS 6338/55- in place of front and rear expansion valves (or a drilled out expansion valve → Anchor)
–  After rinsing, install a new expansion valve.
Transporter 1991 ► from 01. 1996
t  A/C compressor 7D0 820 805 E adapter -VAS 6338/53-
t  A/C compressor 7D0 820 805 H low pressure side adapter -VAS 6338/7-
t  High pressure side adapter -VAS 6338/2-
t  Adapter -VAS 6338/20- for receiver.
t  Adapter -VAS 6338/29- for receiver.
t  Adapter -VAS 6338/26- with sealing cap -VAS 6338/30- to seal front refrigerant circuit.
t  Adapter -VAS 6338/27- with sealing cap -VAS 6338/30- to seal front refrigerant circuit.
t  Adapter -VAS 6338/57- for refrigerant line of 2nd evaporator.
t  Adapter -VAS 6338/58- for refrigerant line of 2nd evaporator.
–  After rinsing, install a new receiver.
l  If the receiver is attached beneath the condenser, it can be rinsed.
–  After rinsing, install a new receiver.
–  Install adapter -VAS 6338/55- in place of front and rear expansion valves (or a drilled out expansion valve → Anchor)
–  After rinsing, install a new expansion valve.

Transporter 2004; LT 2 from 1997
  Note!
On vehicles with a 2nd evaporator, the front and rear refrigerant circuit must be rinsed separately. The front refrigerant circuit must be sealed with sealing adapter -VAS 6338/5- and sealing adapter -VAS 6338/11-.
   
VehicleAdapters required for refrigerant lines to A/C compressorAdapters required for refrigerant lines to receiver and 2nd evaporatorMiscellaneous
Transporter 7H 2004 ►
t  A/C compressor 7H0 820 805 E low pressure side adapter -VAS 6338/12-, high pressure side adapter -VAS 6338/3-
t  A/C compressor 7H0 820 803 C low pressure side adapter -VAS 6338/7-, high pressure side adapter -VAS 6338/2-
–  Remove drying cartridge and seal receiver.
–  After rinsing, install a new drying cartridge.
t  Sealing adapter -VAS 6338/5- for front refrigerant circuit.
t  Sealing adapter -VAS 6338/11- for front refrigerant circuit.
t  Low pressure line for 2nd evaporator adapter -VAS 6338/3-
t  High pressure line for 2nd evaporator adapter -VAS 6338/4-
–  To vehicle chassis number 20000, drill out expansion valve → Anchor)
–  From vehicle chassis number 20001, install adapter -VAS 6338/56- in place of front expansion valve
–  After rinsing, install a new expansion valve.
–  Install adapter -VAS 6338/33- in place of expansion valve on 2nd evaporator
–  After rinsing, install a new expansion valve.
Transporter 7J 2004 ►
t  A/C compressor 7H0 820 805 E low pressure side adapter -VAS 6338/12-, high pressure side adapter -VAS 6338/3-
t  A/C compressor 7H0 820 803 C low pressure side adapter -VAS 6338/7-, high pressure side adapter -VAS 6338/2-
t  A/C compressor 7H0 820 805 D low pressure side adapter -VAS 6338/52-, high pressure side adapter -VAS 6338/51-
–  Remove drying cartridge and seal receiver.
–  After rinsing, install a new drying cartridge.
t  Sealing adapter -VAS 6338/5- for front refrigerant circuit.
t  Sealing adapter -VAS 6338/11- for front refrigerant circuit.
t  Low pressure line for 2nd evaporator adapter -VAS 6338/3-
t  High pressure line for 2nd evaporator adapter -VAS 6338/4-
–  To vehicle chassis number 5000, drill out expansion valve → Anchor
–  From vehicle chassis number 5001, install adapter -VAS 6338/56- in place of front expansion valve
–  After rinsing, install a new expansion valve.
–  Install adapter -VAS 6338/56- in place of expansion valve on 2nd evaporator
–  After rinsing, install a new expansion valve.
LT 2 1997 ►
t  Low pressure side adapter -VAS 6338/7-
t  High pressure side adapter -VAS 6338/2-
t  Adapter -VAS 6338/20-
Adapter -V.A.G 1785/1- twice
–  After rinsing, install a new receiver.
–  Install adapter -VAS 6338/56- in place of expansion valve (or a drilled out expansion valve → Anchor)
–  After rinsing, install a new expansion valve.


Renewing components > < Connecting A/C service station