seat Workshop Repair Guides

SEAT Workshop Service and Repair Manuals

Heater and air conditioning unit, front > < Servicing the refrigerant circuit
Removing and fitting the evaporator
–  Disconnect battery → Electrical system; Rep. gr.27.
–  Remove air conditioning unit → Chapter.
–  Remove the electric components of the air conditioning .
–  Dismantle air conditioning unit → Chapter.
   
–  Extract the evaporator -A- from the lower element of the evaporator housing.
  Note
t  Before fitting evaporator, check and if necessary clean condensate drain.
t  Clean evaporator housing (and if necessary evaporator) before inserting evaporator.
  A87-0715
–  On inserting evaporator -A- in bottom part of evaporator housing and on assembling the two halves of the housing, take care not to damage seal -F-.
  A87-0715
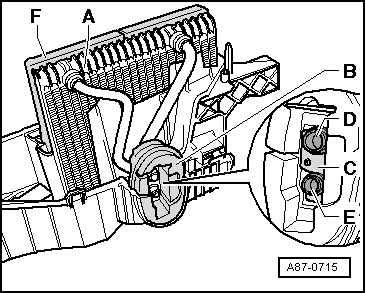
–  Check the seal -F- before fitting the evaporator (must be secured all around).
–  Set retainer -C- and combined seal and insulation -B- on connection pipes of evaporator -D- and -E-.
–  Insert evaporator -A- into evaporator housing (bottom section) as shown.
  Note
t  Check following the fitting, the two parts of the housing, the correct positioning of the seal / insulation -B- in the passage for the two coolant tubes -D- and -E-.
t  Check correct positioning of bracket -C- on both refrigerant pipes -D- and -E-.
t  If heat insulation -B- is missing or improperly installed, it may lead to reduced performance of the air conditioning system (due to changes in the set mapped values of the expansion valve through heat radiation).
t  Inside the evaporator that has been removed, there is refrigeration oil that must be added to the refrigeration circuit (with the new evaporator) → Air conditioning - with refrigerant R134a SEAT.
  A87-0715

Heater and air conditioning unit, front > < Servicing the refrigerant circuit