seat Workshop Repair Guides

SEAT Workshop Service and Repair Manuals

Removing and installing air conditioner compressor and/or ancillary bracket > < Detaching/re-attaching a compressor installed on the right of the engine from/to the bracket
Detaching/re-attaching a compressor installed on the left of the engine from/to the bracket
  Note
t  Do not unfasten refrigerant pipes and corresponding clamps.
   
t  Fig. shows compressor on 4-cyl. petrol turbo engine. Layout only differs slightly from this with other engine versions (e.g. different refrigerant pipes)
–  Remove the noise insulation → General Body Repairs, Exterior; Rep. Gr.50.
–  Move the lock carrier to the service position (only when the poly V-belt nor the compressor have not been able to be removed without the service position, e.g. with 4 cyl. engine 2.0l) → Engine Mechanics; Rep. Gr.17 and → General Body Repairs, Exterior; Rep. Gr.50
–  Remove the oil filter. Protect the sealing surface against being damaged (only necessary with several petrol engines). → Engine Mechanics; Rep. Gr.17
–  Slacken off and detach poly V-belt. → Engine Mechanics; Rep. Gr.13
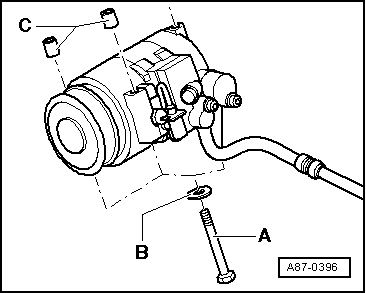
–  Unscrew bolts -A- (25 Nm).
  Note
t  Fit one washer -B- at each of the bolts -A-.
t  Before securing compressor, check position of both bushes -C- in holder or compressor.
  A87-0396
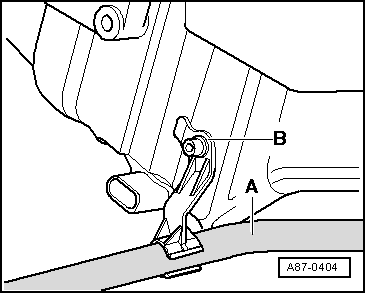
t  After attaching compressor, check routing of refrigerant pipes -A- (pipes must be inserted in holders -B- provided).
t  After attaching compressor, also check refrigerant pipes and corresponding holders to ensure adequate clearance from other components. Make sure there is sufficient distance between the belt, holder and pulley.
  A87-0404

Removing and installing air conditioner compressor and/or ancillary bracket > < Detaching/re-attaching a compressor installed on the right of the engine from/to the bracket