seat Workshop Repair Guides

SEAT Workshop Service and Repair Manuals

Clutch housing: repair > < Gearbox housing: repair
Gear change actuation: adjusting
Special tools and workshop equipment required
   
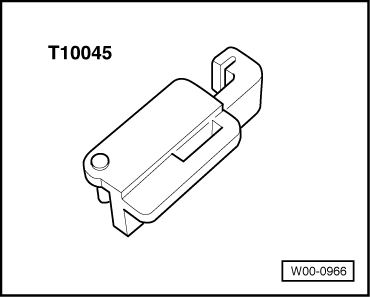
t  Calliper -T10045-
–  Previously set the gearbox to neutral.
  W00-0966
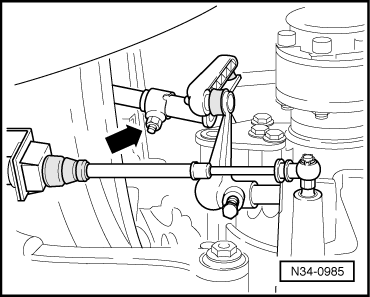
–  Release the clamp -arrow-. The joining element between the control bar and the guide to the gear lever must be able to move easily.
  Note!
Move the control bar several times through the fixing piece in the gear lever guide to make sure that it moves without difficulty.
Remove the dust cover of the gear lever from the central console.
  N34-0985
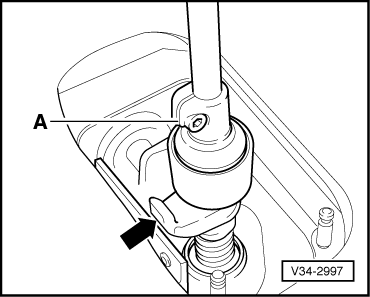
–  The gear change adjustment eccentric must be set in such a way that the clamp -A- faces the gear lever hook -arrow-.
  V34-2997
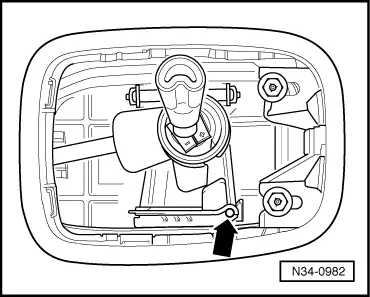
–  Before fitting tool -T10045- make sure that there is a hole -arrow- in the guide.
  N34-0982
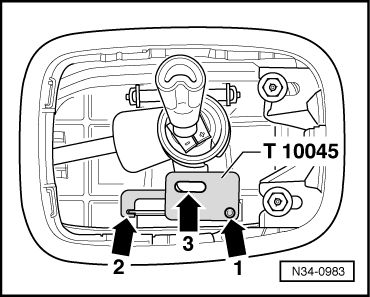
–  Fit tool -T10045- so that the bolt -arrow 1- fits in the hole of the guide (fig. N34-0982), and the lip of the guide -arrow 2- fits in the groove of the tool and the gear change hook fits in the burr of the tool -arrow 3-.
–  To do this, the gearbox must be set in neutral.
–  Then, align the control bar and the guide without tension.
  Note!
Make sure that there is no gear meshed in the gearbox (neutral).
  N34-0983
–  Tighten the clamp -arrow-.
–  Remove tool -T10045-.
–  Fit the gear lever dust cover.
Torque
Clamp for control bar: 25 Nm
Working
l  The gear lever must be in neutral in the track of the 3rd /4th gear.
–  Activate the clutch.
–  Set all gears several times. Make particularly sure that the connection of the reverse gear works properly.
If, when one gear is set several times, it still sticks, proceed as follows:
–  Set 1st gear.
–  Eliminate the gap of the gear change device by carefully pushing the gear lever to the left.
  N34-0985
l  The distance between the stop of the gear change and the protection cover must be 3.0 mm to 4.0 mm (dimension -a-).
–  If this were not the case, make a precision adjustment with the 1st gear in position → .
  Note!
t  An essential condition for the correct adjustment of the gear change is that the elements of actuation and transmission of the gear change device are in perfect conditions.
t  Furthermore, the gear change, clutch and clutch actuation device must be in a perfect state.
Precision adjustment
l  1st gear in position
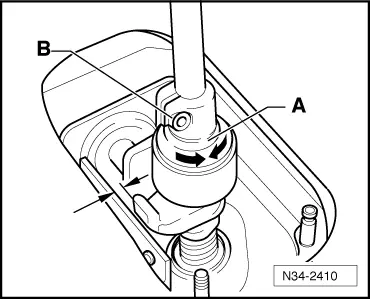
  N34-2410
–  Loosen the fixing bolt -B-.
–  Eliminate the play of the gear change actuation device by carefully pushing the gear lever to the left.
l  The distance between the gear lever stop and the protection cover must be 3.0 mm to 4.0 mm (dimension -a-).
–  Achieve dimension -a- by turning the adjustment eccentric -A-.
–  Tighten the fixing bolt -B-.
–  Fit the gear lever dust cover.
Torque
Fixing bolt for the adjustment eccentric: 2 Nm
  N34-2410

Clutch housing: repair > < Gearbox housing: repair