Leon Mk1
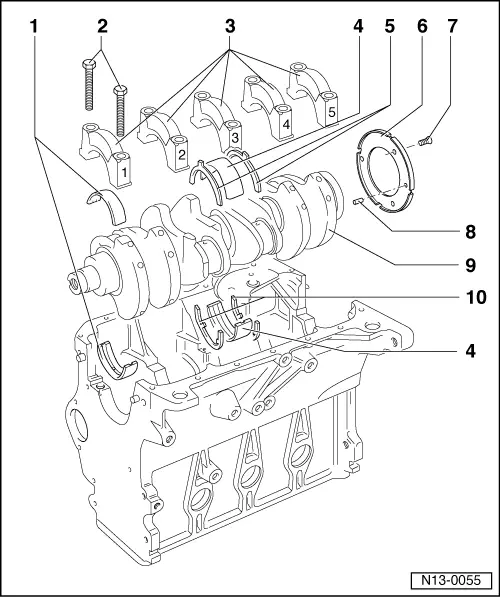
| Removing and installing crankshaft |

| 1 - | Bearing shells 1, 2, 4 and 5 |
| q | Do not interchange used bearing shells |
| q | The → Item bearing shell with oil groove |
| 2 - | 65 Nm + 1/4 turn (90°) |
| q | Renew |
| 3 - | Crankshaft bearing caps |
| q | Note installing sequence |
| q | Bearing cap 1: pulley side |
| q | Bearing cap 3: with recesses for thrust washers |
| q | The bearing shell lugs must be superimposed |
| 4 - | Central bearing shell 3 |
| q | The no. 4 bearing shell cylinder block side with oil groove |
| q | The bearing shell bearing cap side without oil groove |
| 5 - | Axial bearing shell |
| q | For crankshaft bearing cap 3 |
| q | Note the fitting position |
| 6 - | Sender wheel |
| q | For engine revolution sender |
| 7 - | 10 Nm + 1/4 turn (90°) |
| q | Renew |
| 8 - | Adjusting screw |
| q | Check the installation measurenment → Chapter |
| 9 - | Crankshaft |
| q | Axial clearance |
| New engine: 0.07 … 0.17 mm |
| Wear limit: 0.37 mm |
| q | Check radial clearance with Plastigage |
| New engine: 0.03 … 0.08 mm |
| Wear limit: 0.17 mm |
| q | Do not rotate the crankshaft when checking the radial clearance |
| q | Crankshaft dimensions: → Chapter |
| 10 - | Axial bearing shell |
| q | For cylinder block |
| q | The grooves made on one of the two sides must face the crankshaft |
