
Leon Mk1
| Fuel tank with accessory parts and fuel filter: removing and installing |

| 1 - | Plug |
| q | Replace the gasket if worn |
| 2 - | Dust boot |
| q | For filler hole |
| 3 - | Gravity/safety valve |
| q | To remove, free the safety clip and remove the valve from the filler hole, upwards |
| q | Test the continuity of flow of the valve Valve perpendicular: open Valve inclined 45°: closed |
| 4 - | O-ring |
| q | Replace if worn |
| 5 - | Earth connection |
| q | Check for firm seating |
| 6 - | 4 Nm |
| 7 - | Return hose/line |
| q | Blue or blue mark |
| q | Attached to the upper part of the fuel tank |
| q | Check for firm seating |
| q | To detach from the flange, press the lock buttons on the fuel distributor connector |
| 8 - | Connection nut 75 Nm |
| q | Remove and install with spanner -U-40055 A- |
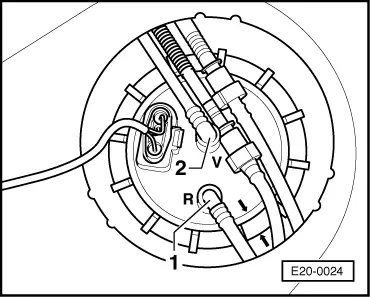
| 9 - | Fuel supply unit |
| q | Check the installation position on the fuel tank → Fig. |
| q | Remove and install → Chapter |
| q | Test the fuel pump → Chapter |
| q | Clean the filter if dirty |
| q | Check the marks “V” and “R” on the flange |
| q | With fuel level sender -G- |
| q | Fuel level sender → Chapter |
| 10 - | Ring gasket |
| q | Replace if worn |
| q | For installation, wet it with fuel |
| 11 - | Fuel filter |
| q | Installation position: the arrow points in the direction of flow |
| 12 - | Supply line |
| q | Black |
| q | Attached to the upper part of the fuel tank |
| q | Check for firm seating |
| q | To detach it from the flange, press the lock buttons on the connecting part |
| q | To the fuel distributor → Item |
| 13 - | 3 Nm |
| 14 - | Fuel tank |
| q | During the removal, fix it with engine and gearbox lift -SAT 1001- |
| q | Remove and install → Chapter |
| 15 - | Pressure washer |
| q | Press the antithermal plate fastening washer firmly over the bolt located on the vehicle floor |
| 16 - | 25 Nm |
| 17 - | Union brace |
| 18 - | Breather pipe |
| q | Attached to the upper part of the fuel tank |
| q | Check for firm seating |
| q | Immobilise with strip clamps |
| q | To the activated charcoal filter → Item |
| 19 - | Dust boot |
| q | After installing the filler hole, fit it over the fuel tank opening |
| 20 - | Filler hole |
| q | With anti-return valve |
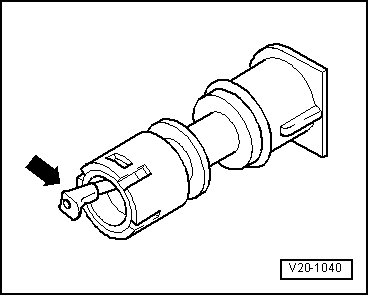
| 21 - | Breather valve |
| q | Test → Fig. |
| q | To remove, remove it sideways from the filler hole |
| q | To remove, lightly press the clips inward -arrow- and remove the valve |
| q | Before installing, remove the plugl → Item |
| 22 - | Fastening ring |
| 23 - | Tank cover unit |
| q | Remove and install: → Rep. Gr.55 |
 Note!
Note!
|
|