seat Workshop Repair Guides

SEAT Workshop Service and Repair Manuals

Engine cylinder head, valve gear > < Engine: Disassembling and assembling
Sealing flange, on the flywheel side: replacement
t  Removing the sealing flange with the sender wheel → Anchor
t  Fitting the sealing flange with the sender wheel → Anchor
t  A - Mount the sealing ring with sender wheel in the centre guide -T10134- → Anchor
t  B - Fit the centre guide -T10134- with the sealing flange on the crankshaft flange → Anchor.
t  C - Bolt the centre guide -T10134- to the crankshaft flange → Anchor.
t  D - Press the sender wheel with the centre guide -T10134- onto the crankshaft flange. → Anchor
t  E - Check the fitting position of the sender wheel on the crankshaft: → Anchor
t  F - Rectifying the position of the sender wheel → Anchor
t  Assembly: → Anchor
t  Tightening torques → Anchor
Consult the equivalence table for tools and equipment according to applicability among Seat / VW / Audi / Skoda → Chapter.
Special tools and workshop equipment required
t  Torque wrench kit -SAT 8010-, see equivalent → Anchor
   
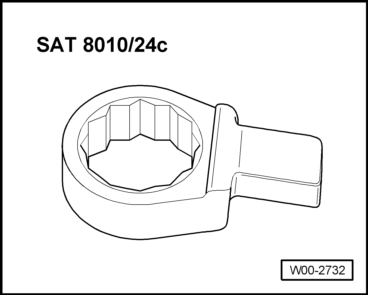
t  Closed mouthpiece of 24 -SAT 8010/24C-, see equivalent → Anchor
  W00-2732
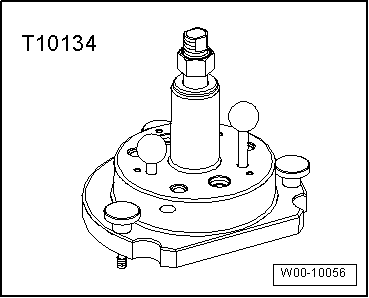
t  Centre guide -T10134-, see equivalent → Anchor
t  Depth gauge
t  Bolt M6 x 35 (3 units)
t  Bolt M7 x 35 (2 units)
Remove the sealing flange with the sender wheel
l  Gearbox removed.
–  Remove flywheel → Chapter.
  W00-10056
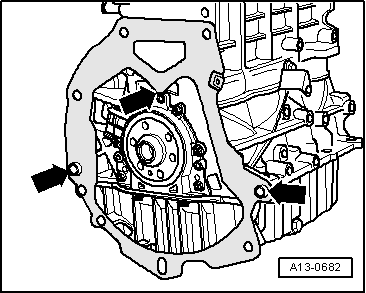
–  Unhook intermediate plate on sealing flange and on the dowel sleeves -arrows-.
–  Put the engine in TDC of cylinder 1 → Chapter.
–  Remove sump → Chapter.
  A13-0682
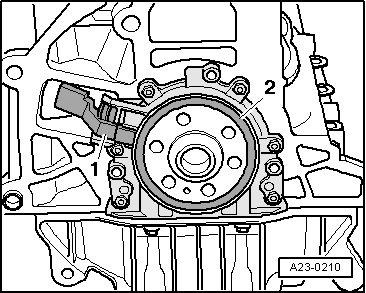
–  Remove the engine speed sender -G28-- 1- using the articulated Allen key.
  A23-0210
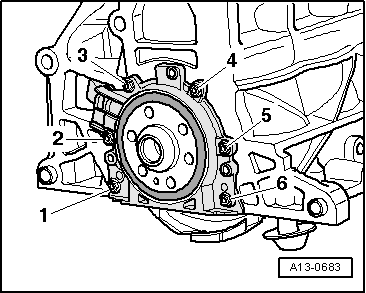
–  Unscrew the attachment bolts -1 … 6- from the sealing flange.
  Note
The sealing flange and the sender wheel are removed together from the crankshaft by the three M6 x 35 mm bolts.
  A13-0683
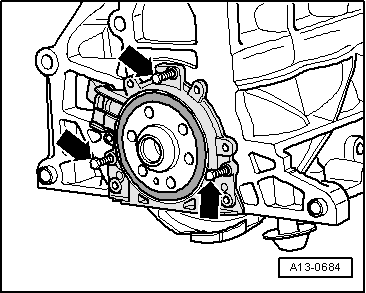
–  Screw three bolts M6 x 35 mm into the threaded spaces of the sealing flange-arrows-.
–  Screw in the 3 bolts M6x35 alternately max. 1/2 turns (180° per bolt) into the sealing flange.
–  Remove the sealing flange with sender wheel.
Fit the sealing flange with the sender wheel
  Note
t  The sealing flange with the PTFE seal is fitted with a pressure ring on the sealing lip. This support ring acts as an assembly sleeve and must not be removed before installation.
t  Once unwrapped, do not separate the sealing flange and the sender wheel or modify the position.
t  The sender wheel finds its position automatically when fitted to the position pin of the centre guide -T10134-.
t  The sealing flange and the seal make up one inseparable component and can only be replaced along with the sender wheel.
t  The centre guide -T10134- is held in its installation position for the crankshaft by a guide pin which is inserted into a hole on the crankshaft.
  A13-0684
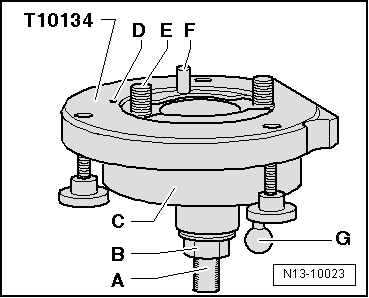
Structure of the centre guide -T10134-
A - Tightening flats
B - Conical hexagon bolt
C - Installation bell
D - Locating pin
E - Hexagon socket head bolt
F - Guide pin for diesel engines (black handle)
G - Guide pin for diesel engines (black handle)
  N13-10023
A - Fit the sealing ring with sender wheel in the centre guide -T10134-:
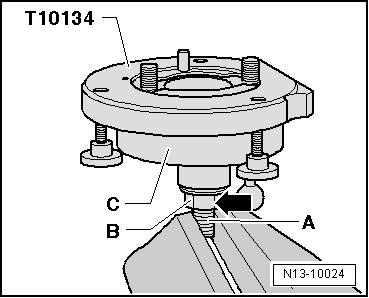
–  Screw in hexagon nut -B- to just before clamping surface -A- of threaded spindle.
  N13-10023
–  Fix the centre guide -T10134- holding it in place in a bench vice, to the threaded spindle surface -B-.
–  Press down on the installation bell -C-, so that it rests -arrow- on the hexagonal bolt -B-.
  Note
Inner part of assembly device and assembly housing must align (be level) with each other.
  N13-10024
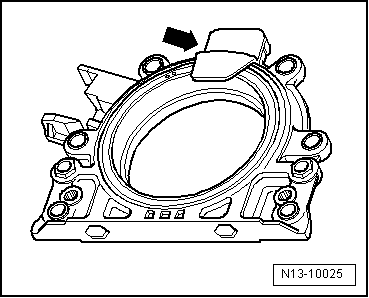
–  Unscrew the attachment clip -arrow- from the new sealing flange.
  Note
The sender wheel must not be taken out of the sealing flange or rotated out of position.
  N13-10025
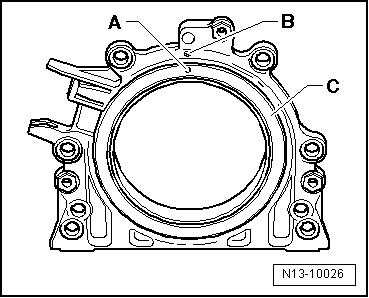
l  Locating hole -A- on sender wheel -C- must align with marking -B- on sealing flange.
–  Secure the sealing flange by the front on a flat, clean surface.
  N13-10026
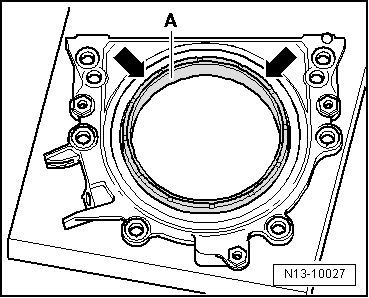
–  Press the sealing lip pressure ring -A- in the -direction of the arrow- downwards until it rests on the flat surface.
  N13-10027
l  The upper edge of the sender wheel and the front edge of the sealing flange must align -arrows-.
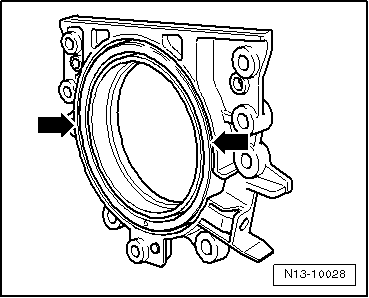
  N13-10028
–  Place the front of the sealing flange on the fitting device -T10134-, so that the fastener -B- sits into the hole -A- in the sender wheel.
  Note
Ensure the sealing flange lies completely on the assembly tool.
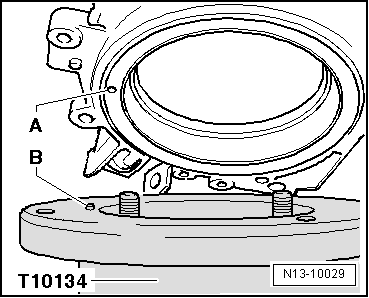
  N13-10029
–  Tighten the sealing flange and the sealing lip pressure ring -B- while tightening the three knurled bolts -A- on the surface of the fitting device -T10134- so that the fastener cannot come out of the hole in the sender wheel.
  Note
When installing sealing flange, ensure that sender wheel remains fixed in assembly device.
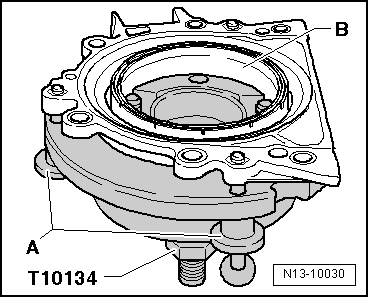
  N13-10030
B - Fit the centre guide -T10134-with the sealing flange on the crankshaft flange
l  The crankshaft flange must be free of oil and grease.
l  The engine is in TDC of cylinder 1.
–  Screw hexagon nuts -B- to end of threaded spindle.
–  Press the threaded spindle on the centre guide -T10134- in the -direction of the arrow- until the hexagonal nut -B- sits on the installation bell -A-.
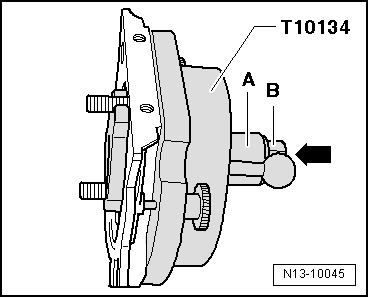
  N13-10045
–  Point the flat side of the installation socket towards the sealing surface of the engine block in contact with the oil sump.
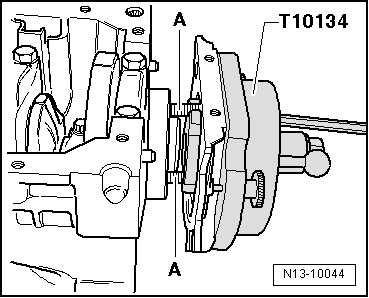
–  Secure the centre guide -T10134- on the crankshaft flange, for this purpose, screw in the Allen bolts -A- to the crankshaft flange by approx. 5 rotations of thread.
  N13-10044
–  Screw in the 2 bolts M7×35 -A- on the engine block to guide the sealing flange.
  N13-10031
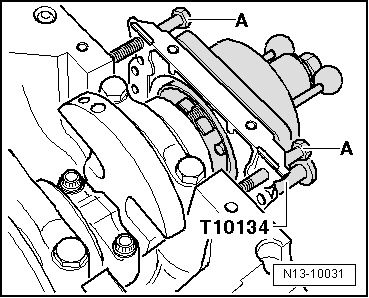
C - Bolt the centre guide -T10134- to the crankshaft flange:
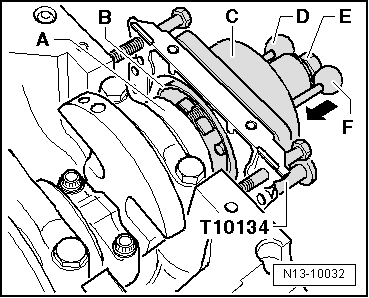
–  Move the installation bell -C- by hand in the -direction of the arrow- until the sealing lip pressure ring -B- sits on the crankshaft flange -A-.
–  Insert the guide pin for diesel engines (black handle) -D- into the crankshaft hole. In this way, the final fitting position of the sender wheel is established.
  Note
The guide pin for petrol engines (red handle) -F- cannot be inserted into the threaded hole.
–  Tighten the Allen bolts of the fitting device by hand.
–  Screw hexagon nut -E- onto threaded spindle by hand until it lies on assembly housing -C-.
  N13-10032
D - Press the sender wheel with the centre guide -T10134- onto the crankshaft flange:
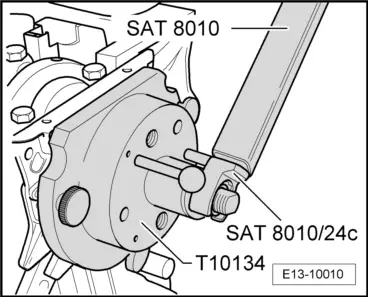
–  Using the sealing support 24 -SAT 8010/24C-, tighten the hexagonal bolt of the centre guide -T10134- to a torque of 35 Nm.
  Note
A small air gap must be present between cylinder block and sealing flange after tightening hexagon nut to 35 Nm.
  E13-10010
E - Check the fitting position of the sender wheel on the crankshaft.
–  Screw hexagon nut -E- to end of threaded spindle.
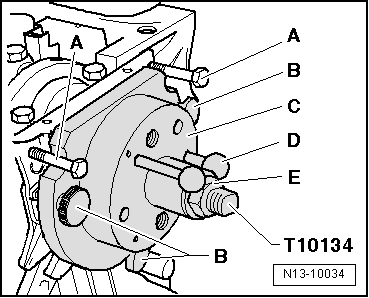
–  Unscrew the 2 bolts -A- of the engine block.
–  Unscrew the knurled bolts -B- from the sealing flange.
–  Remove the centre guide -T10134-.
–  Remove the pressure ring from the sealing lip.
  N13-10034
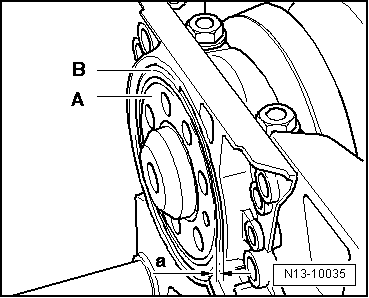
l  The sender wheel is positioned correctly on the crankshaft if the distance -a- between the crankshaft flange -A- and sender wheel -B- is 0.5 mm.
  N13-10035
–  Fit the dial calliper onto the crankshaft flange.
–  Measure the distance -a- between crankshaft flange and sender wheel.
If distance -a- is too small:
–  Re-press sender wheel → Anchor.
If distance -A- is attained:
–  Carry out the remaining installation operations → Anchor.
F - Rectify the position of the sender wheel
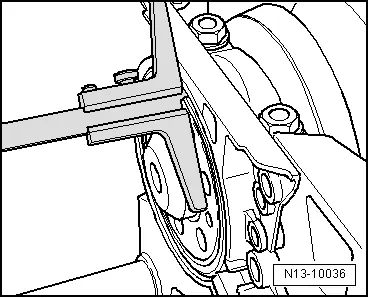
  N13-10036
–  Secure the fitting device -T10134--A- to the crankshaft flange; to do so, tighten the Allen bolts by hand
–  Slide fitting device -T10134- onto the sealing flange by hand.
  N13-10044
–  Screw hexagon nut -E- onto threaded spindle by hand until it lies on assembly housing -C-.
  N13-10034
–  Using the sealing support 24 -SAT 8010/24C-, tighten the hexagonal bolt of the centre guide -T10134- to a torque of 40 Nm.
–  Check the fitting position of the sender wheel on the crankshaft once more → Anchor.
If distance -a- is again too small:
–  Using the sealing support 24 -SAT 8010/24C-, tighten the hexagonal bolt of the centre guide -T10134- to a torque of 45 Nm.
–  Check the fitting position of the sender wheel on the crankshaft once more → Anchor.
  E13-10010
Assembly
–  Screw in the new securing bolts -1 ... 6- of the sealing flange alternatively in the diagonal sequence.
  A13-0683
–  Fit the engine speed sender -G28--1-.
–  Install sump → Chapter.
  A23-0210
–  Fit intermediate plate on sealing flange, and press onto dowel sleeves -arrows-.
–  Install flywheel using new bolts. Tighten the attachment bolts to the torque 60 Nm + 90° (1/4 turn) → Chapter
Tightening torques
  A13-0682
ComponentNm
Sealing flange to cylinder block15 → Remark
Engine speed sender -G28- to the engine block5
Flywheel bolts60 Nm + 90° (1/4 turn)

1)  Tighten alternatively diagonally
   

Engine cylinder head, valve gear > < Engine: Disassembling and assembling