seat Workshop Repair Guides

SEAT Workshop Service and Repair Manuals

Ignition system, glow plug system > < Engine control unit: replace, code and adapt
Injection start: checking and dynamically adjusting
  Note!
t  The dynamic checking and testing of the injection start are only possible in function 04 “Basic engine setting”.
t  The start of the injection should always be checked and be adjusted if necessary, after replacing the toothed belt and after having loosened a bolted joint on the injector pump or the toothed belt wheel.
Special tools and workshop equipment required
   
t  Torque spanners -SAT 8010-
  W00-2760
t  Fault reader -V.A.G 1551- with cable -V.A.G 1551/3B-
  Note!
The vehicle system tester -V.A.G 1552- can be used instead of the fault reader -V.A.G 1551-, although a printout will not be possible in such cases.
Conditions for testing and adjusting
l  Engine basic mechanical setting, OK
l  V-belt tension, correct
Test sequence
–  Connect fault reader -V.A.G 1551- (V.A.G 1552) and select engine electronics control unit with the “address code” 01. When doing so the engine must be idling. (Fault reader: Connecting and selecting the engine electronics control unit → Chapter.)
  W00-0459
Indicated on display:
–  Press keys 0 and 4 for the function “Begin basic setting” and confirm entry with the Q-key.
 
Rapid data transfer                 HELP
Select function XX                      
Indicated on display:
–  Press key 0 three times for “Value group number 0” and confirm entry with the Q-key.
 
Begin basic setting                 HELP
Input display group number XXX          
Display reading: (1...10 = display zones)
 
System in basic setting              0->
   1   2   3   4   5   6   7   8   9  10
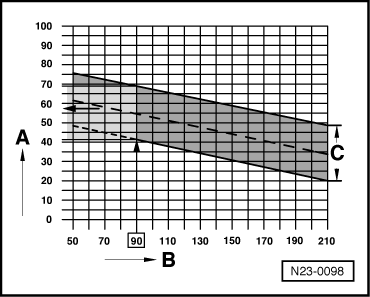
Start of injection, display zone 2, depends on the fuel temperature, display zone 9.
A - Display zone 2, injection start
B - Display zone 9, fuel temperature
C - The tolerance range for the injection start
Example:
The numeric value 90 in the display zone 9 -B-, corresponds in display zone 2 -A- to a range of 42...69.
  Note!
t  In the case of untimely injection start, the injection pump must be turned in the direction of engine rotation, if the start of injection is late, turn the pump in the opposite direction.
t  If when checking the injection start is within the range indicated -C-, a new adjustment is not necessary.
t  After repairs, such as the removal or installation of the injector pump or the adjustment of the distribution times, the injection start should be adjusted to the average value (traced line) of the tolerance range -C-.
–  Withdraw approximately one turn the securing bolts of the injection pump, finishing with the most accesible bolt.
–  Hold the injection pump with your hand, with a certain amount of pre-tension in the direction of the adjustment.
–  Carefully loosen the last securing bolt to the point where the pump can turn a little, then tighten the bolt again.
  N23-0098
–  Observe value in display zone 2 and if necessary, repeat the adjustment until the value indicated stays within the average value of the specifications -C-.
–  Tighten the injection pump securing bolts to a torque of 25 Nm.
–  Re-check injection start.
–  Press the -key.
–  Press keys 0 and 6 for the “End data transfer” function and confirm input with the Q-key.
  Note!
After the dynamic adjustment of the injection pump the injection pipes must be loosened on the side of the pump and then tightened again (25 Nm). In this way, tensions are eliminated which can break the pipes through vibration effect.
  N23-0098

Ignition system, glow plug system > < Engine control unit: replace, code and adapt