Skoda Workshop Service and Repair Manuals
HOME
FEATURES
MENU
INDEX
ABOUT US
Removing and installing oil pump >
< Removing and installing parts of the lubrication system - Part 2
Fabia Mk1
Power unit
1,2/40; 47 kW MPI engine
Engine lubrication
Removing and installing parts of the lubrication system - Part 2
Removing and installing oil pan
Removing and installing oil pan
Removing and installing oil pan
Special tools and workshop equipment required
t
Silicone sealant -D 176 600 A1-
t
Sealant remover gasket stripper (bearing code GST, bearing article no. R 34402), manufacturer Retech s.r.o.
t
Cleaning and degreasing agent, e.g. -D 009 401 04-
t
Protective goggles
Removing
–
Remove noise insulation
-arrows-
.
–
Drain engine oil.
–
Release the oil pan's fixing screws.
–
Separate oil pan, if necessary loosen the oil pan by applying slight blows with a rubber-headed hammer.
WARNING
Wear protective gloves when working with sealant and grease remover!
Carefully remove the remaining sealant on the cylinder block and on the oil pan with sealant remover.
Degrease the sealing surfaces on the cylinder block and on the oil pan.
Install
Note
t
Pay attention to the use by date on sealant.
t
The oil pan must be installed within 5 minutes after applying the silicone sealant.
–
Cut off nozzle tube at the front marking (Ø of nozzle approx. 3 mm).
–
Apply silicone sealant
-A-
to the clean sealing surface of the oil pan, as shown in the illustration.
t
Thickness of sealant bead: 2…4 mm
Note
The sealant bead must not be thicker than 4 mm otherwise excess sealant may get into the oil pan and clogg the oil pump strainer.
–
Fit oil pan immediately and lightly tighten all bolts.
–
Tighten all bolts fully in the given sequence:
Tightening torque: 9 Nm
Note
After installing the oil pan, allow the sealant to dry for at least 30 minutes. Only then may engine oil be filled in.
Further installation occurs in reverse order.
Power unit
1,2/40; 47 kW MPI engine
Engine lubrication
Removing and installing parts of the lubrication system - Part 2
Removing and installing oil pan
Removing and installing oil pump >
< Removing and installing parts of the lubrication system - Part 2
 Note
Note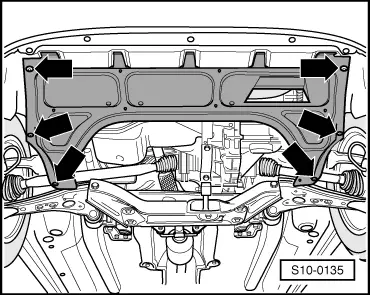
 WARNING
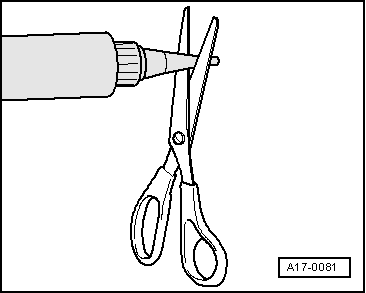 Note
Note
Note
Note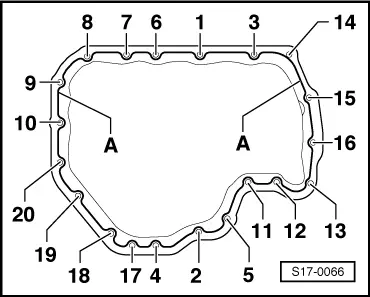
 Note
Note
Note
Note
Note
Note