skoda Workshop Repair Guides

Skoda Workshop Service and Repair Manuals

Removing and installing fuel delivery unit (Roomster) > < Removing and installing fuel tank (Roomster)
Checking fuel pump (Roomster)
Special tools and workshop equipment required
t  Pressure gauge appliance, e.g. -V.A.G 1318-
t  Hose adapter, e.g. -V.A.G 1318/16-
t  Adapter set, e.g. -V.A.G 1318/17-
t  Remote control, e.g. -V.A.G 1348/3A-
t  Measuring vessel
  Note
t  Observe the safety instructions before starting fitting work → Chapter.
t  Observe rules for cleanliness → Chapter.
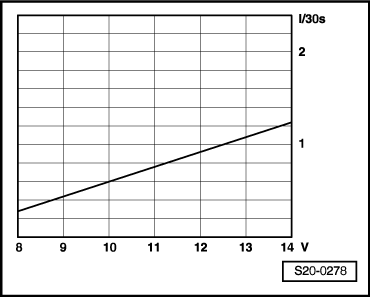
Inspecting proper operation and power supply
Test conditions
l  Battery voltage at least 11.5 V.
   
l  Fuses o.k. (No. 32 and 34).
l  All electrical components such as lights and rear window heater must be switched off.
Test sequence
–  Fold back the middle and rear seat and position vertically → Body Work; Rep. Gr.72.
–  Remove the cover from the fuel delivery unit.
–  Switch on ignition. The fuel pump must be heard to start running.
–  Switch off ignition.
If the fuel pump does not run:
–  Continuing searching for faults using a multimeter e.g. -V.A.G 1715- → Current flow diagrams and Fitting locations.
Check fuel flow rate
Test conditions
l  Supply voltage is o.k.
l  Battery voltage at least 11.5 V.
l  Fuel temperature 15...30°C.
l  Fuel tank at least 1/4 full.
Test sequence
–  Unscrew the cap from the filler neck.
–  Removing rear seat bench → Body Work; Rep. Gr.72.
–  Remove the cover from the fuel delivery unit.
–  Unplug the 4-pin plug from the fuel delivery unit.
  S20-0290
–  Connect remote control -V.A.G 1348/3A- with connection lines from the measuring tool set to contact -1- of the fuel pump and to battery positive terminal.
–  Use connection lines from the measuring tool set to connect the contacts -4- to the plug and to the fuel pump.
–  Pull off the fuel feed line and gather residual fuel in a cloth.
  WARNING
The fuel feed line is pressurized! Place a clean cleaning cloth around the connection point before detaching hose connections. Reduce pressure by carefully releasing the connection point.
–  Connect adapter -V.A.G 1318/17- and -V.A.G 1318/16- to the fuel delivery unit and hold in the measuring vessel.
–  Activate remote control -V.A.G 1348/3A- for 30 seconds.
  S20-0279
–  Compare the amount of the fuel pumped to the specified value (the amount of the fuel pumped is dependent on the voltage at the fuel delivery unit).
If the minimum flow rate is not reached:
–  Remove the fuel delivery unit and check whether the pump strainer is not clogged up.
If no fault was detected until now:
–  Replace fuel delivery unit.
  S20-0278

Removing and installing fuel delivery unit (Roomster) > < Removing and installing fuel tank (Roomster)