
Octavia Mk2
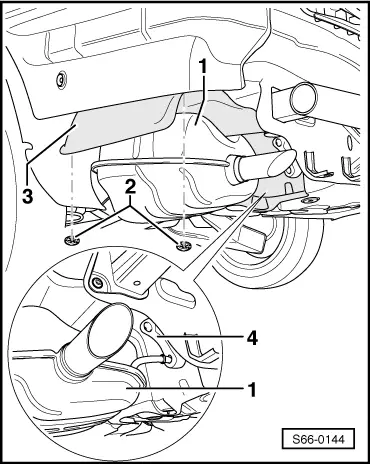
 Note
Note
|
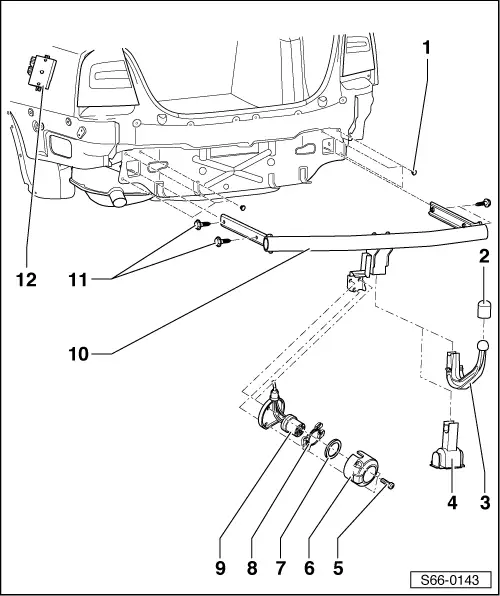
| 1 - | Blind plug |
| 2 - | Cap |
| 3 - | Trailer arm |
| Removing: |
| – | Open lock on control lever. |
| – | Fold back control lever about 90°. |
| – | Remove trailer arm. |
| Installing: |
| – | Installation is carried out in the reverse order. |
| 4 - | Blind plug |
| q | Insert in trailer arm hole. |
| 5 - | 2.5 Nm |
| 6 - | Power socket |
| Removing: |
| – | Remove screws (Pos. 5). |
| – | Remove power socket housing. |
| Installing: |
| – | Installation is carried out in the reverse order. |
Note| Use the type of power socket and the electric installation according to the relevant national legislation. |
| 7 - | Gasket |
| 8 - | Support |
| 9 - | Electrical cable with gasket |
| 10 - | Trailer coupling frame |
| Removing: |
| – | Remove trailer arm (Pos. 3). |
| – | Position blind plug (Pos. 4). |
| – | Remove the rear bumper → Chapter. |
| – | Remove socket (Pos. 6). |
| – | Remove seal (Pos. 7) and bracket (Pos. 8). |
| – | Pull the electrical wiring (Pos. 9) through the trailer coupling frame. |
| – | Remove the shield partially and unhook the rear muffler → Fig. |
| – | Remove screws (Pos. 11). |
| – | Remove trailer coupling frame from vehicle. |
| Installing: |
| – | Installation is carried out in the reverse order. |
| 11 - | 70 Nm |
| 12 - | Control unit for trailer detection |
| q | Removing and installing → Chapter. |
|
|