Skoda Workshop Service and Repair Manuals
HOME
FEATURES
MENU
INDEX
ABOUT US
Removing and installing pressure box for exhaust turbocharger >
< Removing and installing exhaust gas turbocharger
Octavia Mk2
Drive unit
1.4/90 kW TSI engine
Exhaust turbocharger, G-charger / Exhaust gas turbocharger
Testing exhaust turbocharger pressure box
Testing exhaust turbocharger pressure box
Testing exhaust turbocharger pressure box
Special tools and workshop equipment required
t
Hand vacuum pump, e.g. -VAS 6213-
Test requirements
l
The hose for the exhaust turbocharger above the charge pressure control solenoid valve -N75- must have access to the pressure unit and must be tight.
l
charge pressure control solenoid valve -N75- o.k.
Work procedure
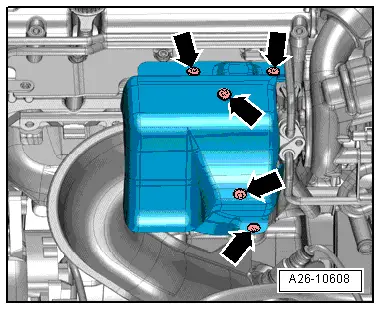
–
Release screws
-arrows-
and remove heat shield for exhaust turbocharger.
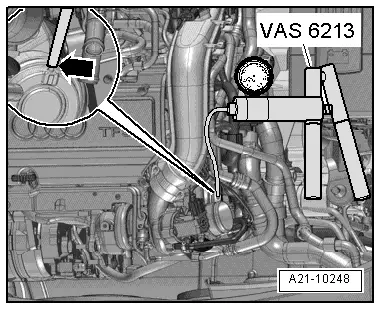
–
Detach the vacuum hose
-arrow-
from the exhaust turbocharger pressure unit and instead connect the hand vacuum pump -VAS 6213-.
–
Put the control ring
-1-
of the hand vacuum pump -VAS 6213- in position
-B-
for “pressure”.
–
Operate the hand vacuum pump -VAS 6213 - several times.
Caution
Risk of damage to the pressure box from excessive pressure.
The pressure must not be greater than 0.08 MPa (800 mbar).
Note
The fitting position with the exhaust turbocharger removed is shown in the illustration.
–
Observe the actuator rod
-1-
of the exhaust turbocharger pressure unit.
l
The actuator rod must move at approx. 0.03 MPa (300 mbar).
l
The actuator rod must be at the end of the adjustment path at approx. 0.08 MPa (800 mbar).
–
Ventilate the hand vacuum pump -VAS 6213-
-arrow A-
.
l
The actuator rod must move in the reverse direction.
Note
Observe the motion sequence of the actuator rod over the entire adjustment range. It must move continuously and without jolting.
Installation is performed in the reverse order, pay attention to the following points:
t
Tightening torque of heat shield for exhaust turbocharger: 8 Nm
Drive unit
1.4/90 kW TSI engine
Exhaust turbocharger, G-charger / Exhaust gas turbocharger
Testing exhaust turbocharger pressure box
Removing and installing pressure box for exhaust turbocharger >
< Removing and installing exhaust gas turbocharger
 Note
Note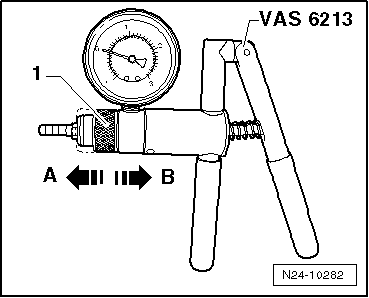
 Caution
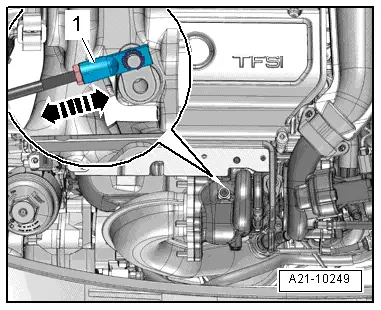 Note
Note
 Note
Note
Note
Note