skoda Workshop Repair Guides

Skoda Workshop Service and Repair Manuals

Exhaust system > < Engine control unit
Removing and installing engine control unit
Special tools and workshop equipment required
t  Body saw e.g. -V.A.G 1523 A-
  Note
If the engine control unit should be replaced, clean throttle valve → Chapter, connect vehicle diagnosis system, measurement and information system -VAS 5051B- and in the targeted fault finding carry out “replace engine control unit”.
Removing
–  Switch off ignition.
–  Remove the cooling water tank cover → Body Work → Rep. Gr.66.
   
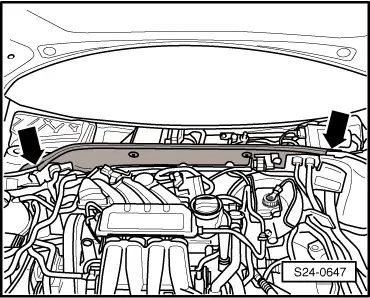
–  Remove the intermediate wall for cooling water tank -arrows-.
–  Remove windscreen wiper and washer system → Electrical System → Rep. Gr.92.
For vehicles with protective cover
  S24-0647
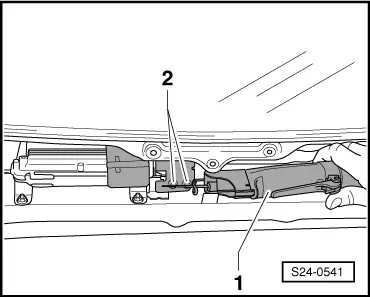
–  Cut with body saw -1- a slot for the cross-head screwdriver in the heads of the pull-off screws -2-.
  Note
t  It must be sawed twice with the body saw, so that the slot is wide enough, in order to be able to unscrew the screws with a suitable screwdriver.
t  The pull-off screws until are inserted with locking agent.
–  Unscrew bolts -2-.
  S24-0541
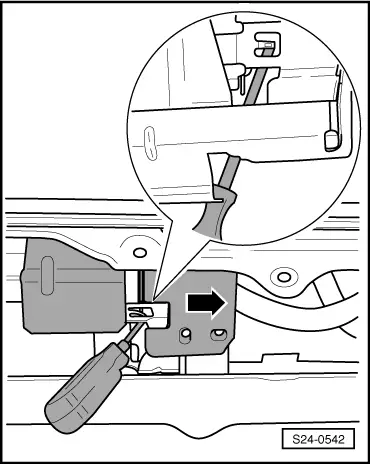
–  Lift locking tab of protective cover with cross-head screwdriver.
–  Push the protective cover in the -direction of the arrow- out of the bracket for engine control unit.
Continued for all vehicles
  S24-0542
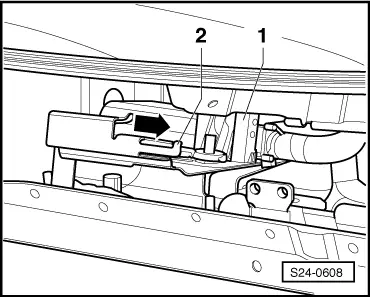
–  Uplug the front connector -1- and disconnect from the engine control unit.
–  Lever off retaining bracket -2- slightly.
–  Push engine control unit out of the bracket -arrow-.
–  Release rear connector and unplug from engine control unit.
Install
  Note
For vehicles with protective cover, the metal swarfs must be suctioned out of the plenum chamber before installing the engine control unit.
–  Connect rear connector to engine control unit and lock.
  S24-0608
–  Push engine control unit into the bracket and lock the retaining bracket -2-.
–  Connect front connector to engine control unit and lock.
For vehicles with protective cover
–  Fasten protective cover with new pull-off screws (before tightening align the protective cover in such a way that it does not come into contact with the surrounding components)
–  Tighten pull-off screws evenly until the screw heads are pulled off.
Continued for all vehicles
–  Install windscreen wiper and washer system → Electrical System → Rep. Gr.92.
–  Install intermediate wall and cover of the plenum chamber → Body Work → Rep. Gr.66.
  S24-0608

Exhaust system > < Engine control unit