skoda Workshop Repair Guides

Skoda Workshop Service and Repair Manuals

Remove the double clutch "new design" as of 06.11 > < Double clutch - Summary of components (as of 06.11)
Remove the double clutch „old design“ up to 05.11
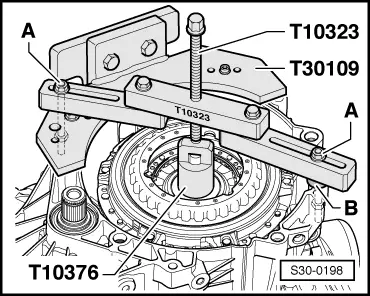
Special tools and workshop equipment required
t  Assembly stand -MP9-101-
t  Hook -3438-
t  Supporting bridge -T10323-
t  Thrust piece -T10368-
t  Extractor -T10373-
t  Thrust piece -T10376-
t  Gearbox mount -T30108-
t  
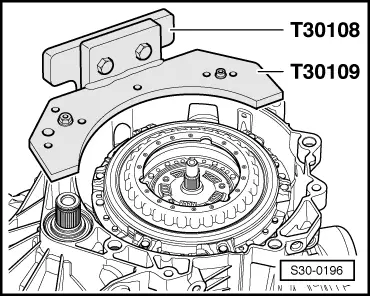
Gearbox mount -T30109 (VW 353)-
l  Gearbox removed
l  
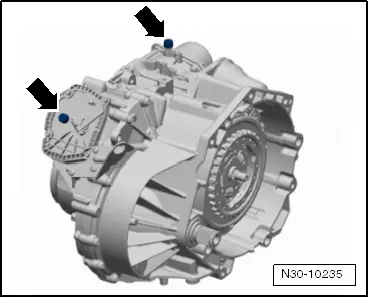
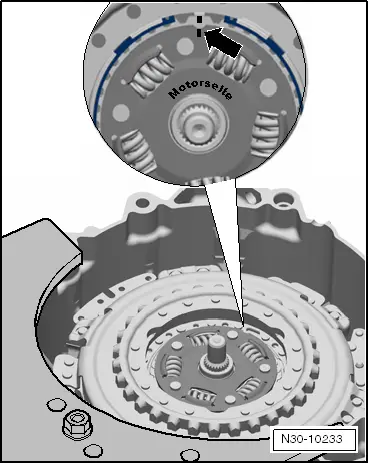
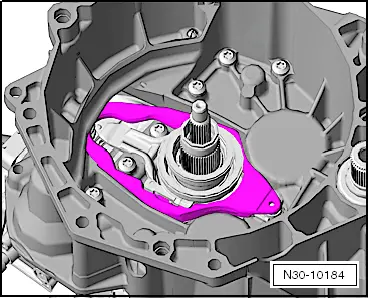
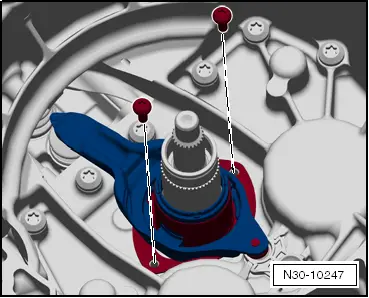
The mechatronics for double clutch gearbox -J743- is installed on the gearbox
When working on the gearbox, both ventilation caps -arrows- must be detached and must be closed in an oil-tight manner with suitable screw plugs. In case of oil leakage from the mechatronics, the mechatronics must be replaced → Electronic Catalogue of Original Parts. The »new«mechatronics for the gearbox is already precisely filled with oil at the factory. Therefore, it is only possible to fill the mechatronics with oil at the factory.
   
–  Detach both ventilation caps -arrows- and close in an oil-tight manner with suitable screw plugs.
  Note
The ventilation cap for the mechatronics is damaged when removed and must be replaced → Electronic Catalogue of Original Parts.
  N30-10235
The gearbox must be installed on the gearbox mount -T30109 (VW 353)- with the clutch pointing upwards.
The way in which the gearbox is transported and attached to the assembly support can be seen here → Chapter.
  S30-0196
–  Remove the circlip for the hub -arrow-.
  N30-10233
–  Take out the hub with hook -3438--A- and screwdriver -B-.
  N30-10237
–  Remove the circlip for the clutch -arrow-.
  Note
t  It is possible that the clutch is resting at the circlip so close that the circlip »fits very tightly«. In this case it is possible to press the clutch slightly downwards as described in the following work procedure. In doing so, the circlip is released. Do not knock on the clutch or the shaft with a hammer!
t  Always replace circlip -arrow- → Electronic Catalogue of Original Parts.
The circlip -arrow- for the clutch cannot be removed:
  Note
  N30-10238
In the following description the clutch is pressed slightly downwards in the event that the circlip cannot be removed.
–  Position the supporting bridge -T10323- parallel to the flange of the clutch housing.
–  Equalise distances, e.g using washers -B- with a total thickness of 15 mm.
–  Attach the supporting bridge -T10323- with screws -A-.
  Note
Fasten screws -A- with nuts.
–  Carefully press the clutch downwards via the spindle.
–  Remove supporting bridge -T10323-.
  S30-0198
–  Remove the circlip for the clutch -arrow-.
The circlip for the clutch -arrow- is removed:
  N30-10238
–  Insert the extractor -T10373- in the clutch and remove the clutch.
  N30-10240
–  Remove the clutch together with the extractor -T10373-.
  N30-10241
–  Remove the small engaging bearing.
–  Remove the large engaging lever.
  N30-10184
–  Remove the screws and the small engaging lever.
  N30-10247
–  Remove the support for the engaging lever.
Before installing the clutch, check if it must be adjusted or not → Chapter.
Install double clutch → Chapter.
  N30-10246

Remove the double clutch "new design" as of 06.11 > < Double clutch - Summary of components (as of 06.11)