skoda Workshop Repair Guides

Skoda Workshop Service and Repair Manuals

Removing and installing fuel delivery unit > < Extract fuel from the fuel tank
Removing and installing fuel delivery unit
(Octavia II with front-wheel drive, Yeti)
Special tools and workshop equipment required
t  Key -T30101 (3087)-
Removing
l  The fuel tank must not be more than 3/4 full.
  Note
t  If necessary drain the fuel tank → Chapter.
t  Safety precautions when working on the fuel supply system → Chapter.
t  Observe rules for cleanliness → Chapter.
–  Switch off ignition and withdraw ignition key.
For the vehicles Octavia II
–  Removing rear seat bench → Body Work; Rep. gr.72.
For the vehicles Yeti
–  Remove rear seat bench with brackets → Body Work; Rep. gr.72.
–  Remove floor covering under the rear seat bench.
For all vehicles
   
–  Unclip retaining catches -arrows- of cover for the fuel delivery unit and remove cover.
  Note
For vehicles with auxiliary heating, the plug connection for the dosing pump -V54- must be disconnected additionally.
  A20-1206
–  Unplug the 5-pin plug -1-, the black feed line -2- and blue return-flow line -3-.
  Note
t  Press in the securing ring in order to unlock the lines.
t  For vehicles with auxiliary heating the suction line for the dosing pump -V54- must be pulled out additionally (open lower clamp).
  M20-0232
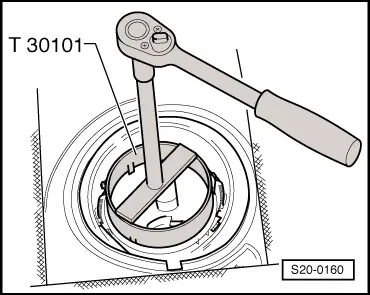
–  Open lock ring with the wrench -T30101 (3087)-.
  Note
When installing, ensure that the float arm of the sender for fuel gauge display -G- is not bent.
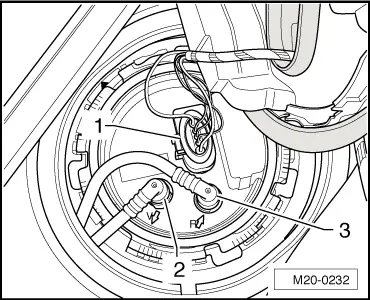
–  Pull the fuel delivery unit and the gasket ring out of the opening of the fuel tank.
  Note
You must empty the old fuel delivery unit before disposing of it if you wish to replace it.
Install
–  The fuel delivery unit is installed in the reverse order. However, pay attention to the following:
  Note
t  Insert new dry gasket ring into the opening of the fuel tank.
t  The gasket ring must only be moistened on the inside with fuel before assembly of the fuel delivery unit.
t  Do not bend the sender for fuel gauge display when installing it.
  S20-0160
t  Observe the fitting location of the fuel delivery unit. The marking -3- on the flange must point against the direction of travel. The fuel delivery unit can only be installed in this position.
t  Do not interchange feed line and return-flow line.
t  Tighten the lock ring to 110 Nm.
t  Make sure the line connections fit tightly.
t  After installing the fuel delivery unit, check whether the feed line and the return-flow line are still clipped in place on the fuel tank.
  S20-0336

Removing and installing fuel delivery unit > < Extract fuel from the fuel tank