Skoda Workshop Service and Repair Manuals
HOME
FEATURES
MENU
INDEX
ABOUT US
Removing and installing fuel gauge sender 2G169 >
< Removing and installing fuel delivery unit
Octavia Mk2
Power unit
1.6/55; 66; 77 kW TDI CR Engine
Fuel supply, gas operation
Removing and installing parts of the fuel supply system
Removing and installing the sender for fuel gauge displayG
Removing and installing the sender for fuel gauge displayG
Removing and installing the sender for fuel gauge display -G-
(Octavia II, Superb II, Yeti)
Removing
–
Remove fuel delivery unit:
t
Octavia II with front-wheel drive, Yeti
→ Chapter
.
t
Octavia II with four-wheel drive, Superb II
→ Chapter
.
–
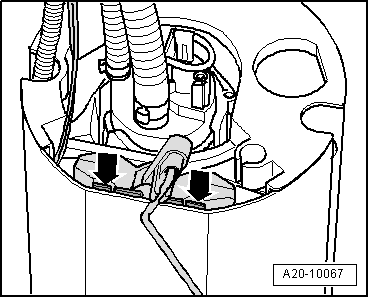
Unlock the catches
-arrows-
using a screwdriver and pull out the sender for fuel gauge display -G- towards the top.
–
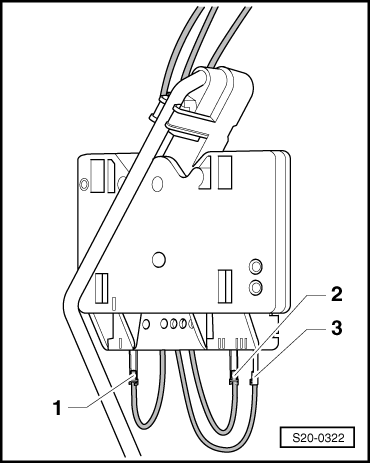
Unlatch and disconnect the plug connection of the lines
-1-
(brown),
-2-
(blue) and
-3-
(black).
Install
–
Connect the lines and check the connector for secure catch.
–
Insert the sender for fuel gauge display -G- in the guides at the fuel delivery unit and press downwards until it latches into position.
–
Install fuel delivery unit:
t
Octavia II with front-wheel drive, Yeti
→ Chapter
.
t
Octavia II with four-wheel drive, Superb II
→ Chapter
.
Power unit
1.6/55; 66; 77 kW TDI CR Engine
Fuel supply, gas operation
Removing and installing parts of the fuel supply system
Removing and installing the sender for fuel gauge displayG
Removing and installing fuel gauge sender 2G169 >
< Removing and installing fuel delivery unit