skoda Workshop Repair Guides

Skoda Workshop Service and Repair Manuals

Mixture preparation system, electronic inj.,Gas > < Charge air system - Summary of components
Removing and installing charge air cooler
Special tools and workshop equipment required
t  Hose clamps up to Ø 25 mm -MP7-602 (3094) -
t  Pliers for spring strap clamps
t  Catch pan, e.g. -VAS 6208-
  Note
Observe the general notes for assembly work on the charge air system → Chapter.
Removing
   
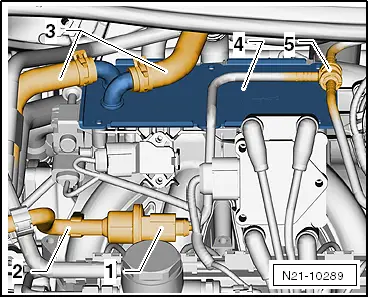
–  Disconnect plug -1- and hose -3- from activated charcoal filter system solenoid valve 1 -N80-.
–  Remove the lines with the non-return valve -5- and the activated charcoal filter system solenoid valve 1 -N80- from the intake manifold.
–  Disconnect coolant hoses -3- with hose clamps -3094 - and detach from charge-air cooler.
–  Release the fixing screws of the ignition transformer -N152- and carefully place the ignition transformer onto the cylinder head cover.
–  Release fixing screws at charge air cooler -4-.
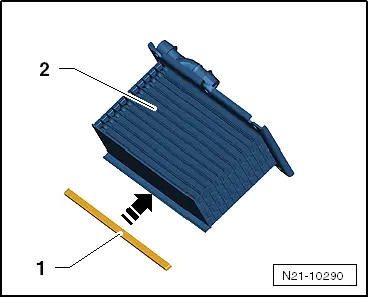
–  Carefully pull the charge air cooler -4- out of the intake manifold.
  Note
Pour the residual coolant out of the charge air cooler into a collecting tank.
Install
Installation is performed in the reverse order, pay attention to the following points:
  N21-10289
–  Slide the seal -1- in -direction of arrow- onto the edge of the charge air cooler -2-.
–  Check the correct seating of the new gasket at the intake manifold.
–  Slide the charge air cooler into the intake manifold.
–  Press down the charge-air cooler up to the stop into the intake manifold.
  Note
Do not tilt the charge-air cooler when installing.
–  First tighten the fixing screws uniformly crosswise until the screw heads are positioned.
–  Tighten the fixing screws crosswise to the tightening torque: 7 Nm.
  N21-10290

Mixture preparation system, electronic inj.,Gas > < Charge air system - Summary of components