skoda Workshop Repair Guides

Skoda Workshop Service and Repair Manuals

Filling/bleeding the high pressure pump and the fuel system > < Removing and installing fuel pressure senderG247
Removing and installing the high pressure pump
Special tools and workshop equipment required
t  Counterholder -T10051-
t  Extractor -T40064-
t  Thrust piece -T40064/1-
t  Fillister head screws -T40064/2-
Removing
  Note
t  Observe safety measures when working on the fuel system → Chapter.
t  Observe rules for cleanliness → Chapter.
–  Pull toothed belt off camshaft sprocket and from toothed belt gear on the high pressure pump → Chapter.
   
–  Release screws -2- and remove timing belt gear from the high pressure pump.
  N15-10400
–  Hold the hub of the high pressure pump with the counterholder -T10051- and unscrew the securing nut -1-.
  Note
  N23-10221
Replace the basic pressure plate with the pressure plate -T40064/1- on the extractor -T40064-.
–  Position extractor -T40064- with thrust piece -T40064/1- and cylinder screws (bolts) -T40064/2- as shown.
–  Detach the hub from the high pressure pump, if necessary counterhold with a fixed spanner SW 24.
  N23-10372
–  Release screws -arrows-.
–  Lay the coolant line and the fuel return-flow line to the side.
–  Slacken the wiring loom from the wiring guide of the glow plugs.
  Caution
t  Carefully disconnect the plug from the glow plugs.
t  If the plug is damaged when disconnecting it, the complete wiring loom including the plugs must be replaced (plugs cannot be replaced separately).
  N23-10220
–  Carefully disconnect the plug from the glow plugs. Use the assembly spanner SW 11 for help.
  N23-10224
–  Unscrew union nuts -1- and -3- and remove high pressure line.
  A23-10449
–  Disconnect plugs -1- and -3-.
–  Remove fuel intake hose -2- and fuel return-flow hose -4-.
  A23-10452
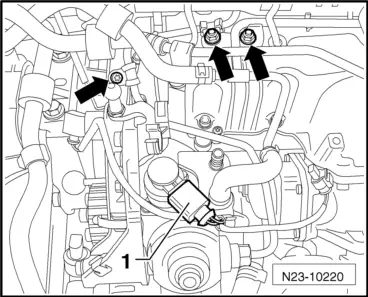
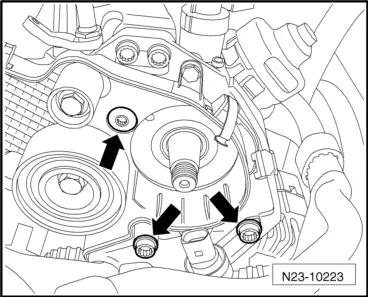
–  Release the fixing screws -arrows- of the high pressure pump.
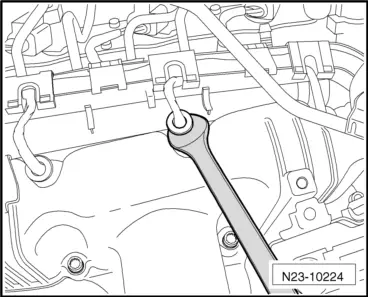
–  Carefully remove the high pressure pump.
Install
  Caution
Risk of damage to the high pressure pump through running dry.
t  After reinstalling the high pressure pump: carry out the basic setting „test of fuel pump for predelivery“»3 times« before the first engine start → Vehicle diagnostic tester.
t  After installing a new high pressure pump: fill up the high pressure pump with fuel before the first engine start → Chapter.
Installation is performed in the reverse order, pay attention to the following points:
  Note
t  When installing the high pressure pump, ensure that no dirt penetrates the fuel system.
t  Only remove the screw plug immediately before installing the fuel lines.
t  The fixing screws for the high pressure pump must be replaced.
Tightening torques: → Chapter.
  N23-10223

Filling/bleeding the high pressure pump and the fuel system > < Removing and installing fuel pressure senderG247