skoda Workshop Repair Guides

Skoda Workshop Service and Repair Manuals

Removing and installing the fuel distributor > < Removing and installing the injection units
Installing the high pressure lines
Special tools and workshop equipment required
t  Socket wrench insert -T40055-
  Caution
t  Slacken the fuel distributor from the high pressure pump free of stress for improved and stress-free installation of the high pressure line. If necessary, slightly push the fuel distributor.
t  Slacken the fuel distributor and the clamping claws of the injection units for improved and stress-free installation of the high pressure lines. If necessary, slightly push the fuel distributor and slightly twist the relevant injection unit.
t  The high pressure lines must on no account be bent or installed under tension. Tensions would eventually lead to a fracture of the corresponding high pressure line.
  Note
t  The installation of new high pressure lines is described in the following. If previously installed high pressure lines are re-used, they must not be damaged. Before the installation, they must be carefully checked, the work procedure is otherwise the same.
t  Moisten the threads of the union nuts and the connection fittings with diesel fuel.
–  Slacken the fixing screws of the fuel distributor in order to push it.
–  Loosen the fixing screws of the clamping claws in order to turn the injection units.
–  Remove the new high pressure lines from their wrapping. Remove the screw plugs and install the high pressure lines at the connection fittings without placing them down.
  Note
First of all, install the high pressure lines between the injection units and the fuel distributor, then install the high pressure line between the high pressure pump and the fuel distributor.
–  First tighten the union nuts of the high pressure lines in the prescribed order → Anchor by hand up to the „stop“. When doing this, ensure that the pipe cones are correctly seated in the connection fittings.
  Note
Tighten the union nuts of the high pressure lines using the socket wrench insert -T40055-.
–  Tighten the fixing screws and the union nuts of the high pressure lines according to the prescribed work procedure → Anchor.
–  Carefully press the connection of the fuel return-flow line via the new gasket rings onto the injection unit.
l  The cap must click audibly into place.
–  Press down the securing bolts.
–  Check fuel system for tightness → Chapter.
  WARNING
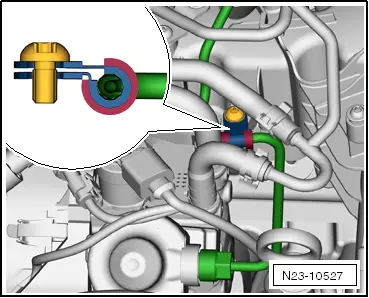
The fixing clamp of high pressure line between the high pressure pump and the fuel distributor must absolutely be installed in the correct position. Otherwise the high pressure line can kink due to vibration or tension.
   
Fitting location of the fixing clamp of the high pressure line
–  Tighten fixing clamp to 8 Nm.
  N23-10527
Mounting sequence
Tightening orderTightening torque
1. Screws of clamping claws for injection units8 Nm + torque a further 180° (1/2 turn)
2.1. Union nuts of the high pressure lines at the connection fittings of the injection units15 Nm + torque a further 60° (1/6 turn) 1)
2.2. Union nuts of the high pressure lines at the connection fittings of the fuel distributor15 Nm + torque a further 60° (1/6 turn) 1)
3.1. Union nuts of the high pressure line at the connection fitting of the high pressure pump15 Nm + torque a further 60° (1/6 turn) 1)
3.2. Union nuts of the high pressure line at the connection fitting of the fuel distributor15 Nm + torque a further 60° (1/6 turn) 1)
4. Fixing screws of the fuel distributor22 Nm
5. Screws of the clamp for the high pressure line8 Nm

1) Tighten union nuts in one work step without time delay between tightening and torquing angle (max. 1 min).
   

Removing and installing the fuel distributor > < Removing and installing the injection units