skoda Workshop Repair Guides

Skoda Workshop Service and Repair Manuals

Connections of washer fluid level pipes > < Repairing corrugated washer fluid level pipes - vehicles up to 12.2010
Repairing corrugated washer fluid level pipes - vehicles as of 01.2011
  Note
t  The following repair procedure of corrugated washer fluid level pipes can also be applied to vehicles manufactured up to 01.2011.
t  The repair point must not be exposed to tension or flexion.
t  
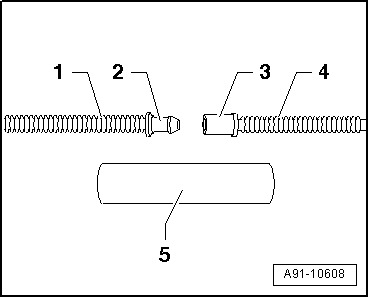
If the damaged point is longer than 15 mm, insert new corrugated pipe and then perform the described work sequence twice.
Special tools and workshop equipment required
t  Hot-air blower
Procedure
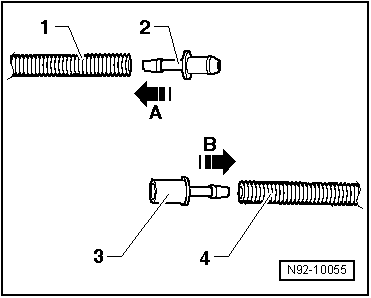
–  Cut the damaged point straight out of the corrugated pipe to be repaired so that the distance between the pipe ends is maximum 15 mm.
   
–  Select the suitable connecting pieces -2-, -3- as well as the suitable shrink hose according to the → Electronic Catalogue of Original Parts.
–  Warm up the end of the corrugated pipe -1- slightly using a hot-air blower.
–  Press the connecting piece -2- into the corrugated pipe -arrow A-.
–  Warm up the end of the corrugated pipe -4- slightly using a hot-air blower.
–  Press the connecting piece -3- into the corrugated pipe -arrow B-.
  N92-10055
–  Lengthen off the shrink hose so that the corrugated pipe on both sides can be covered by the shrink hose at least 20 mm -dimension X-.
  N92-10056
–  Slide the shrink hose -5- over the corrugated pipe and connect up the connecting pieces -2- and -3-.
–  Secure the repair point with the shrink hose.
  Note
t  The shrink hose must be heated from the middle outwards until it is completely sealed.
t  During shrinking make sure the hot nozzle does not damage any other cables, plastic parts or insulating materials.
–  Perform a functional and tightness test.
  A91-10608

Connections of washer fluid level pipes > < Repairing corrugated washer fluid level pipes - vehicles up to 12.2010