
Roomster
| Summary of components of PH hybrid tailgate (Scout) |
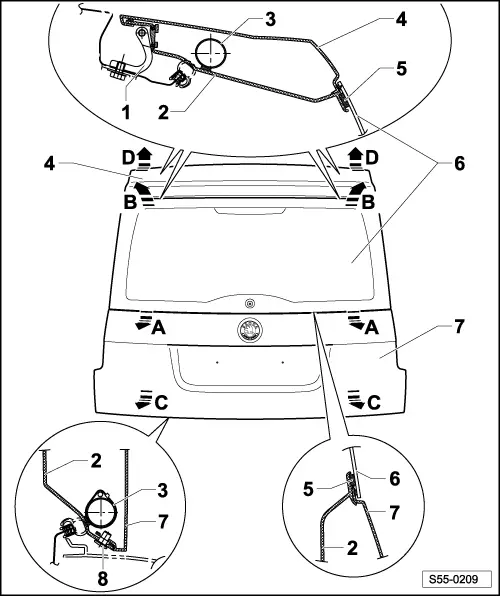
| 1 - | Tailgate hinge |
| 2 - | Interior trim panel for tailgate |
| 3 - | Tailgate frame |
| 4 - | Top trim panel |
 Note
Note| t | The removal of the top trim panel for the tailgate (Pos.4) is carried out on the removed flap. Remove tailgate → Chapter. |
| t | The electrical installation is not separated inside the tailgate yet at the top → Chapter after the removal of the D pillar, where the plug connections are located. |
| Removing: |
| – | Remove securing clips (Pos. 8). |
| – | Slide out the trim panel in -direction of arrow B-. |
| – | Unhook the trim panel in -direction of arrow D-. |
| – | Remove the trim panel from the tailgate. |
| Installing: |
| – | Installation is carried out in the reverse order. |
Note| When installing extreme caution is recommended, so that the foam seal all around the trim panel is not damaged! If damaged, water can penetrate into the tailgate. |
| 5 - | Foam seal |
| 6 - | Tailgate windscreen |
Note| The tailgate windscreen cannot be replaced individually! If damaged, the complete frame (Pos.3) with window, electrical installation and interior trim panel for tailgate (Pos.2) must be replaced. |
| 7 - | Bottom trim panel |
| Removing: |
| – | Slide out the bottom trim panel in -direction of arrow A-. |
| – | Unhook the bottom trim panel in -direction of arrow B-. |
| – | Separate the plug connection of the electrical cable. |
| – | Remove the bottom trim panel from the tailgate. |
Note| When installing extreme caution is recommended, so that the foam seal all around the trim panel is not damaged! |
| 8 - | Securing clip |
|
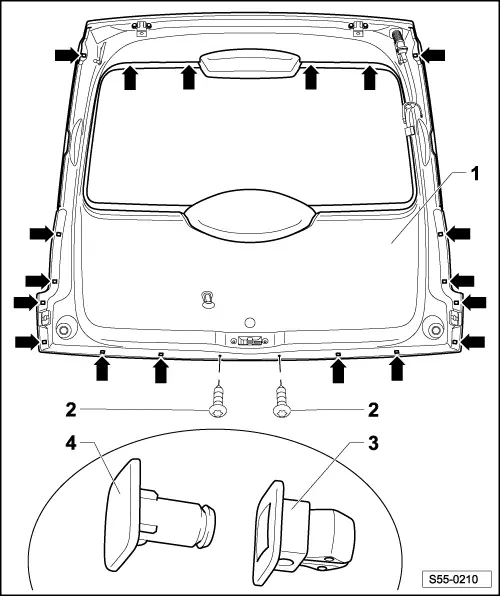
| 1 - | Interior trim panel for tailgate |
| 2 - | 2.5 Nm |
| 3 - | Spreader clip |
| Removing: |
| – | Remove securing clip (Pos. 4). |
| – | Lever off the spreader clip using a screwdriver (e.g.) and slide out. |
| Installing: |
| – | Clip the clip into the opening. |
| 4 - | Securing clip → Anchor |
| Removing: |
| – | Lever off the clip using a small screwdriver (e.g.) and slide out of the spreader clip (Pos. 3). |
| Installing: |
| – | Clip the clip into the opening. |