skoda Workshop Repair Guides

Skoda Workshop Service and Repair Manuals

Final drive, differential, differential lock > < Drive shaft
Disassembling and assembling the secondary shaft
Special tools and workshop equipment required
t  Drive bushing -MP1-316 (30-100)-
t  Drift -MP3-403 (VW 295)-
t  Pressure plate -MP3-406 (VW 401)-
t  Thrust piece -MP3-408 (VW 412)-
t  Multi-purpose tool -MP3-419 (VW 771)-
t  Drive bushing -MP3-427 (40-21)-
t  Pipe section -MP3-429 (2010)-
t  Thrust piece -MP3-448 (VW 408A)-
t  Pipe section -MP3-461 (VW 519)-
t  Pipe -MP3-472 (3118)-
t  Thrust piece -MP6-405 (VW 411)-
t  Ejector -3138-
t  Drawing ring -T30036/3 (2003/3)-
t  Thrust plate -T30045 (3005)-
t  Pressure washer -T30047 (3062)-
t  Guide bushing -T30075 (3039)-
t  Separating device 22...115 mm, e.g. -Kukko 17/2-
t  Hot-air blower
   
  Note
t  When installing new pinions or drive shaft observe the technical data → Chapter.
t  In case of replacement of the parts marked with 1) the adjustments need to be made. Setting overview → Chapter.
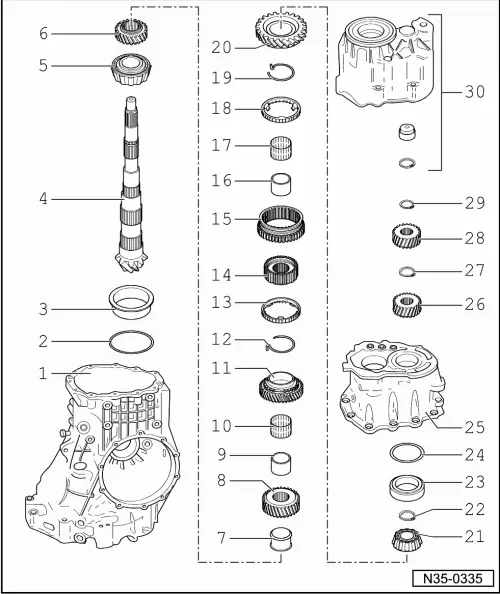
1 - Gearbox housing
q   repairing → Chapter
2 - Adjusting washer S3
q   Setting overview → Chapter
3 - Outer ring/taper roller bearing, large1)
q   removing → Fig.
q   installing → Fig.
4 - Secondary shaft1)
q   is paired with the crown wheel - if replacing, replace both
q   Adjusting the secondary shaft and crown wheel → Chapter
5 - Inner ring/taper roller bearing, large1)
q   pressing off → Fig.
q   pressing on → Fig.
6 - 4th gear pinion
q   pressing off → Fig.
q   pressing on → Fig.
7 - Spacer sleeve
8 - 3rd gear pinion
q   press off together with inner ring Pos. 9 → Fig.
q   pressing on → Fig.
9 - Inner ring for needle bearing
q   for 2nd gear sliding gear
q   press off together with 3rd gear pinion Pos. 8 → Fig.
q   pressing on → Fig.
10 - Needle bearing
q   for 2nd gear sliding gear
q   lubricate with gear oil before installing
11 - 2nd gear sliding gear
q   before installing, insert spring Pos. 12 and push needle bearing Pos. 10 onto secondary shaft
12 - Spring
q   insert in the 2nd gear sliding gear Pos. 11 → Fig.
q   Assignment to sliding gear → Electronic Catalogue of Original Parts
13 - 2nd gear synchronizer ring
q   coated with molybdenum
q   check for wear → Fig.
14 - Synchronizer body for 1st and 2nd gear
q   pressing off → Fig.
q   pressing on → Fig.
15 - Sliding sleeve for 1st and 2nd gear
q   Fitting position: groove for selector rod facing towards 1st gear sliding gear Pos. 20
16 - Inner ring for needle bearing
q   for 1st gear sliding gear
q   pressing off → Fig.
q   pressing on → Fig.
17 - Needle bearing
q   for 1st gear sliding gear
q   lubricate with gear oil before installing
18 - 1st gear synchronizer ring
q   check for wear → Fig.
19 - Spring
q   insert in the 1st gear sliding gear Pos. 20 → Fig.
q   Assignment to sliding gear → Electronic Catalogue of Original Parts
20 - 1st gear sliding gear
21 - Inner ring/taper roller bearing, small1)
q   pressing off → Fig.
q   pressing on → Fig.
22 - Circlip
q   Determining thickness again → Chapter
23 - Outer ring/taper roller bearing, small1)
q   extracting → Fig.
q   installing → Fig.
24 - Adjusting washer S4
q   Setting overview → Chapter
25 - Bearing shield1)
q   repairing → Chapter
26 - 6th gear pinion
q   pressing off and on → Chapter
q   Fitting position: collar points towards inner ring/tapered-roller bearing small
27 - Circlip
q   Determining thickness again → Chapter
28 - 5th gear pinion
q   xtracting and inserting → Chapter
29 - Circlip
30 - Cover
q   repairing → Chapter

   
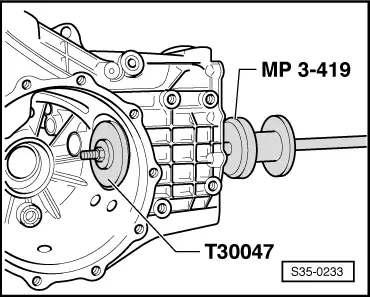
Removing large outer ring/tapered-roller bearing
Thrust washer -T30047 (3062)- lies with the graduated side on the outer ring.
  S35-0233
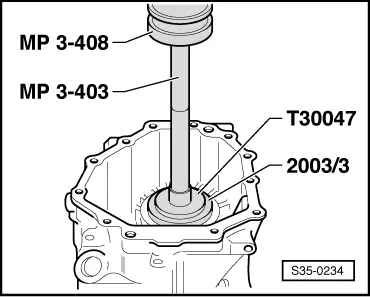
Inserting the large outer ring/tapered-roller bearing into the gearbox housing and pressing down
–  Heat the gearbox housing with the hot-air blower in the area of the bearing assembly, to about 100°C for around 15 minutes.
–  Insert the outer ring in the heated gearbox, and press in under the workshop press until heat is transferred.
  S35-0234
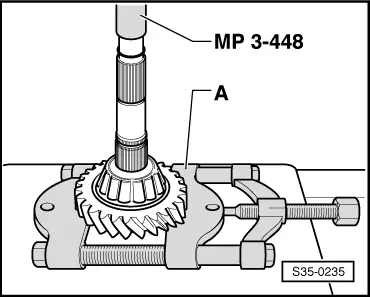
Pressing off the small inner ring/taper roller bearing with 1st gear sliding gear
A - Separating device 22...115 mm, e.g. -Kukko 17/2-
  S35-0235
Pressing off 2nd gear sliding gear with sliding sleeve/synchronizer body for 1st and 2nd gear and inner ring for needle bearing/1st gear sliding gear
A - Separating device 22...115 mm, e.g. -Kukko 17/2-
  S35-0236
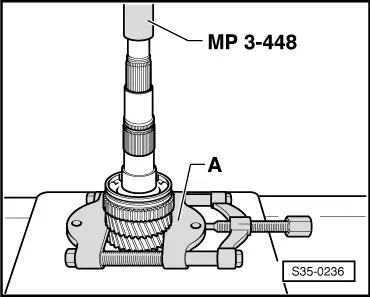
Pressing off 3rd gear pinion with inner ring for needle bearing/2nd gear sliding gear
A - Separating device 22...115 mm, e.g. -Kukko 17/2-
  S35-0237
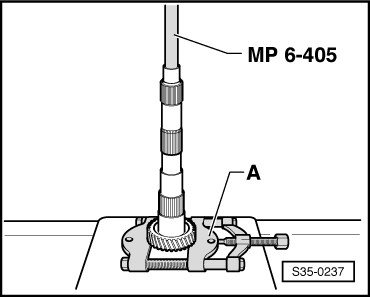
Pressing out 4th gear pinion
A - Separating device 22...115 mm, e.g. -Kukko 17/2-
  Note
The 4th gear pinion can also be pressed off together with 3rd gear pinion and inner ring for needle bearing/3rd gear sliding gear
  S35-0238
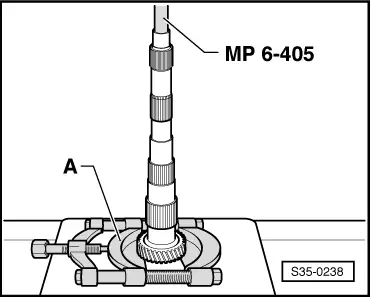
Pressing off large inner ring/tapered-roller bearing
A - Separating device 22...115 mm, e.g. -Kukko 17/2-
The bearing is destroyed by removing
  S35-0239
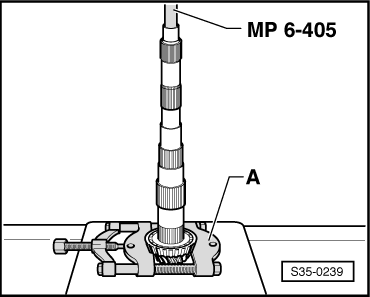
Pressing on large inner ring/tapered-roller bearing
–  Heat inner ring to around 100 °C and mount.
–  Press down till there is no axial play.
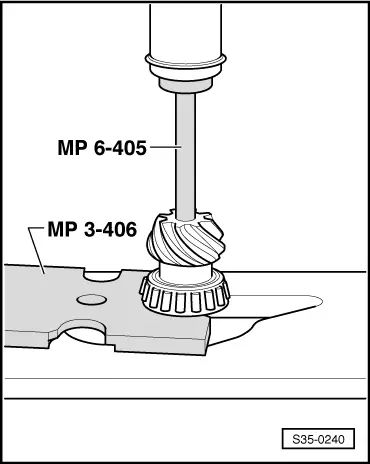
  S35-0240
Pressing on 4th gear pinion
–  Heat pinion to around 100 °C, place in position and press on.
   Fitting position:
Collar towards 3rd gear pinion.
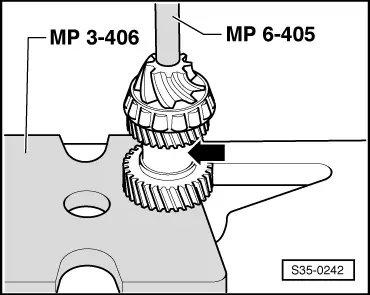
  S35-0241
Pressing on 3rd gear pinion
–  Mount spacer sleeve -arrow-.
–  Heat 3rd gear pinion to approx. 100 °C, mount, and press down.
   Fitting position:
Collar towards 4th gear pinion.
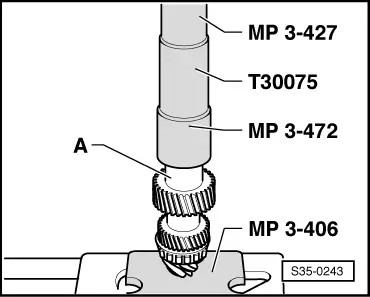
  S35-0242
Pressing on inner ring -A- for needle lager/ 2nd gear sliding gear
–  Heat inner ring to around 100 °C and mount.
–  Press down till there is no axial play.
  S35-0243
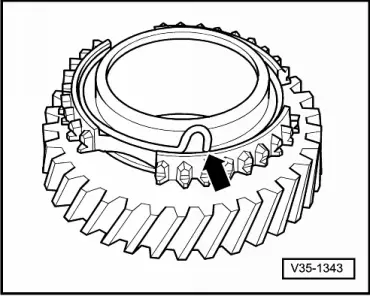
Insert spring in sliding gear
The looped end of the spring -arrow- must engage in the hole in the sliding gear.
  V35-1343
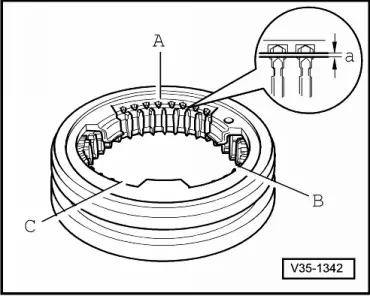
Check synchronizer ring for wear
–  Press synchronizer ring into sliding sleeve and measure the size of gap -a- with a feeler gauge at positions -A-, -B- and -C-.
–  Add up the measurements and divide by 3.
The resulting value should not be less than 0.5 mm.
  V35-1342
Mounting 2nd gear sliding gear, pressing on 1st and 2nd gear synchronizer body
–  Lubricate needle bearing.
–  Mount the needle bearing, sliding gear with spring, and synchronizer ring for 2nd gear.
–  Heat inner synchronizer body to around 100 °C and mount.
Fitting position:
Level hub with 2nd gear sliding gear.
–  Press down till there is no axial play.
–  Mount sliding sleeve for 1st and 2nd gear.
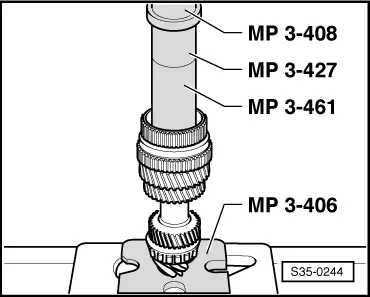
  S35-0244
Pressing on inner ring -A- for needle bearing/ 1st gear sliding gear
–  Heat inner ring to around 100 °C and mount.
–  Press down till there is no axial play.
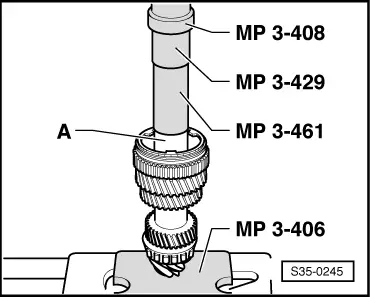
  S35-0245
Press on small inner ring/tapered-roller bearing
–  Lubricate needle bearing.
–  Mount the needle bearing, sliding gear with spring, and synchronizer ring for 1st gear.
–  Heat inner ring to around 100 °C and mount.
–  Press down till there is no axial play.
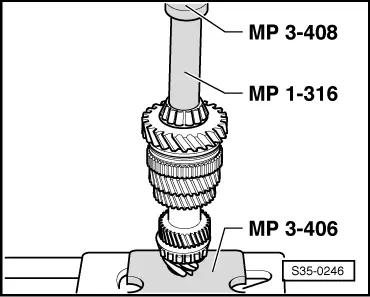
  S35-0246
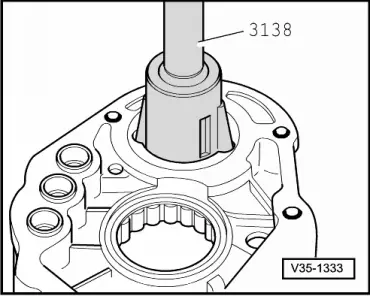
Extracting small outer ring/tapered-roller bearing
  V35-1333
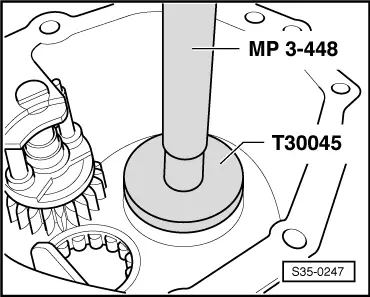
Pressing in small outer ring/tapered-roller bearing
–  Place washer S4 in the bearing pedestal in the bearing bracket.
–  Press in outer ring for small tapered-roller bearing till it reaches the stop.
  S35-0247

Final drive, differential, differential lock > < Drive shaft