skoda Workshop Repair Guides

Skoda Workshop Service and Repair Manuals

Brakes, hydraulics, regulator, servo > < Brake pedal - Vehicles with left-hand drive
Removing and installing bracket
Removing:
–  Remove engine cover → engine; Rep. gr.10.
Vehicles with diesel engines 2.0 TDI CR - India (BS4):
–  Remove filler neck for washer-fluid reservoir and lay it to one side → Engine; Rep. gr.10.
–  Remove the coolant expansion bottle and lay it to one side.
   
–  Unhook fuel hose -2- from bracket.
–  Remove the bracket for the fuel lines upwards in -direction of arrow- and lay to the side.
–  Disconnect plug connection -1- for additional fuel pump -V393-.
–  Unscrew screws -3- for bracket of additional fuel pump -V393-.
–  Fold the bracket with the additional fuel pump -V393- forwards.
Other vehicles with diesel engines 2.0 TDI CR:
–  Remove filler neck for washer-fluid reservoir and lay it to one side → Engine; Rep. gr.10.
–  Remove the coolant expansion bottle and lay it to one side.
  A23-10241
–  Disconnect plug connection -2- from differential pressure sender -G505- in -direction of arrow-.
–  Unscrew fixing screw -3- from bracket for differential pressure sender -G505-.
–  Place the bracket for the differential pressure sender -G505- to the rear.
  A26-10722
–  Unhook fuel hose -2- from bracket.
–  Remove the bracket for the fuel lines upwards in -direction of arrow- and lay to the side.
–  Disconnect plug connection for additional fuel pump -V393--1-.
–  Unscrew screws -3- for bracket of additional fuel pump -V393-.
–  Fold the bracket with the additional fuel pump -V393- forwards.
Vehicles with diesel engines 1.6 TDI CR:
–  Remove filler neck for washer-fluid reservoir and lay it to one side → Engine; Rep. gr.10.
–  Remove the coolant expansion bottle and lay it to one side.
  A23-10241
–  Disconnect plug connection -2- from differential pressure sender -G505- in -direction of arrow-.
–  Unscrew fixing screws -1- from bracket for differential pressure sender -G505-.
–  Place the bracket with the differential pressure indicator -G505- to the rear.
Continued for all vehicles:
–  Remove brake pedal → Chapter.
  N26-10526
–  Unscrew the screws -1- of the brake servo unit -2-.
–  Slacken the electrical line from the bearing bracket.
  N46-10234
–  Unscrew screws -1- from the right bracket.
–  Unscrew nut -2- from the left bracket.
–  Remove bracket.
Installing:
–  Insert bracket.
  N46-10232
–  Screw on nut -2- for the left bracket and tighten to tightening torque.
–  Screw in screw -1- for the right bracket and tighten to tightening torque.
  N46-10232
–  Screw in screws -1- for the brake servo unit -2- and tighten to tightening torque.
–  Further installation occurs in reverse order.
  N46-10234
Tightening torques: 
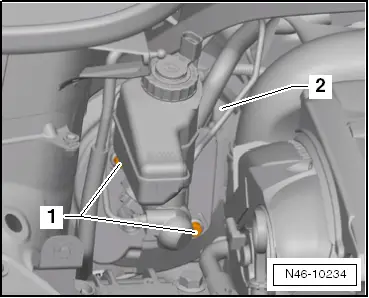
Brake servo unit to bracket/front wall
t  Use new screws!
25 Nm
Bracket to front wall
t  Use new nut or screw!
25 Nm


Brakes, hydraulics, regulator, servo > < Brake pedal - Vehicles with left-hand drive