|
Alternator, Remove and Install
 Remove Remove
Remove air cleaner housing with hot film mass air flow meter and
air intake hose - see illustration "Air duct X 20 DTL, Y 20 DTL"
and "Air duct Y 20 DTH up to MY 2003" or "Air duct Y 20 DTH as of
MY 2003, Y 22 DTR".
Remove lower engine compartment cover – see operation
"Lower Engine Compartment Cover, Remove and Install" in group
"A".
Tension ribbed V-belt-tension roller anti-clockwise and take
ribbed V-belt from alternator pulley.
Remove fastening bolts (x3) for rear wiring trough. Detach cable
connections at alternator.
|
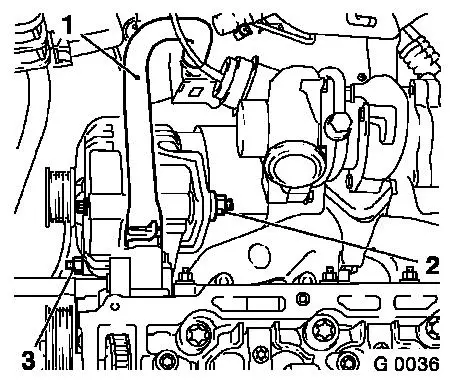
Remove turbocharger and starter heat shields. Loosen lower
alternator fastening bolt (3).
Detach wiring harness plug and vacuum line from charge pressure
controller solenoid valve and remove charge pressure controller
solenoid valve.
Remove upper fastening bolt alternator (2) and lay alternator
aside to rear.
Detach coolant hose (1). Detach coolant flange from cylinder
head – collect coolant.
|
|
Remove lower fastening bolt and remove alternator upwards.
Note: Check
alternator – see operation "Alternator, Check" (X 16 XEL
Engine) in group "J".
Disassemble and reassemble alternator – see operation
"Bosch Compact Alternator, Disassemble and Reassemble" (X 16 XEL
Engine) in group "J".
 Install
Insert alternator in lower bracket from above and tighten
fastening bolt by hand.
Attach coolant flange to cylinder head with new gasket.
Insert alternator in upper bracket (coolant flange) and install
fastening bolt – tightening torque 35 Nm / 26 lbf. ft.
Install charge pressure controller solenoid valve, connect
vacuum lines and wiring harness plug.
Tighten lower alternator fastening bolt – tightening
torque 35 Nm / 26 lbf. ft.
Attach cable connections to alternator. Fasten wiring trough to
cylinder block.
Install turbocharger and starter heat shields.
Tension ribbed V-belt tension roller anti-clockwise and place
ribbed V-belt on alternator pulley.
Install lower engine compartment cover – see operation
"Lower Engine Compartment Cover, Remove and Install" in group
"A".
Install air cleaner housing with hot film mass air flow meter
and air intake hose - see illustration "Air duct X 20 DTL, Y 20
DTL" and "Air duct Y 20 DTH up to MY 2003" or "Air duct Y 20 DTH as
of MY 2003, Y 22 DTR".
 Inspect
Charge cooling system – see operations "Cooling System,
Charge and Bleed" and "Cooling System, Check for Leaks".
|
