|
Piston Reduction Brake B4, Disassemble and
Reassemble (AF 20)
Survey
|
1
|
Anchor bolt with seal ring
|
|
2
|
Pressure spring
|
|
3
|
Piston rod with damping spring mount
|
|
4
|
Cushion spring
|
|
5
|
Seal ring
|
|
6
|
Piston
|
|
7
|
Retainer ring
|
|
8
|
Seal rings
|
|
9
|
Cover
|
|
10
|
Retaining ring
|
|
11
|
Brake band B4
|
|

|
 Remove Remove
Remove transmission – see operation "Transmission, Remove
and Install (AF 20)". Secure converter against falling out.
|
Attach transmission to KM-694-A (2). Attach assembly to KM-113-2
(1).
Remove fluid drain bolt (3), drain transmission fluid and
collect for damage diagnosis – see operation "Transmission
Fluid Condition, Check (AF 13-II/AF 17/AF 20/AF 22)".
Remove converter – see operation "Converter and/or Fluid
Pump Seal Ring, Replace (AF 13-II/AF 17/AF 20/AF 22)".
|

|
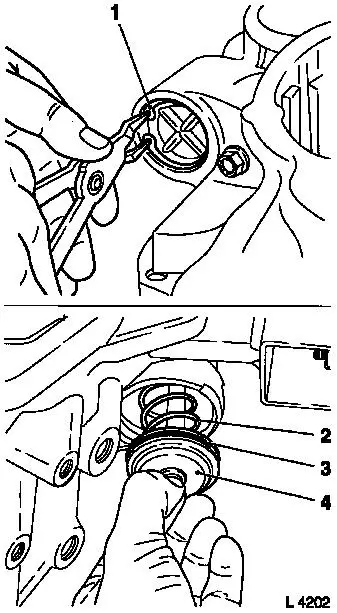
Caution
Cover is spring-pressured, secure against springing out.
Remove
|
Remove retaining ring (1) with retaining ring pliers and remove
cover – assist with pliers if stiff.
Remove piston (4) with pressure spring (2) from main housing
– if stiff, blow in low-pressure compressed air (4 bar) on
main housing inner side.
Replace O-rings (3) on cover and piston.
|
|
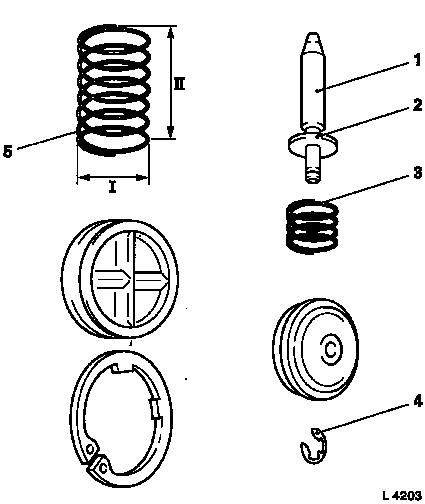
 Disassemble
|
Remove retainer ring (4) from piston rod (1) with pliers. Remove
pressure spring (5), cushion spring (3) and washer (2) from piston
rod.
 Measure
Measure outside diameter of pressure spring (5). Measurement
value (I): 29.7 mm
Measure length of pressure spring (5). Measurement value (II):
63.2 mm. Replace pressure spring, if necessary.
 Assemble
Attach piston rod, washer, pressure spring and cushion spring to
piston – secure piston rod with new retainer ring.
|
|
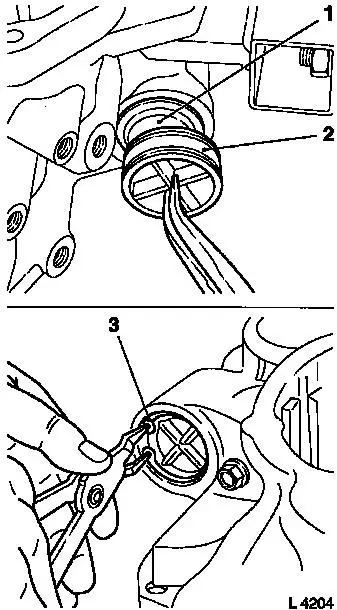
 Install
|
Insert piston (1) with pressure spring and cover (2) into main
housing. Press cover into main housing and install new retaining
ring (3) with retaining ring pliers.
 Inspect
Check retaining ring is seated correctly.
|
|
Install
Install converter – see operation "Converter and/or Fluid
Pump Seal Ring, Replace (AF 13-II/AF 17/AF 20/AF 22)". Secure
converter against falling out.
|
Attach fluid drain bolt (3) with new seal ring to transmission
– tightening torque 40 Nm / 29.5 lbf. ft.
Remove transmission assembly from KM-113-2 (1) with KM-694-A
(2).
Remove transmission from KM-694-A.
Install transmission – see operation "Transmission, Remove
and Install (AF 20)".
Charge transmission fluid.
Inspect
Check and correct level of transmission fluid – see
operation "Transmission Fluid Level, Check and Correct (AF 13-II/AF
17/AF 20/AF 22)".
|
|
|
