
Exhaust Manifold Heat Shield Replacement - Right Side (Engine Exhaust)
- Make
- Vauxhall
- Model
- Astra J
- Section
- Engine Exhaust › Repair Instructions › Exhaust Manifold Heat Shield Replacement - Right Side
‹ Prev Exhaust Manifold Heat Shield Replacement - Left Side - 1.3L Diesel LDV and LSFNext › Exhaust System Description - LDE, LXT, LXV, 2H0, LUW and LFH
EngineExhaust Manifold Heat Shield Replacement - Right Side
Exhaust Manifold Heat Shield Replacement - Right SideRemoval Procedure
|
| 1. | Remove the air cleaner outlet front duct. Refer to Air Cleaner Outlet Front Duct Replacement . |
| 2. | Remove the catalytic converter. Refer to Catalytic Converter Replacement . |
| 3. | Remove the turbocharger oil feed pipe. Refer to Turbocharger Oil Feed Pipe Replacement . |
| 4. | Remove the turbocharger oil return hose. Refer to Turbocharger Oil Return Hose Replacement . |

| 5. | Remove the vacuum hose (3) from the turbocharger wastegate actuator vacuum control solenoid valve (4). |
| 6. | Remove the air charge cooler hose bolts (2) from turbocharger (1). |
| 7. | Remove the vacuum pressure sensor connector from turbocharger wastegate actuator vacuum control solenoid valve (4). |

| 8. | Remove the upper turbocharger nut (1) from the exhaust manifold (2). |
| 9. | Remove the lower turbocharger nuts (3) from the turbocharger (4). |
| 10. | Remove the turbocharger (4). |
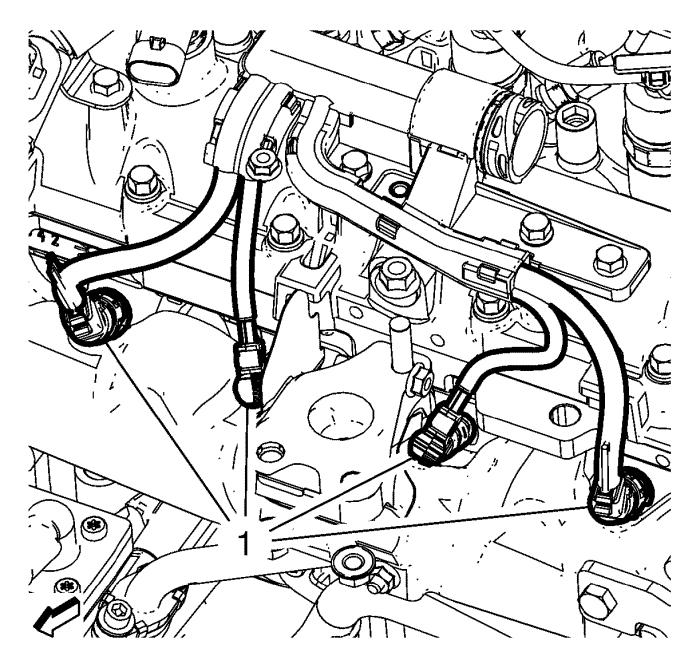
| 11. | Remove the 4 glow plug wiring harness plugs (1). |
| 12. | Remove the exhaust manifold heat shield - left side. Refer to Exhaust Manifold Heat Shield Replacement - Left Side . |
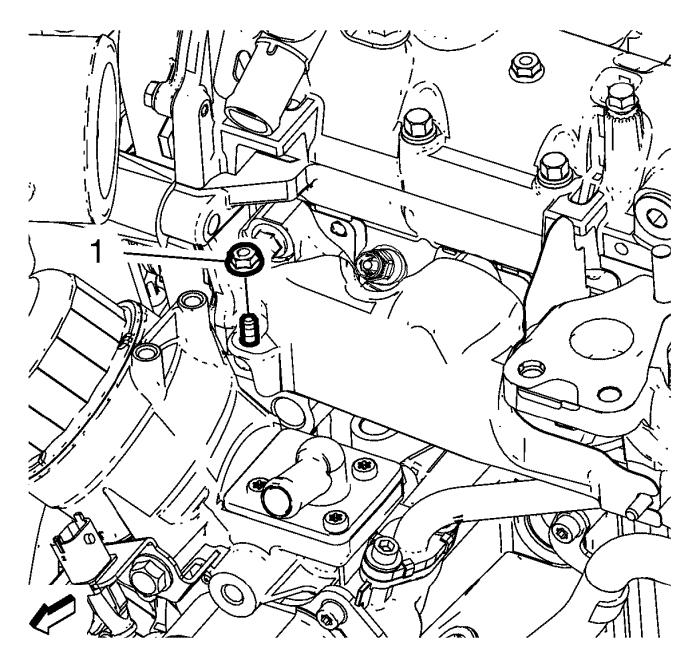
| 13. | Remove the exhaust manifold heat shield nut (1) from the exhaust manifold. |
| 14. | Remove the exhaust manifold heat shield. |
Installation Procedure
| 1. | Install the exhaust manifold heat shield. |
Caution: Refer to Fastener Caution . |
| 2. | Install the exhaust manifold heat shield nut (1) to the exhaust manifold and tighten to 9 N·m (80 lb in) . |
| 3. | Install the exhaust manifold heat shield - left side. Refer to Exhaust Manifold Heat Shield Replacement - Left Side . |
| 4. | Install the 4 glow plug wiring harness plugs (1). |
| 5. | Install the turbocharger. |
| 6. | Install the lower turbocharger nuts (3) to the turbocharger (4) and tighten to 25 N·m (18 lb ft) . |
| 7. | Install the upper turbocharger nut (1) to the exhaust manifold (2) and tighten to 25 N·m (18 lb ft) . |
| 8. | Install the vacuum pressure sensor connector to the turbocharger wastegate actuator vacuum control solenoid valve (4). |
| 9. | Install the air charge cooler hose bolts (2) to the turbocharger (1) and tighten to 10 N·m (89 lb in) . |
| 10. | Install the vacuum hose (3) to the turbocharger wastegate actuator vacuum control solenoid valve (4). |
| 11. | Remove the turbocharger oil return hose. Refer to Turbocharger Oil Return Hose Replacement . |
| 12. | Remove the turbocharger oil feed pipe. Refer to Turbocharger Oil Feed Pipe Replacement . |
| 13. | Remove the catalytic converter. Refer to Catalytic Converter Replacement . |
| 14. | Remove the air cleaner outlet front duct. Refer to Air Cleaner Outlet Front Duct Replacement . |
‹ Prev Exhaust Manifold Heat Shield Replacement - Left Side - 1.3L Diesel LDV and LSFNext › Exhaust System Description - LDE, LXT, LXV, 2H0, LUW and LFH
Parts & tools for this job For Vauxhall Astra
- PARTExhaust gasketSearch: Vauxhall Astra exhaust gasket
- TOOLPenetrating oilSearch: penetrating oil
- TOOLOBD2 scannerSearch: OBD2 scanner
Links open Amazon search results in a new tab. As an Amazon Associate I earn from qualifying purchases.