|
Seal complete transmission (F23)
Note: This operation
requires the transmission to be dismantled. The components must be
inspected for any damage due to inadequate lubrication and replaced
if necessary.
If the gearwheels are damaged the transmission must be replaced,
using an exchange transmission.
Transmission shafts must only be dismantled in order to replace
synchronisation or bearings. The repair kits for synchro systems
are obtainable from "Aftersales".
Important: The use
of pulse screwdrivers or impact screwdrivers to remove bolts from
transmission shafts is not permitted.
 Remove Remove
|
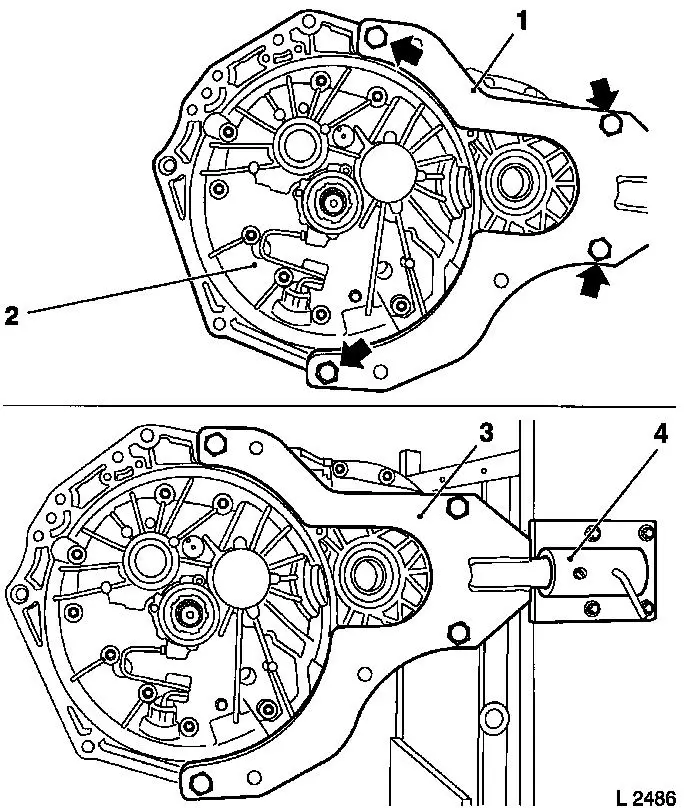
| 2. |
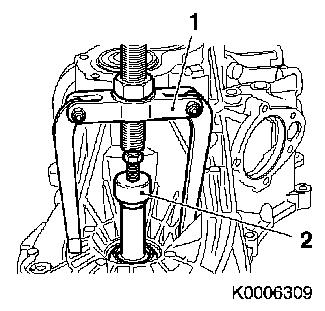
Attach transmission (2) to workbench with KM-113-2 (4) and KM-6115
(1) and (3)
| • |
Attach transmission to KM-6115 with
4x bolt (arrows)
|
| • |
Attach transmission with KM-6115 to
KM-113-2
|
|
|
|
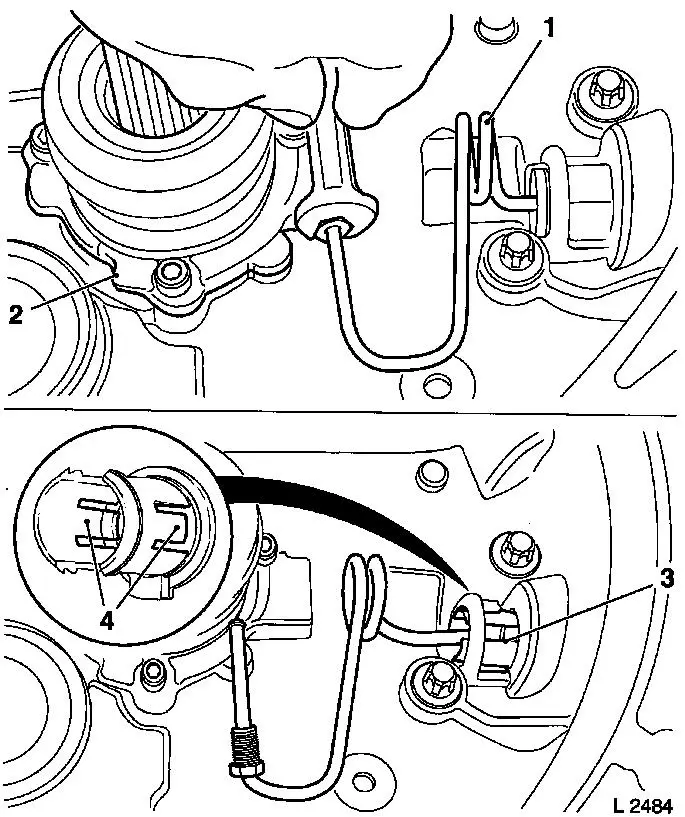
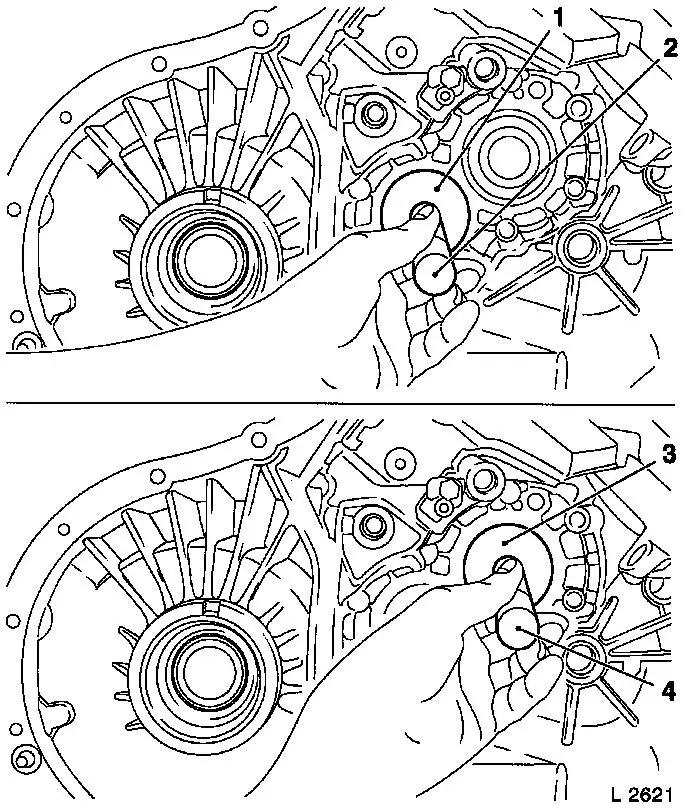
| 3. |
Remove pressure line (1)
| • |
Remove pressure line from central release (2)
|
| • |
Disengage 2x retaining lug (4)
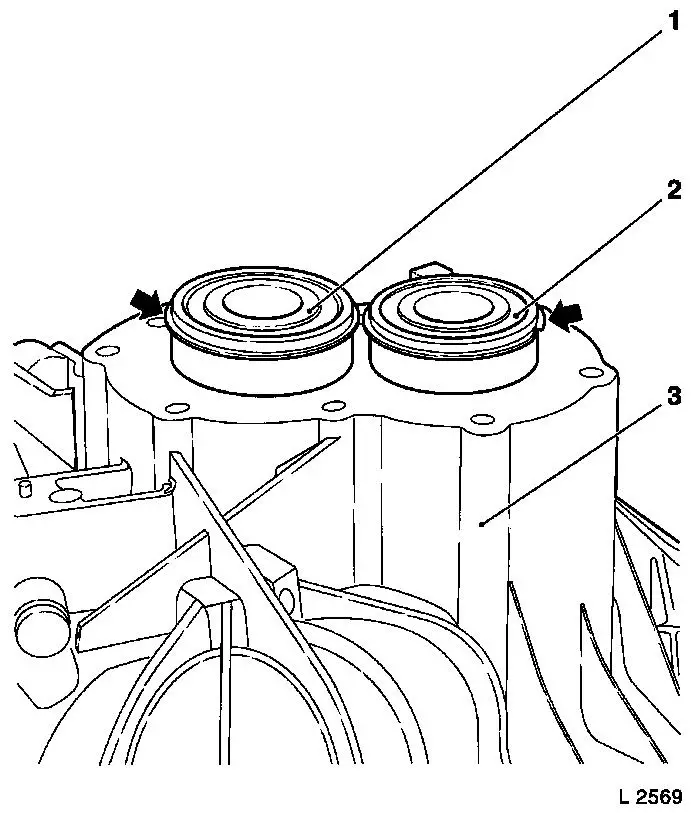
| – |
Carefully lever outwards with screwdriver
|
|
|
| 4. |
Remove pressure line sleeve (3)
| • |
Release and remove from clutch housing
|
|
|

|
| 5. |
Remove central release (1)
|
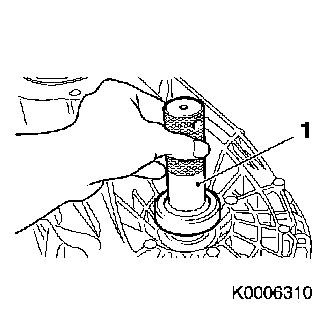
| 6. |
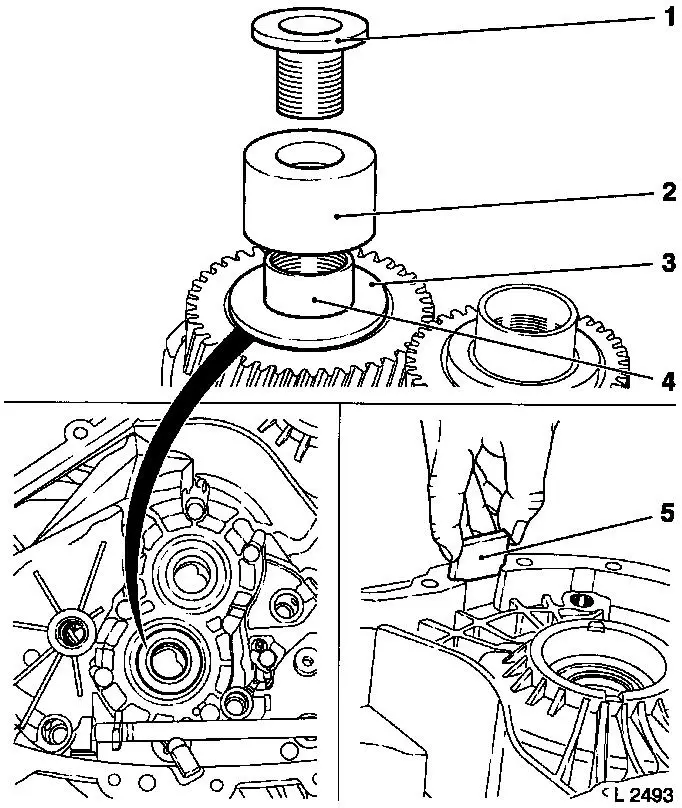
Remove intermediate shaft cover (3)
| • |
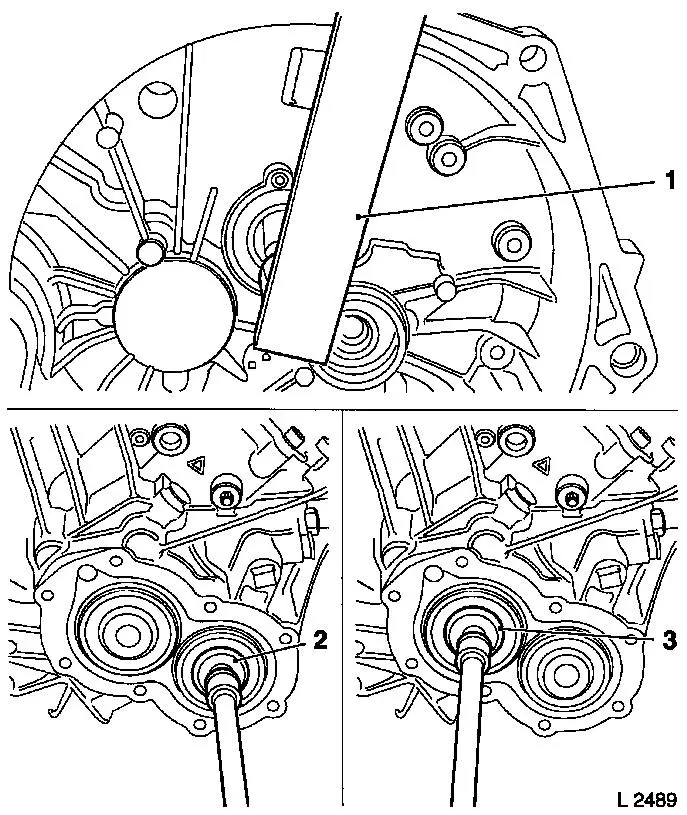
Knock out with KM-328-B (4) and KM-6101 (5)
| – |
Using a suitable drift (2) drive in hole centrally (6)
|
| – |
Screw KM-6101 flush into the
cover
|
|
|
| 7. |
Remove transmission fluid pipe
|
|
|
| 8. |
Engage 3rd or 4th gear
|
| 9. |
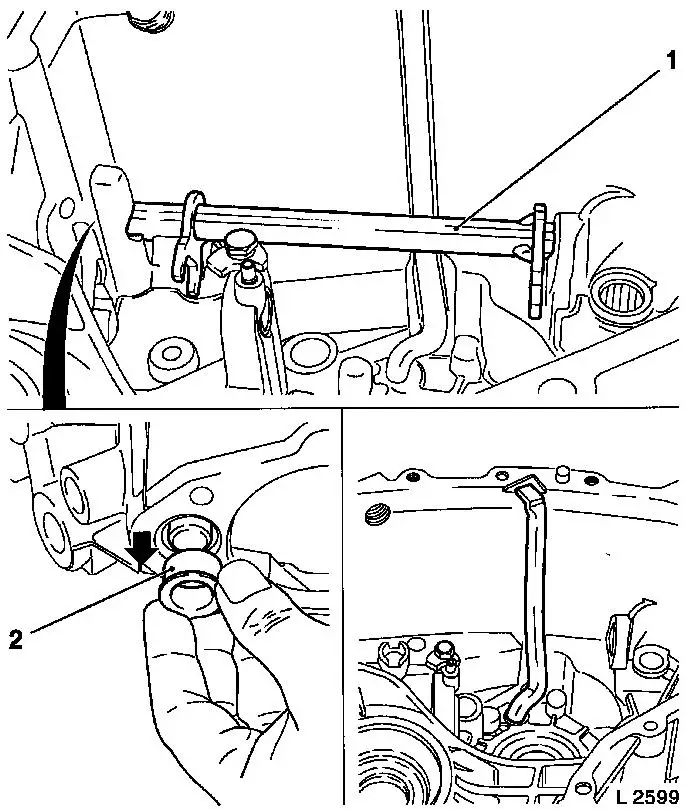
Unscrew intermediate shaft connection (3)
| • |
Lock drive shaft (2) with KM-6117
(1)
|
|
| 10. |
Tilt transmission in KM-113-2 90°
to the left
|
|
|
| 11. |
Remove transmission housing cover (1)
Important: Do not damage sealing
surface
|
| • |
Release and remove transmission housing cover using KM-J-37228 (2)
|
|
| 12. |
Remove transmission fluid collector pipe (3)
|
|
|
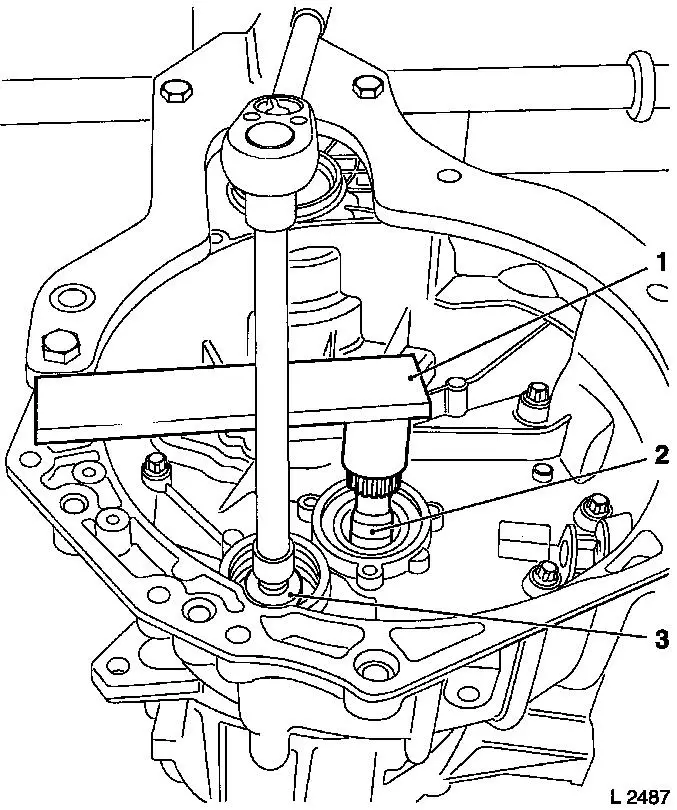
| 13. |
Unscrew main shaft (2) and drive shaft (3) connection
| • |
Lock drive shaft with KM-6117 (1)
|
|
| 14. |
Put transmission into neutral
|
|
|
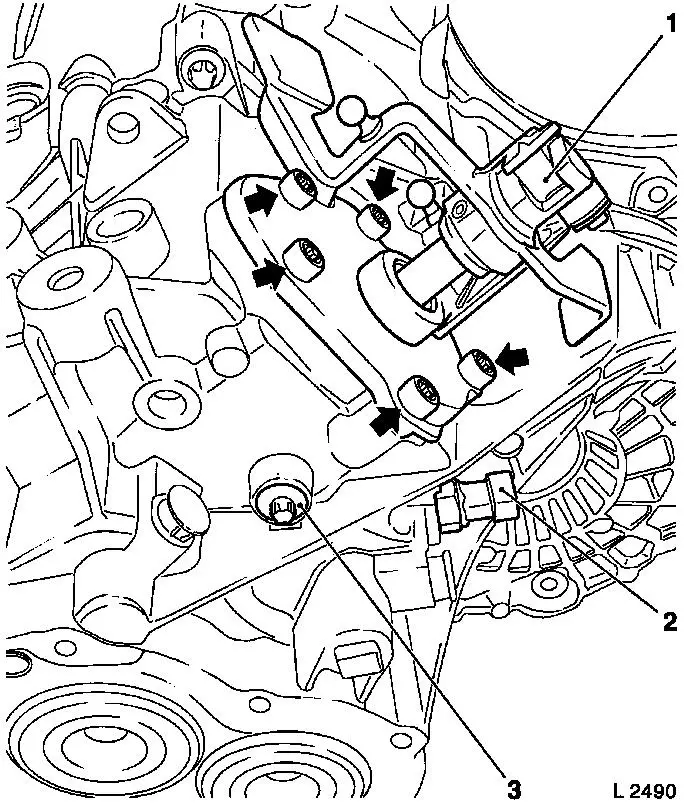
| 15. |
Dismantle gear shift assembly (1)
| • |
Unscrew 5x bolt (arrows)
|
| • |
Remove gear shift assembly
|
|
| 16. |
Remove reversing lamp switch (2)
| • |
Detach reversing lamp switch wiring harness plug
|
| • |
Unscrew reversing lamp switch
|
|
|
|
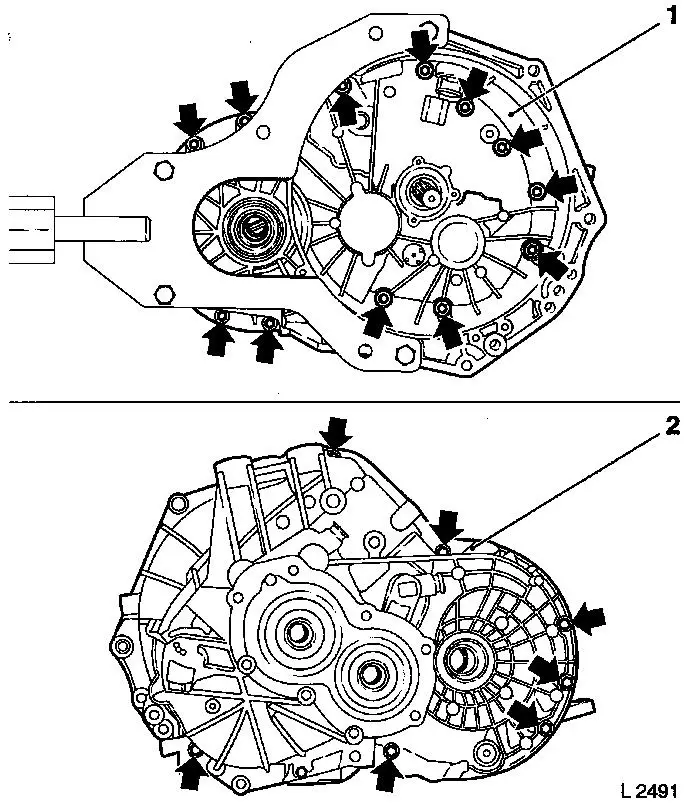
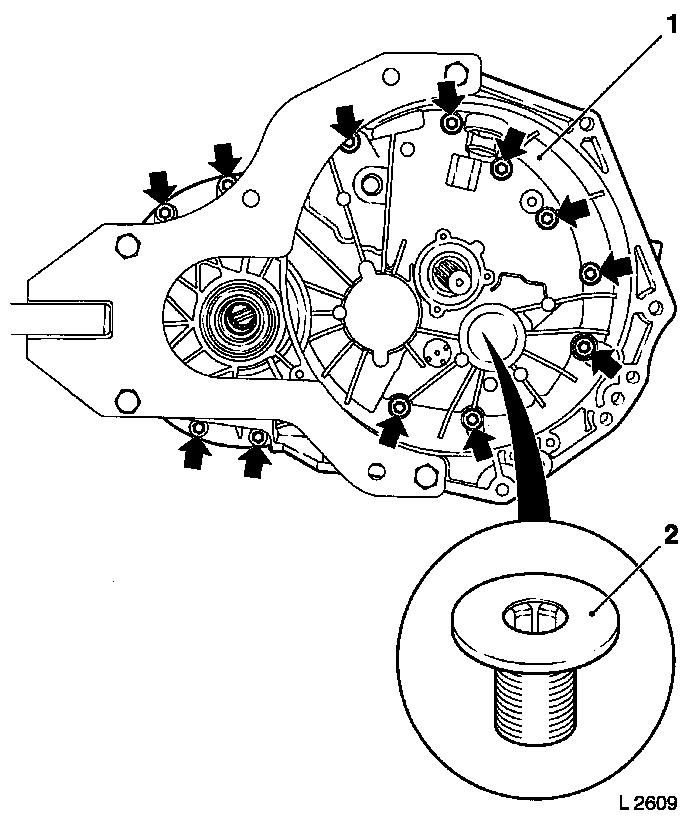
| 17. |
Release transmission housing (2) from clutch housing (1)
| • |
Remove 12x bolt (arrows) from clutch housing (1)
|
| • |
Tilt transmission in KM-113-2 90°
to the left
|
| • |
Remove 7x bolt (arrows) from transmission housing (2)
|
|
|
|
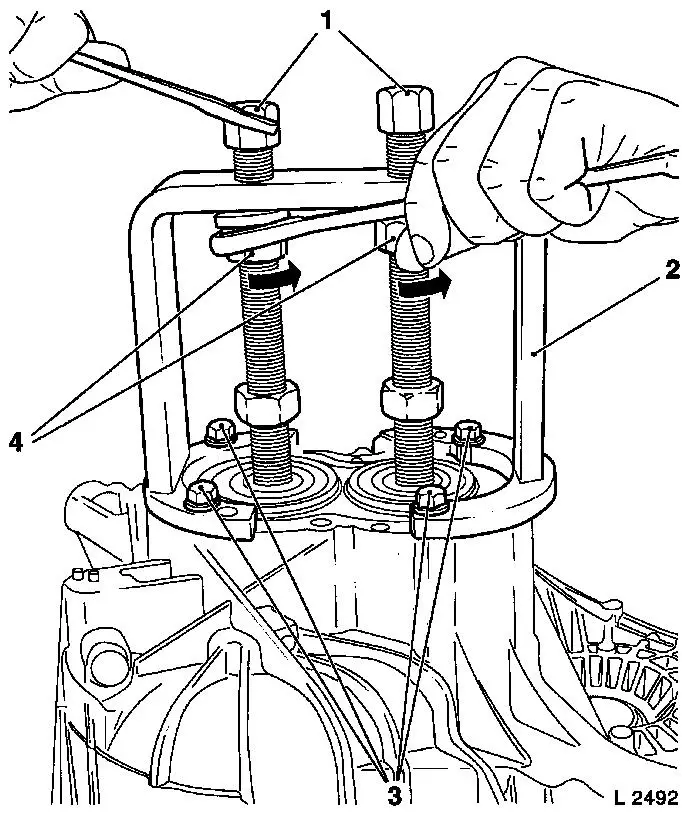
| 18. |
Release transmission housing from clutch housing
| • |
Attach KM-6116 (2)
| – |
with 4x bolt (3) on transmission housing
|
| – |
Screw 2x spindle at least 5 revolutions into main shaft and
drive shaft
|
|
| • |
Pull transmission housing and both bearings from clutch
housing, main shaft and drive shaft using KM-6116
Note: Turn both nuts
(4) evenly to pull transmission housing off. Tighten nuts
alternately by 90° approx., counterholding at hex head (1)
|
| • |
Remove transmission housing
|
|
|
| 19. |
If necessary: assemble 3rd/4th gear synchro body 
|
|
| 20. |
Remove magnet (5) from transmission housing and clean it.
|
| 21. |
Secure 3rd/4th gear synchro body assembly against falling
apart,
Note: making sure that
the drive shaft friction washer (3) is not left behind in the
transmission housing.
| • |
Attach KM-6121 (2) to drive shaft
(4)
|
|
|
|
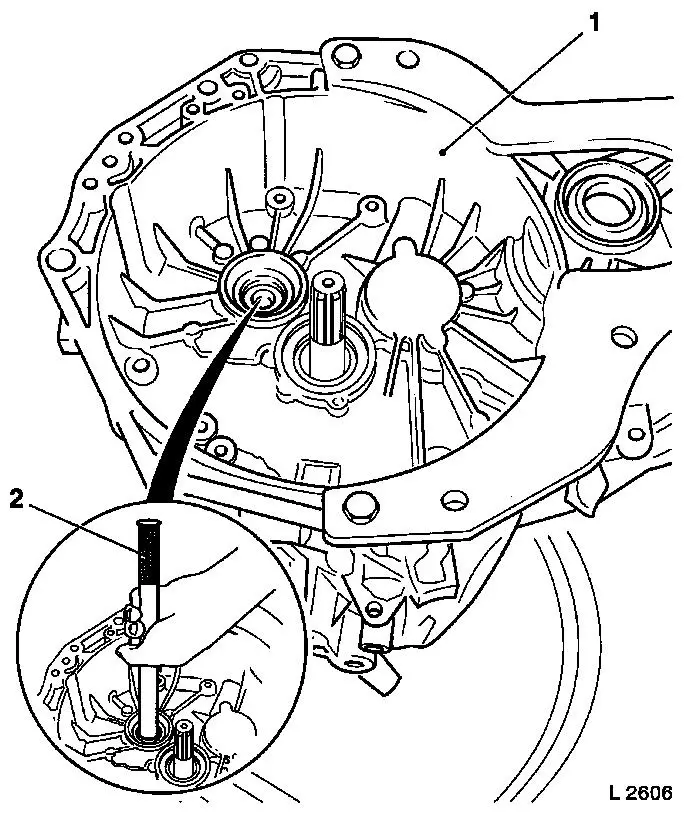
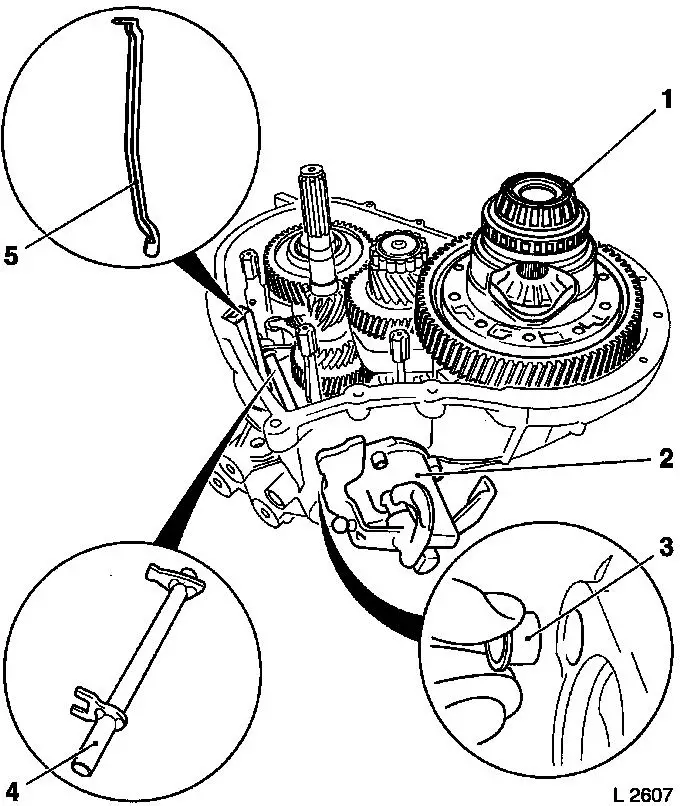
| 22. |
Remove gear shift shaft (1) from transmission housing
| • |
Remove gear shift shaft guide sleeve (2)
| – |
Press out of transmission housing from inside and remove
|
|
| • |
Remove gear shift shaft
|
|
| 23. |
Remove transmission fluid pipe from transmission housing
|
|
|
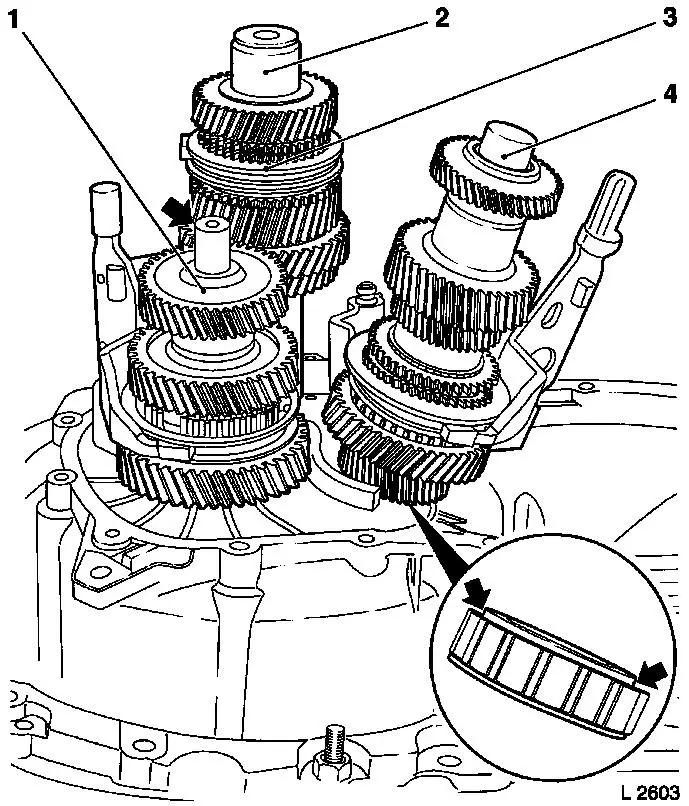
| 24. |
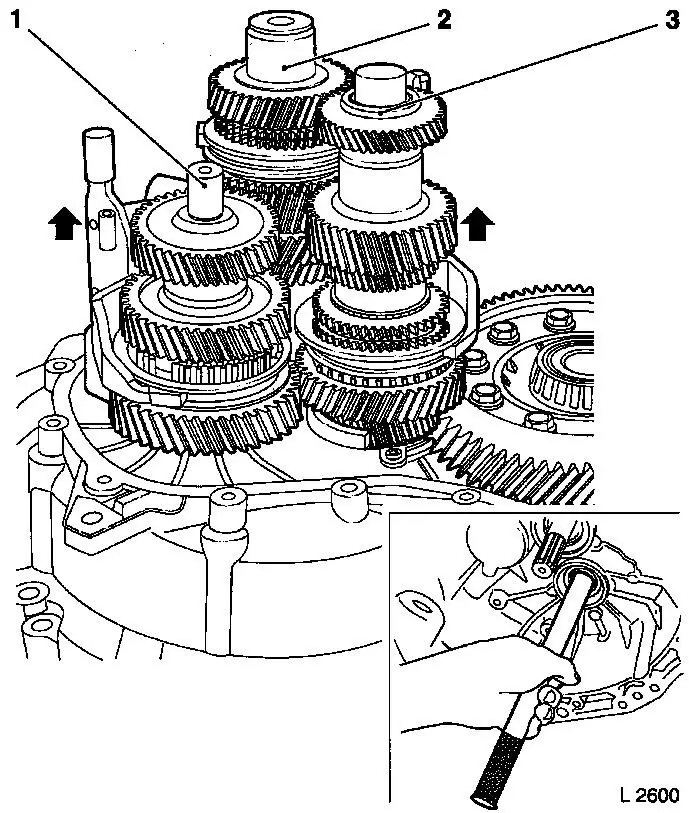
Dismantle main shaft (3), intermediate shaft (1) and drive
shaft (2) with shift forks
Note: A second fitter
is needed to hold the main shaft, intermediate shaft and drive
shaft with shift forks still and remove them.
| • |
Knock intermediate shaft out with KM-6126 and KM-523-1
| – |
out of bearing in clutch housing
|
|
|
|
|
| 25. |
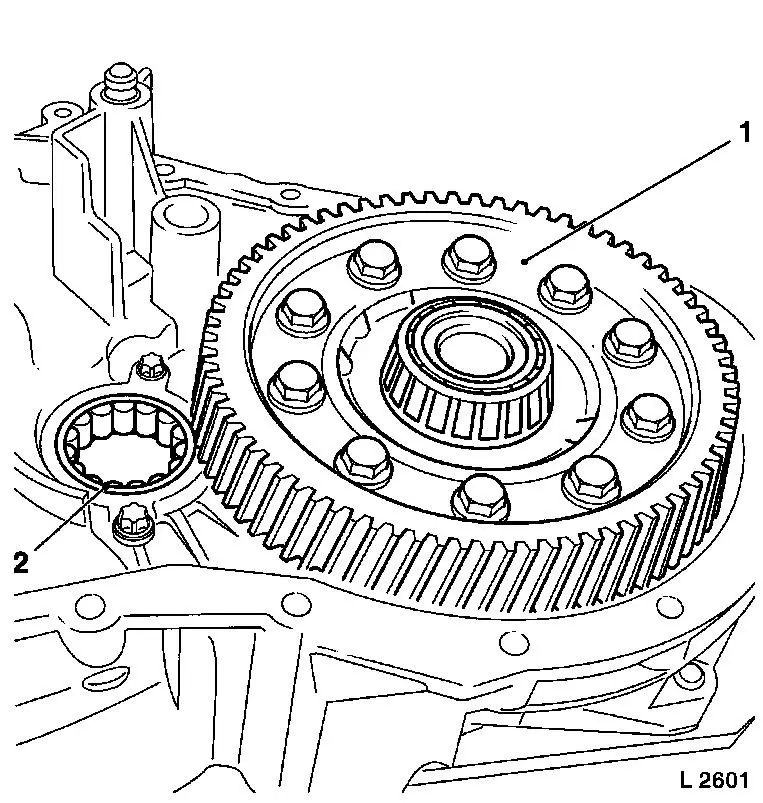
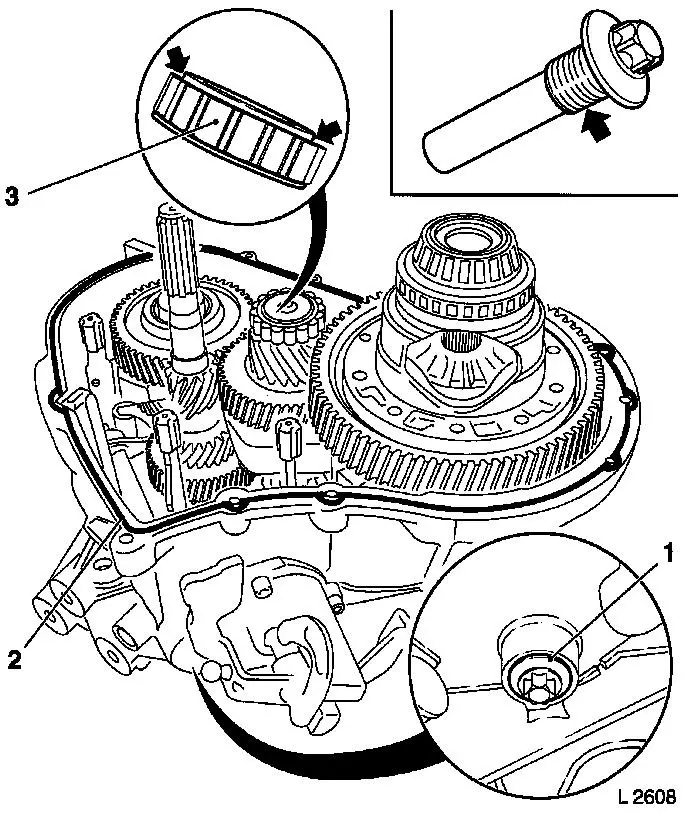
Remove differential gear(1) from clutch housing
|
| 26. |
Remove main shaft roller bearing (2) from clutch housing
|
|
|
| 27. |
Remove main shaft bearing from transmission housing
| • |
Knock out with KM-6122 (1) and KM-523-1 (2)
|
|
| 28. |
Remove drive shaft bearing from transmission housing
| • |
Knock out with KM-6123 (3) and KM-523-1 (4)
|
|
|
| 29. |
Remove 2x axle shaft seal from clutch housing and transmission
housing
| • |
using MKM-557-1 (1) and MKM-557-2 (2)
|
|
|
|
| 30. |
Clean all sealing surfaces and transmission components
|
| 31. |
Inspect sealing surfaces and transmission components for
damage, replace if necessary
Note: If the gearwheels
are damaged the transmission must be replaced, using an exchange
transmission.
|
 Install
| 32. |
Install 2x axle shaft seal in clutch housing and transmission
housing
|
|
|
|
| 33. |
Insert main shaft roller bearing
| • |
Shoulder (arrows) faces the clutch housing
|
|
| 34. |
Insert main shaft (4), intermediate shaft (1) and drive shaft
(3) with shift forks in clutch housing
Note: A second fitter
is needed.
| • |
Drive the intermediate shaft (arrow) into the bearing in the
clutch housing
Important: To prevent damage to
components when driving the intermediate shaft into the bearing,
continuously monitor the installation position with respect to the
seating of the shafts and shift forks in the clutch housing.
|
| – |
Use a plastic hammer
|
|
|
Important: Do not move the shift
sleeve.
|
| 35. |
Remove KM-6121 (2)
|
|
| 36. |
Place the transmission housing on the clutch housing
Note: In this step, do
not assemble the transmission fluid pipe, magnet and gear shift
shaft. Do not apply sealing compound.
| • |
Introduce the main shaft and drive shaft into the bearing
seating in the transmission housing
|
| • |
Introduce the intermediate shaft and shift forks into the
opposite bearing in the transmission housing.
|
| • |
Observe the guide sleeves
|
| • |
Fasten the halves of the housing
| – |
Insert 4x bolts but do not tighten fully
|
|
|
|
Important: Do not remove
retaining rings (arrows) from bearings. Retaining rings cannot be
fitted if bearing is installed. Replace main shaft bearing
|
| 37. |
Place bearings for drive shaft (1) and main shaft (2) on
transmission housing (3)
|
|

|
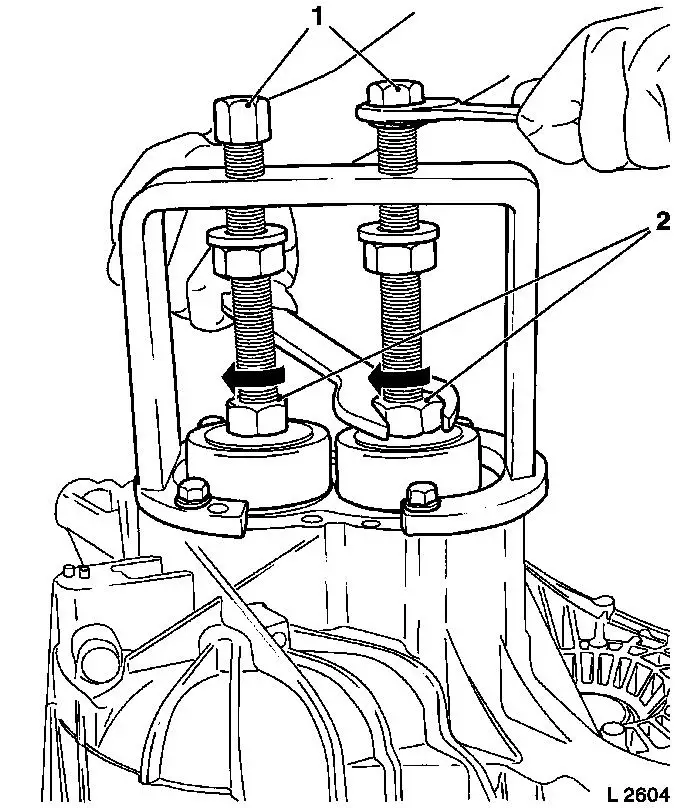
| 38. |
Attach KM-6116 (1) with 2x pressure
pad KM-6116-3 (3)
| • |
Place 2x KM-6116-3 on spindle
|
| • |
Install KM-6116 with 4x bolt (arrow)
on transmission housing (2)
|
| • |
Screw 2x spindle into main shaft and drive shaft
|
|
|
|
| 39. |
Pull bearings of main shaft and drive shaft into transmission
housing and onto both shafts
Note: This step pulls
the bearing and the transmission housing onto the shafts and puts
the transmission housing on the clutch housing.
Important: Do not use any force.
If considerable force is needed when operating KM-6116 , separate the transmission housing from the
clutch housing and check the positions of the shafts and shift
forks, then repeat the step. Make sure that the transmission
housing is correctly positioned above the clutch housing.
|
| • |
Counterhold each of the 2 spindles at the head (1)
|
| • |
Turn 2x nut (2) in direction of arrow
Note: Pull the bearings
evenly onto the main shaft and drive shaft by tightening nuts (2)
of KM-6116 alternately until a pressure
point is reached.
|
| • |
Remove KM-6116 from transmission
|
| • |
If necessary: drive bearings for main shaft and drive shaft
into transmission housing
| – |
until they are against the retainers on the transmission
housing
|
| – |
Use KM-6116-3 and a plastic
hammer
|
|
|
| 40. |
Screw 2 bolts into main shaft and drive shaft
| • |
Do not tighten them
Note: The main purpose
of the two old screws in the main shaft and the drive shaft is to
provide temporary assistance during installation
|
|
|
|
| 41. |
Detach transmission housing with main shaft, intermediate
shaft, drive shaft and shift forks from the clutch housing (1)
| • |
Secure the transmission housing to the clutch housing
|
| • |
Rotate transmission 180° with KM-6115 in KM-113-2
|
| • |
Unscrew 4x bolt
Note: A second fitter
is needed to hold the transmission housing steady.
|
| • |
Drive intermediate shaft out of clutch housing
| – |
using KM-6126 and KM-523-1 (2)
|
|
| • |
Place transmission housing on workbench and support it
| – |
with a suitable piece of wood
|
|
|
|
|
| 42. |
Insert transmission fluid pipe (5)
|
| 43. |
Install gear shift lever (4)
| • |
Ensure that it engages in the shift forks
|
|
| 44. |
Install gear shift shaft guide sleeve (3)
|
| 45. |
Insert magnet in transmission housing
|
| 46. |
Install gear shift assembly (2)
| • |
Apply sealing compound
| – |
to gear shift assembly sealing surface
|
|
| • |
Insert gear shift assembly
| – |
Ensure that it engages in the shift forks
|
|
|
| 47. |
Install differential gear (1) in transmission housing
|
|
|
| 48. |
Install fit bolt (1) of gearshift assembly 25 Nm
| • |
Apply screw locking compound to thread (arrow)
|
| • |
Fit bolt must engage in gear shift assembly
|
|
| 49. |
Attach clutch housing to transmission housing
| • |
Check seating of main shaft roller bearing (3)
| – |
Shoulder (arrows) faces upwards
|
|
| • |
Apply sealing compound to sealing surface of transmission
housing (2)
| – |
Spread sealing compound
|
|
| • |
Remove clutch housing with KM-6115
from KM-113-2
|
| • |
Set clutch housing with KM-6115 on
transmission housing
Note: The main shaft
and drive shaft in their bearings must engage in the clutch
housing. Shift forks must be seated in their bearings in the clutch
housing.
|
|
|
|
| 50. |
Pull the intermediate shaft, in its bearing, into the clutch
housing (1)
|
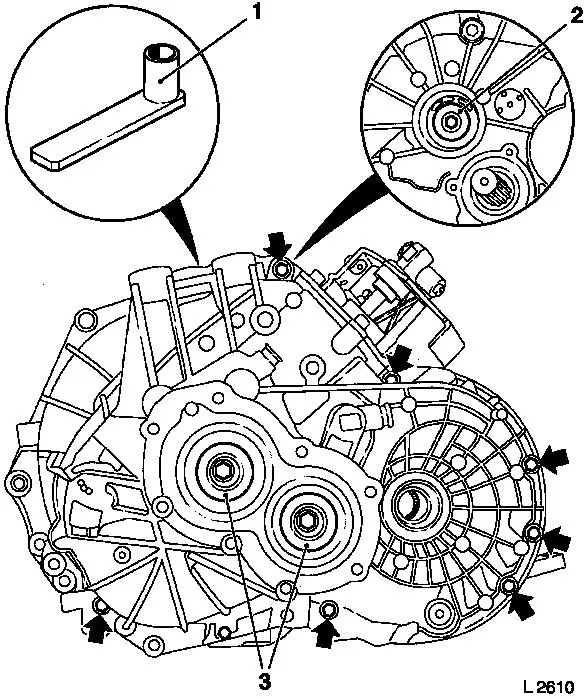
| 51. |
Fit 12x screw (arrows)
| • |
Tighten evenly in crosswise formation 28 Nm
|
|
|
|
| 52. |
Attach transmission with KM-6115 to
KM-113-2
|
| 53. |
Fit 7x screw (arrows)
| • |
Tighten bolts evenly in crosswise formation 28 Nm
|
|
| 54. |
Fit 3 new bolts in main shaft, intermediate shaft and drive
shaft 100 Nm
| • |
Engage gear
| – |
and check gear shifting
|
|
| • |
Lock drive shaft with KM-6117
|
| • |
Unscrew 3 old bolts (2) and (3)
|
| • |
Insert 3x new bolts with locking compound
|
|
|
|
| 55. |
Insert fluid collector pipe
|
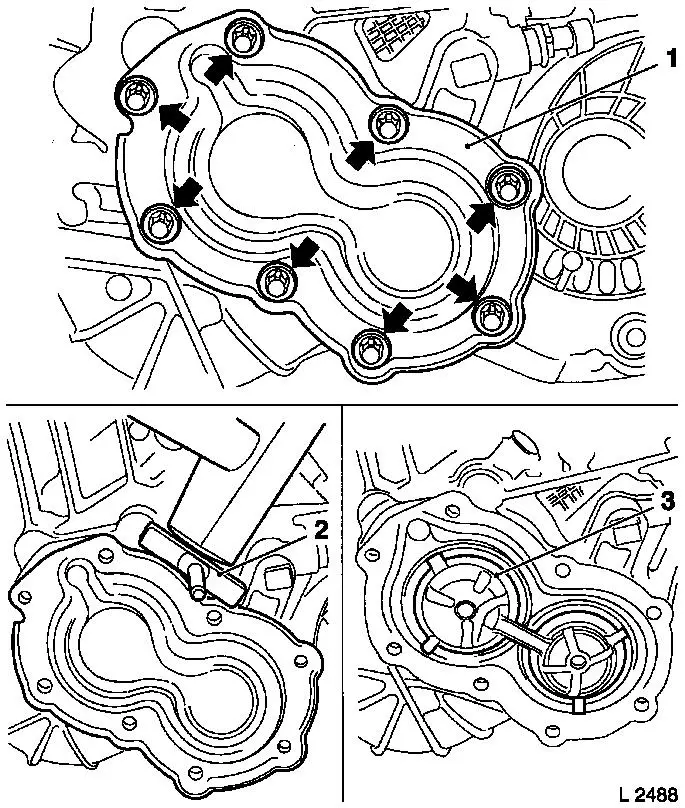
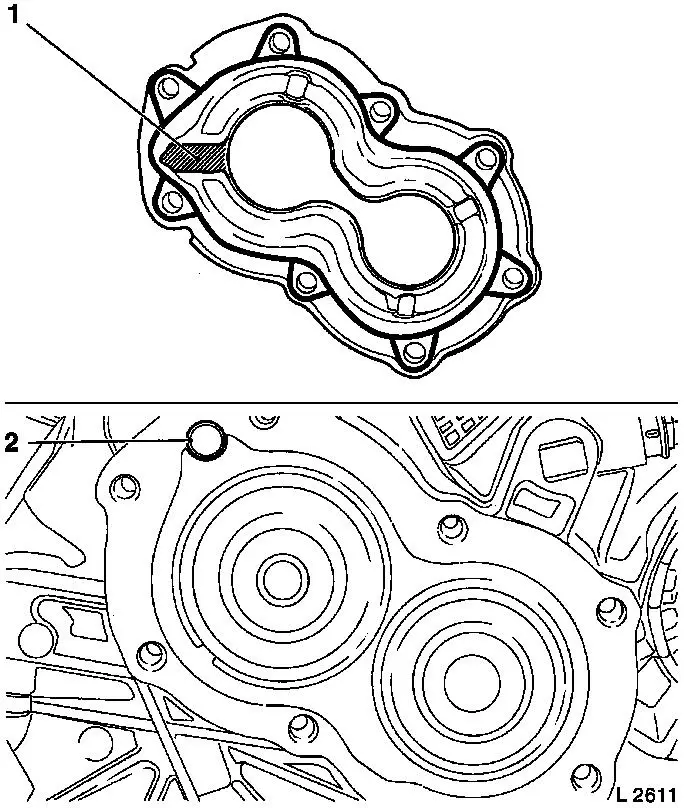
| 56. |
Install transmission housing cover
| • |
Apply a thin coat of sealing compound evenly to sealing
surface
|
Important: Do not apply any
sealing compound in area (1) so as not to block transmission fluid
pipe (2)
|
| • |
Tighten 8x bolt 25 Nm
|
|
|
|
| 57. |
Insert transmission fluid pipe (5) in intermediate shaft
|
| 58. |
Drive intermediate shaft cover (4) in flush into clutch
housing
| • |
using KM-6102 ) and KM-523-1 (3)
|
|
| 59. |
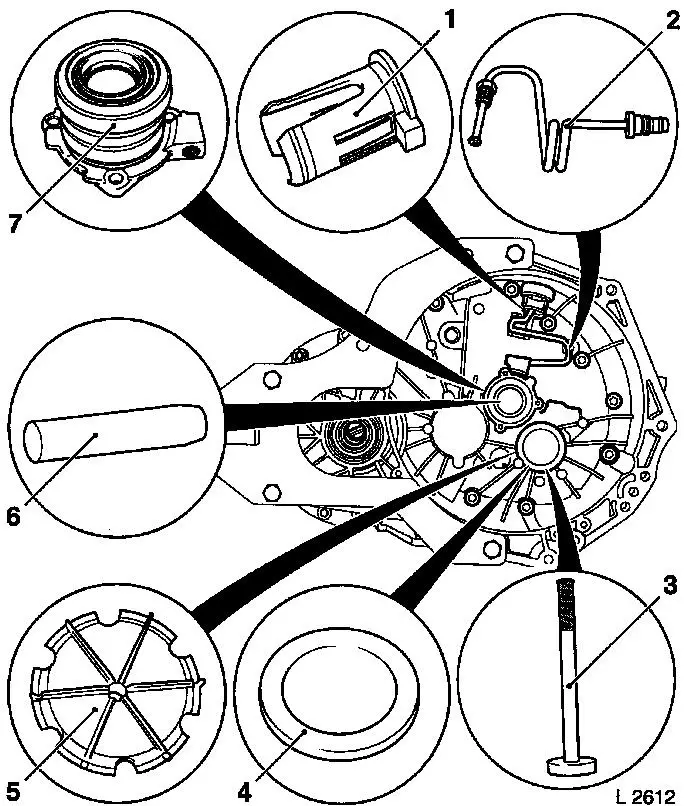
Install new central release (7)
| • |
Slide central release onto drive shaft with KM-6059 (6)
|
|
| 60. |
Install pressure line (2)
| • |
Insert pressure line sleeve (1) into clutch housing
|
| • |
Insert pressure line into pressure line sleeve
| – |
Pressure line must engage in sleeve
|
|
| • |
Attach pressure line to central release
| – |
Tighten union bolt 14 Nm
|
|
|
|
|
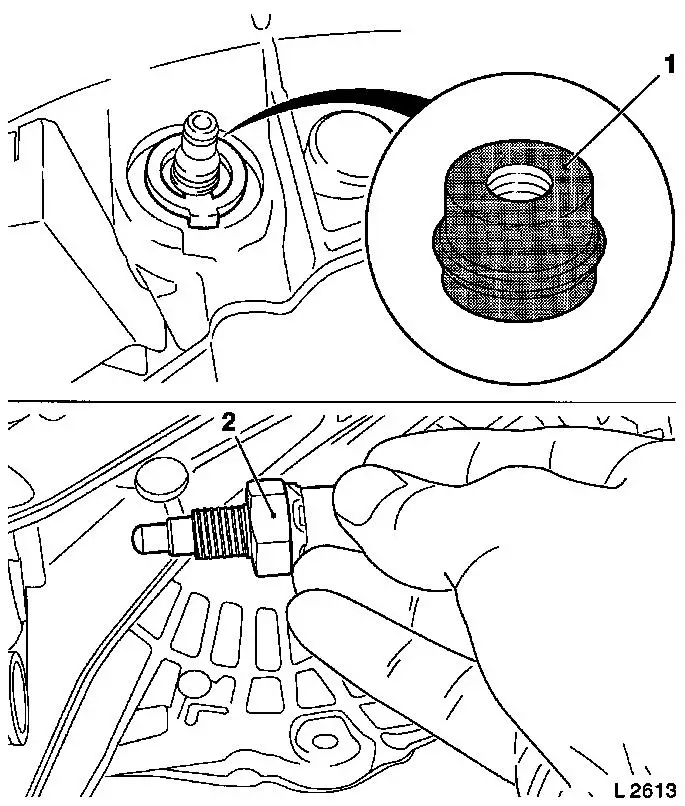
Important: A damaged or faulty
O-ring (1) leads to leaks at the hydraulic clutch actuation
|
| 61. |
Check that the O-ring is not damaged and is correctly
seated
|
| 62. |
Install reversing lamp switch (2) 20
Nm
| • |
Insert with (green) sealing compound
|
|
|

|
| 63. |
Detach transmission (4) from KM-6115
(1) and (3)
| • |
Remove clutch housing with KM-6115
from KM-113-2 (2)
|
|
|
|
