| Installation Materials Name Specification Cable ties Automatic transmission fluid WSS-M2C202-B Installation All Vehicles | | -
General note. - Renew all circlips and self-locking nuts.
| | | -
NOTE:Installation position of the intermediate panel. Move the transmission into position under the vehicle. - Tighten the top and right-hand side flange bolts.
| | | -
Install the transmission. - Tighten the left-hand side flange bolts.
- Lift the engine and transmission assembly on the support bar until the fitting position is reached.
| | | -
Raise the engine and transmission assembly. | | | -
Fit the rear engine mounting studs. | | | -
NOTE:Do not tighten the nuts and bolts. Install the rear engine mounting bracket. | | | -
Remove the engine support bar. - Detach the engine lifting eye.
- Tighten the engine mounting bracket bolt.
| | | -
Fit the engine roll restrictor. | | | -
Fit the exhaust system using a new gasket. | | | -
Fit the starter motor. - Screw in the bolts.
- Fit the starter motor bracket.
| Vehicles with a one-part intermediate shaft | | -
CAUTION:The inner joint must not be bent at more than 18 degrees; the outer joint must not be bent at more than 45 degrees. CAUTION:When installing the intermediate shaft, use the locating sleeve (supplied with each new oil seal) to protect the oil seal. NOTE:Check that the intermediate shaft shows no signs of grooving caused by the oil seal. Install the right-hand front drive halfshaft with the intermediate shaft into the transmission. | Vehicles with a two-part intermediate shaft | | -
CAUTION:The inner joint must not be bent at more than 18 degrees; the outer joint must not be bent at more than 45 degrees. CAUTION:When inserting the front drive halfshafts always use the installation sleeve (supplied with every new oil seal) to protect the oil seal. NOTE:Make sure the circlip snaps securely into place. Install the right-hand front drive halfshaft with the new circlip and the intermediate shaft into the transmission | | | -
CAUTION:The inner joint must not be bent at more than 18 degrees; the outer joint must not be bent at more than 45 degrees. CAUTION:When inserting the front drive halfshafts always use the installation sleeve (supplied with every new oil seal) to protect the oil seal. NOTE:Ensure the circlip engages securely. Install the left-hand front drive halfshaft with the new circlip into the transmission. | | | -
CAUTION:The inner joint must not be bent at more than 18 degrees; the outer joint must not be bent at more than 45 degrees. Secure the front drive halfshaft centre bearing. | | | -
Connect the transmission immobiliser plug. | | | -
Install the lower suspension arm on the spindle carrier on the left-hand and right-hand sides (left-hand side shown). | | | -
Fit the speedometer drive gear on the transmission. | | | -
Guide the gear shift cable into the bracket and clip it in place. | | | -
Carefully position the radiator crossmember with fan and tighten the bolts (four bolts). - Clip the cable in place on the right.
| | | -
Connect the plugs on the radiator. - Clip the wiring to the radiator.
| | | -
CAUTION:Stop the fitting from turning using an open-ended spanner. Connect the oil pipes to the transmission. - Check the O-rings and install new ones if necessary.
| | | -
Install the drive belt cover. | | | -
Attach the cable to the automatic transmission. - Hook the operating cable into the connector and insert it into the automatic transmission.
- Tighten the bracket bolt.
| | | -
Hook the operating cable into the cam plate. - Guide the operating cable through the bracket and insert the grommet.
- Hook in the operating cable nipple.
| | | -
Check the adjustment of the cam plate operating cable and correct it if necessary. | | | -
CAUTION:Always tighten the front engine mounting bracket before the rear engine mounting bracket so that the stud bolts can locate in the elongated holes of the rear engine mounting bracket. Tighten the front engine mounting. | | | -
Tighten the rear engine mounting bracket. | | | -
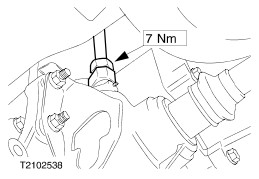
NOTE:Use an Allen key to stop the piston rod from turning. Tighten the suspension strut nuts on the right and left-hand sides. | | | -
NOTE:One flange bolt secures the earth strap. Insert the upper bolts of the flange and tighten them. | | | -
Connect the VSS multiplug and clip it in. | | | -
Connect the multiplug for the coolant temperature gauge and join the main wiring harness multiplug. - Main wiring harness multiplug
- Coolant temperature gauge sensor multiplug
| | | -
Connect the plug. - Ignition coil connector
- ECT multiplug
| | | -
Install the radiator grille. | | | -
Push the hoses onto the EGR valve (if present). | | | -
Fit the accelerator cable and the intake hose. | | | -
Install the ground lead on the battery tray . | | | -
Install the battery box and the battery. - Attach the cable bracket.
- Screw in the bolts.
| | | -
Check the engine and the cooling system for leaks (visual check). For additional information, refer to Section 303-03 Engine Cooling. | | | -
Standard finishing operations. - Reprogram the preset radio stations.
- Carry out a road test to enable the PCM to gather data.
| |