| In-vehicle Repair Special Tool(s) | | Flange Holding Wrench, Universal 205-072 (15-030A) | | | Remover, Crankshaft Rear Seal 303-336 (21-151) | | | Installer/Aligner, Front Cover Seal 303-373 (21-159) | | | Remover, Mainshaft Double Lip Seal 308-151 (16-055) | General Equipment Materials Name Specification SAE 75W-140 High performance rear axle oil
WSL-M2C192-A Removal | | -
Raise and support the vehicle. For additional information, refer to: (100-02 Jacking and Lifting) Jacking (Description and Operation), Lifting (Description and Operation). | | | -
NOTE:Mark the position of the driveshaft flange in relation to the drive pinion flange. Detach the driveshaft from the drive pinion flange and position it to one side. | | | -
Using the special tool, remove the drive pinion flange locknut and washer. | | | -
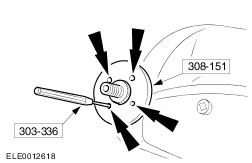
Using the special tools, make pilot holes in the drive pinion seal. - Secure the special tool to the drive pinion seal using four suitable self-tapping screws.
| | | -
Using the special tool and a suitable two leg puller, remove the drive pinion seal. | Installation | | -
NOTE:Install a new drive pinion seal. NOTE:Locate the drive pinion seal leaving a protrusion of 2 mm. Using the special tool and a suitable drift, locate the drive pinion seal. | | | -
Using the special tool and the drive pinion locknut, install the drive pinion seal. - Remove and discard the locknut.
| | | -
NOTE:Install a new drive pinion flange locknut and washer. Using the special tool, install the drive pinion flange. | | | -
CAUTION:Install new bolts NOTE:Align the mark on the driveshaft flange with the mark on the drive pinion flange. Attach the driveshaft to the drive pinion flange. | | | -
Check the rear axle oil level. | | |