skoda Workshop Repair Guides

Skoda Workshop Service and Repair Manuals

Installing > < Removing and installing oil pan
Removing
Removing
–  Put lock carrier in service position → Body Work; Rep. Gr.50.
–  Drain engine oil.
   
–  Unbolt the dead stop -1--arrow-.
  S10-0229
–  Unclip the lower part -1- of the bracket for the starter cable -arrow-.
–  Unscrew oil return line from the exhaust turbocharger on the oil pan.
Vehicles with automatic gearbox
  S17-0129
–  Unscrew screws -arrows- from support -1- of ATF line.
Continued for all vehicles
–  Unplug connector of oil level / temperature sender.
  S17-0117
–  Mark the installed position of the screws -1- and the fixing sleeves -2- below on the left and right on the engine bearings.
–  Unscrew both engine bearings downwards.
  S17-0118
–  Fit supporting device -MP 9-200- as shown.
–  Remove the lug of the lifting device -MP 9-201-.
–  Place bolts -1- back in the central bore hole of the lifting device and secure in place using a split pin.
–  Hang the bolts of the lifting device -MP 9-201- on the spindle of the supporting device -MP 9-200-.
–  Hang the lifting device -MP 9-201- in the lifting eyes at the front and rear on the engine.
  WARNING
Lifting hooks and pegging pins on the supporting device must be secured using insertion locking mechansims - arrow in the diagram.
–  Lift the engine with the spindle of the supporting device upwards as far as possible until the T-piece of the crankcase vent is lying against the bulkhead (ca. 20 mm).
  S17-0074
–  Support the assembly carrier with the works crane -V.A.G 1202 A -.
  S17-0075
–  First screw out the front screws -2- and -3- of the assembly carrier on the left and the right. Then unscrew screws -4-.
  Note
The assembly carrier must only be loosened at the front side or lowered to avoid having to make an axial measurement.
Vehicles fitted with a manual gearbox
  S17-0119
–  Loosen the nut -arrow- for the left hand gearbox bearing plate in such a way that it is flush with the lower edge of the screw (loosen by about four turns).
Vehicles with automatic gearbox
  S17-0120
–  Loosen the rear bolts -2- for the left hand gearbox bearing plate some turns and screw out the front bolt -1- for the left hand gearbox bearing plate.
Continued for all vehicles
  S17-0121
–  Loosen the rear bolts -2- for the right hand gearbox bearing plate some turns and screw out the front bolt -1- for the right hand gearbox bearing plate.
  S17-0122
–  Lower the assembly carrier slowly using the works crane.
–  Move out the works crane and swing the stabiliser downwards.
–  Unbolt oil pan.
  Note
t  Use the socket insert -3185- to loosen or tighten up the inner oil pan screws and use the socket insert -3249- for screwing out and screwing in.
  S17-0075
t  
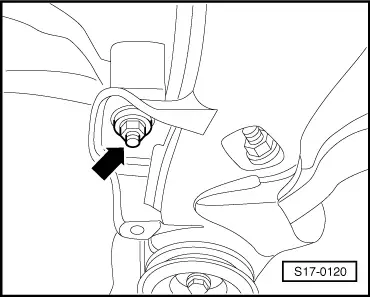
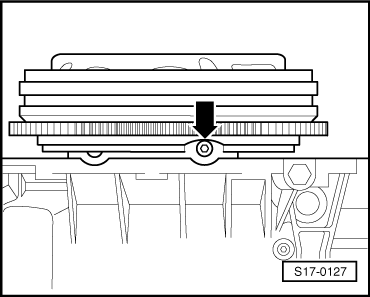
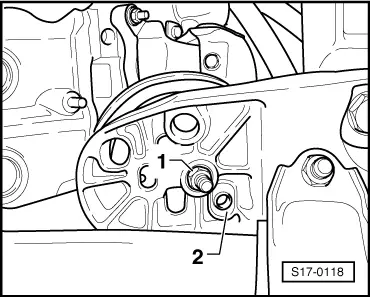
The two rear inner oil pan screws are accessible through the recess -arrow- on the flywheel, turn the flywheel appropriately to allow this.
–  Remove oil pan. If necessary release remove the oil pan by applying slight blows with a rubber-headed hammer.
–  In order to be able to swing the oil pan over the assembly carrier, swing the oil pan at the rear to the left and press the assembly carrier downwards somewhat on the left-hand side.
–  Use a flat scraper to remove sealant residues on the cylinder block.
  S17-0127
–  Remove sealant residues on the oil pan with a rotating brush, e.g. a hand drill with plastic brush attachment (wear protective goggles).
–  Clean the sealing surfaces. They must be free of oil and grease.
  S17-0123

Installing > < Removing and installing oil pan