
Catalytic converter - r + r
- Make
- Alfa Romeo
- Model
- 147 Factory Service Manual
- Year
- 2000–2004
- Section
- Exhaust emission control system › Catalytic converter - r + r
Catalytic converter - r + r
Removing
Position the vehicle on the ramp.
Ensure that the ignition key is in the OFF postition, then disconnect the battery negative terminal.
| Name | Connector | |
|---|---|---|
| Battery | A1B |
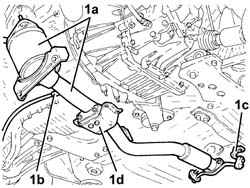
1. Disconnect the electrical connections (1a) and (1b) for the Lambda sensors.
| Name | Connector | |
|---|---|---|
| 1a | Lambda sensor on pre-catalyzer | K15 |
| Name | Connector | |
|---|---|---|
| 1b | Lambda sensor downstream of post-catalyzer | K17 |
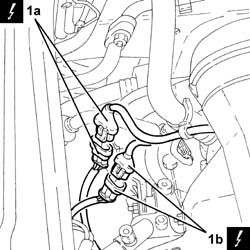
Proceed with the removal - 1072C44 exhaust manifold heat shield on bulkhead - r+r.
1. Undo the nuts fixing the catalytic converter, manifold side.
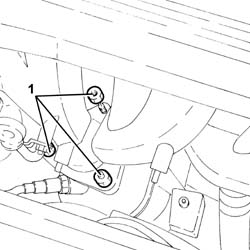
1. Undo the nuts securing the catalytic converter to the engine sump.
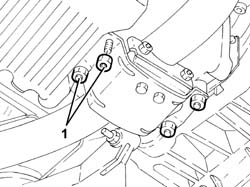
1. Undo the bolts fixing the catalytic converter flexible mounting brackets, bodyshell side.
2. Undo the bolts fixing the catalytic converter, intermediate silencer side.
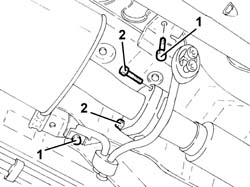
1. Remove the catalytic converter (1a), complete with Lambda sensors (1b), flexible mounting brackets (1c) and support connected to the crankcase sump (1d).
Refitting
Place the complete catalytic converter back in its housing.
1. Tighten the bolts fixing the catalytic converter, intermediate silencer side, to the recommended torque.
| Fastening | Component | Ø | Value (daNm) | |
|---|---|---|---|---|
| 1 | Bolt | CATALYTIC CONVERTER (ONE) | M8 | (Intermediate silencer side) 2.7 ÷ 3.3 |
2. Tighten the bolts fixing the catalytic converter flexible mounting brackets, bodyshell side.
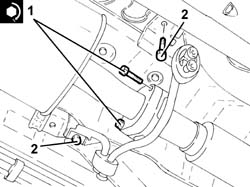
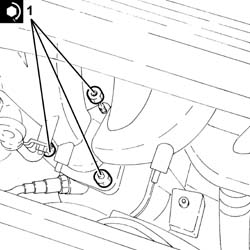
Tighten the nuts fixing the catalyti converter mounting, crankcase sump side.
1. Tighten the nuts fixing the catalytic converter, manifold side.
| Fastening | Component | Ø | Value (daNm) | |
|---|---|---|---|---|
| 1 | Nut | CATALYTIC CONVERTER (ONE) | M10 | (Manifold side) 4.1 ÷ 5.0 |
Proceed with the refitting - 1072C44 exhaust manifold heat shield on bulkhead - r+r.
Connect the Lambda probe electrical connections.
Connect the battery terminal (-).
Remove the car from the ramp.
Removing
Position the vehicle on the ramp.
Ensure that the ignition key is in the OFF postition, then disconnect the battery negative terminal.
| Name | Connector | |
|---|---|---|
| Battery | A1B |
1. Disconnect the electrical connection for the Lambda sensor.
| Name | Connector | |
|---|---|---|
| 1 | Lambda sensor downstream of post-catalyzer | K17 |
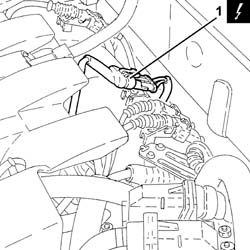
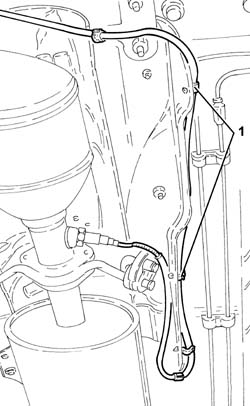
1. Release the electrical wiring for the Lambda sensor from the fastenings.
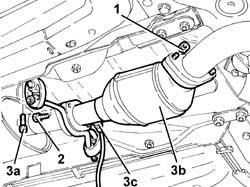
1. Undo the nuts fixing the catalytic converter to the catalytic pre-converter.
2. Tighten the bolts fixing the catalytic converter to the intermediate exhaust silencer.
3. Undo the bolts (3a) fixing the flexible mountings and remove the catalytic converter (3b), complete with Lambda sensor (3c) and gaskets.
Refitting
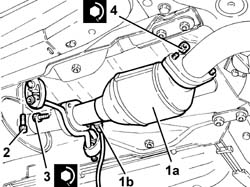
1. Place the catalytic converter (1a), complete with Lambda sensor (1b) and gaskets, back in its housing.
2. Tighten the bolts for the flexible mountings.
3. Tighten the bolts fixing the catalytic converter to the intermediate exhaust silencer to the recommended torque.
| Fastening | Component | Ø | Value (daNm) | |
|---|---|---|---|---|
| 3 | Bolt | CATALYTIC CONVERTER (ONE) | M8 | (Intermediate silencer side), 2.7 ÷ 3.3 |
4. Tighten the nuts fixing the catalytic converter to the catalytic pre-converter to the recommended torque.
| Fastening | Component | Ø | Value (daNm) | |
|---|---|---|---|---|
| 4 | Nut | COOLANT SYSTEM FITTINGS | M6 | 0.7 ÷ 1.1 |
Secure the electrical wiring for the Lambda sensor to the fastenings.
Connect the electrical connection for the Lambda sensor.
Connect the battery terminal (-).
Remove the car from the ramp.
Removing
Position the vehicle on the ramp.
Ensure that the ignition key is in the OFF postition, then disconnect the battery negative terminal.
| Name | Connector | |
|---|---|---|
| Battery | A1B |
1. Disconnect the electrical connection for the Lambda sensor.
| Name | Connector | |
|---|---|---|
| 1 | Lambda sensor downstream of post-catalyzer | K17 |
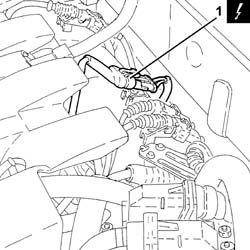
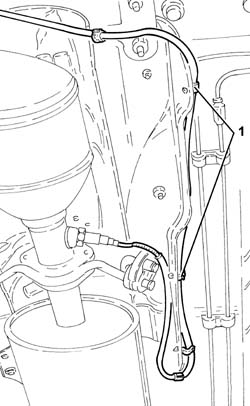
1. Release the electrical wiring for the Lambda sensor from the fastenings.
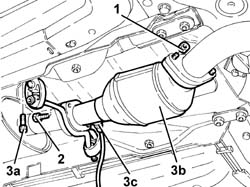
1. Undo the nuts fixing the catalytic converter to the catalytic pre-converter.
2. Tighten the bolts fixing the catalytic converter to the intermediate exhaust silencer.
3. Undo the bolts (3a) fixing the flexible mountings and remove the catalytic converter (3b), complete with Lambda sensor (3c) and gaskets.
Refitting
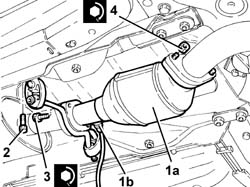
1. Place the catalytic converter (1a), complete with Lambda sensor (1b) and gaskets, back in its housing.
2. Tighten the bolts for the flexible mountings.
3. Tighten the bolts fixing the catalytic converter to the intermediate exhaust silencer to the recommended torque.
| Fastening | Component | Ø | Value (daNm) | |
|---|---|---|---|---|
| 3 | Bolt | CATALYTIC CONVERTER (ONE) | M8 | (Intermediate silencer side), 2.7 ÷ 3.3 |
4. Tighten the nuts fixing the catalytic converter to the catalytic pre-converter to the recommended torque.
| Fastening | Component | Ø | Value (daNm) | |
|---|---|---|---|---|
| 4 | Nut | CATALYTIC CONVERTER (ONE) | M8 | (Catalytic pre-converter side) 2.7 - 3.3 |
Secure the electrical wiring for the Lambda sensor to the fastenings.
Connect the electrical connection for the Lambda sensor.
Connect the battery terminal (-).
Remove the car from the ramp.
Removing
Place the car on a ramp.
Raise the lift.
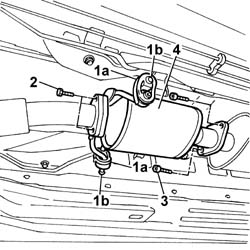
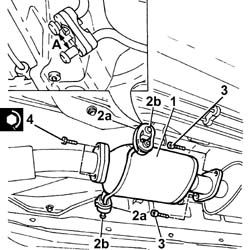
1. Remove rubber blocks (1a) from retaining pins (1b).
2. Undo the bolts securing the catalytic convertor to the front section of the exhaust pipe.
3. Undo the bolts securing the catalytic converter to the intermediate silencer.
4. Remove the catalytic converter.
Refitting
1. Fit the catalytic converter and tighten the retaining bolts with the exhaust pipe front section.
2. Secure the rubber mountings (2a) to the pins on the bodyshell (2b).
3. Tighten the bolts fixing the catalytic converter to the intermediate silencer.
4. Tighten the bolts securing the catalytic converter to the front exhaust pipe section.
| Fastening | Component | Ø | Value (daNm) | |
|---|---|---|---|---|
| 4 | Bolt | EXHAUST PIPE TO ENGINE | M8 | (catalytic converter) 3 |
Check that distance A shown in the figure, on both sides of the supports, between the bracket on the floor and the bracket for the silencer, measured inside them near the rubber mountings, is not less than 25 mm. If the values are lower, fold the silencer mounting bracket, ensuring that the distance is correct (25 - 28 mm).
Remove the vehicle from the ramp.
Removing
Position the vehicle on the ramp.
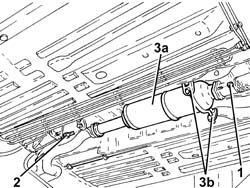
1. Undo the nuts securing the catalytic convertor to the front section of the exhaust pipe.
2. Undo the bolts securing the catalytic converter to the rigid exhaust pipe section.
3. Remove the catalytic converter (3a) after having released it from the flexible mountings (3b).
Remove the gaskets.
Refitting
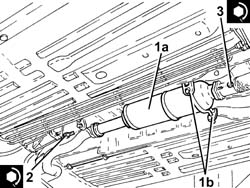
1. Place the catalytic converter (1a) complete with gaskets in its housing and fasten it to the flexible mountings (1b).
2. Tighten the bolts securing the catalytic converter to the exhaust pipe rigid section to the specified torque.
| Fastening | Component | Ø | Value (daNm) | |
|---|---|---|---|---|
| 2 | Bolt | CATALYTIC CONVERTER (ONE) | M8 | (Rigid pipe side) 2.3 ÷ 2.8 |
3. Tighten the nuts fixing the catalytic converter to the front section of the exhaust pipe to the recommended torque.
| Fastening | Component | Ø | Value (daNm) | |
|---|---|---|---|---|
| 3 | Nut | CATALYTIC CONVERTER (ONE) | M8 | (Exhaust pipe front section side) 2.3 ÷ 2.8 |
Remove the car from the ramps.
Parts & tools for this job For 2000 Alfa Romeo 147
- PARTExhaust gasketSearch: Alfa Romeo 147 2000 exhaust gasket
- TOOLPenetrating oilSearch: penetrating oil
- TOOLOBD2 scannerSearch: OBD2 scanner
Links open Amazon search results in a new tab. As an Amazon Associate I earn from qualifying purchases.