
Preliminary Hinge Setup
- Make
- Aston Martin
- Model
- DB9 Factory Workshop Manual
- Year
- Issue 2, 2005
- Section
- Body Closures › Preliminary Hinge Setup
01 Body systemPreliminary Hinge Setup
| Repair Operation Time (ROT) | |
|---|---|
| Item | Code |
| Remove and install | LH 01.03.CB RH 01.03.DB |
Preliminary Hinge Setup
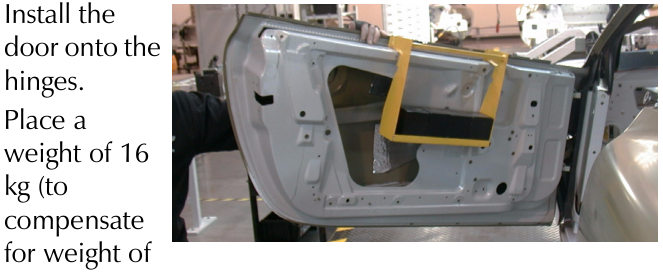
- F2 Install the door onto the hinges.
- Place a weight of 16 kg (to compensate for weight of door windows, locks etc.) hanging from inner door skin as shown.
Weight and position are critical to accurately simulate weight and distribution of door furniture. Adjustment is difficult on a fully installed door.
- If removed, install the front wing (Refer to 'Front Wing', page 1-2-1).
- Gently close the door. Check for an acceptable initial install.
- Align the door. Manoeuvre the door to achieve correct gaps and flush (add / remove shims as required). Tighten the bolts. Do not torque.
- Open the door and torque all hinge bolts. Remove the door weight.
- Hinge to Body - 36 Nm.
F3 Hinge to Door - 47.5 Nm.
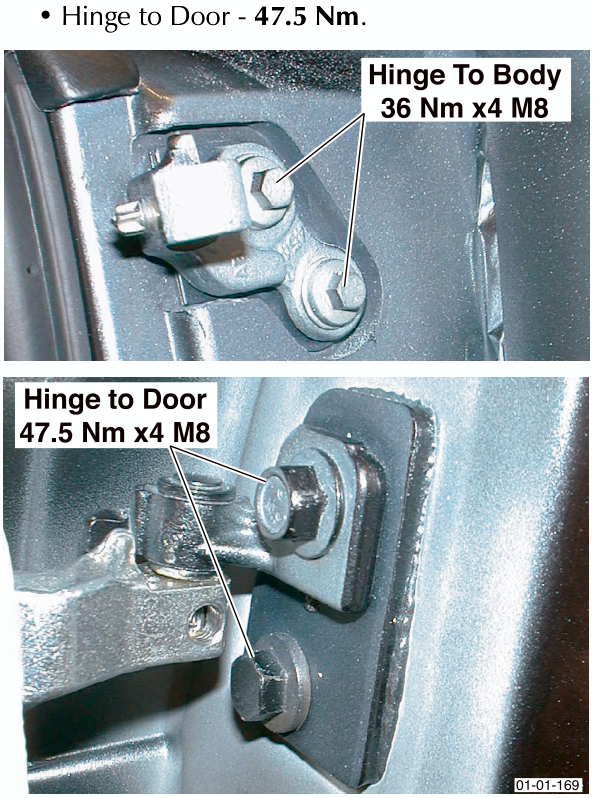
- Release the hinge locking screws and remove the door for installation of window, locks etc.
- Connect the vehicle battery.
⚠ Warning
Never touch the door lock linkage with electrical power available to the door. The window mechanism can move and trap hands, arms, etc. in door frame.
- Check door alignment and closure of the door catch. Adjust striker plate if required.
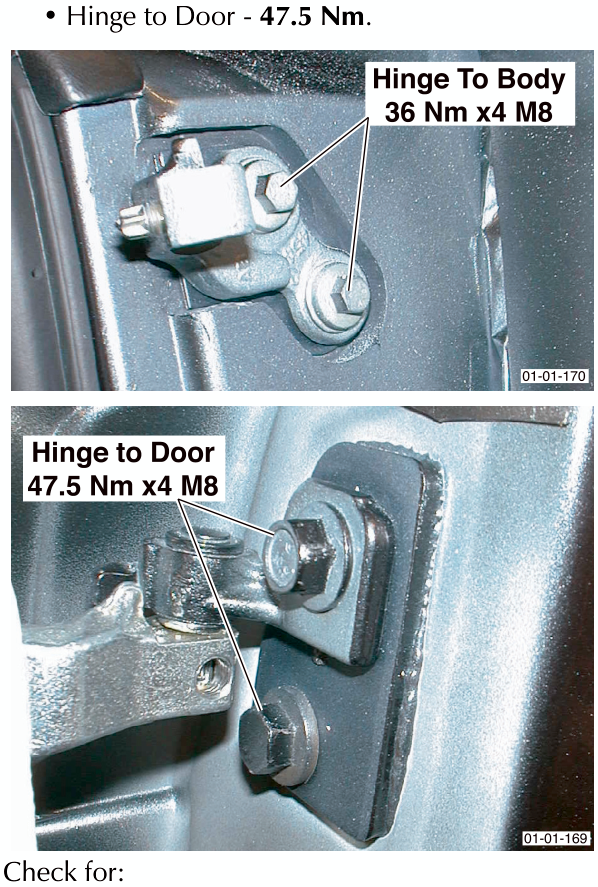
- When satisfied with the door install - torque the hinge bolts.
- Hinge to Body - 36 Nm.
F1• Hinge to Door - 47.5 Nm.
- Check for:
- Correct operation of all door lock functions.
- Correct operation and sealing of the door window.
Parts & tools for this job For 2005 Aston Martin DB9
- TOOLTrim removal tool kitSearch: trim removal tool kit
- PARTTouch-up paintSearch: Aston Martin touch up paint
- PARTPanel clip assortmentSearch: Aston Martin panel clips assortment
Links open Amazon search results in a new tab. As an Amazon Associate I earn from qualifying purchases.