
3. Rear Caliper brake pipes.
- Make
- Aston Martin
- Model
- DB9 Factory Workshop Manual
- Year
- Issue 2, 2005
- Section
- Front Disc Brake › 3. Rear Caliper brake pipes.
2.2 Install the brake pipe alignment tool. Check that the brake pipe orientation is correct:
- The flex hose alignment line is straight
- The brake pipe faces forward and locates correctly in the alignment tool
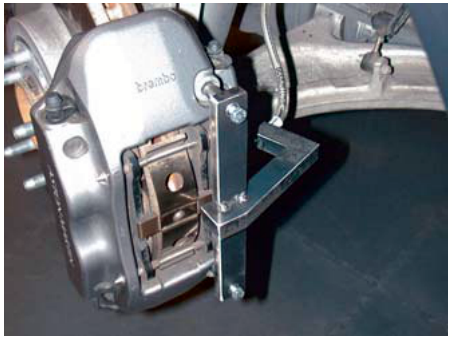
2.3 If the alignment is not correct, carefully back off the pipe union at the brake calliper until the pipe can be rotated backwards to allow forward movement when being re-torqued. Re torque the brake pipe union to 22 Nm then re check alignment as detailed above.
3. Rear Caliper brake pipes.
- Insert the brake pipe union to the caliper. Torque to 22 Nm.
- Check that the brake pipe orientation is correct.
- Flex hose alignment line is straight
- If the alignment is not correct, carefully back off the pipe union at the brake calliper until the pipe can be rotated backwards to allow forward movement when being re-torqued. Re torque the brake pipe union to 22 Nm then re check alignment as listed above.
- Install the brake pads and brake pad wear sensor. Note LH and RH shims from removal.
When installing new brake pads, install a new brake pad wear sensor.
- Bleed the brakes (Refer to ‘Brake Bleed - Manual’, page 6-4-4).
- Install the road wheels (Refer to ‘Road Wheel Nut Torque Tightening’, page 4-5-7).
- ‘Bed-In’ the brakes (Refer to ‘Brake Pad ‘Bedding-in’’, page 6-1-6).
Brake Discs (Front and rear)
| Repair Operation Time (ROT) | |
|---|---|
| Item | Code |
| Brake Disc Renew | (Front) 06.03.CB (Rear) 06.04.CB |
Removal
Place a cloth around the brake reservoir filler neck to absorb any possible brake fluid spillage.
- Raise the vehicle and make safe.
- For each affected wheel station remove the road wheel(s).
Retract the caliper pistons (allowing easier removal of caliper). Retracting the caliper pistons may cause the brake fluid reservoir to overflow.
3. Rear Road Wheels Only.
Remove the parking brake caliper (Refer to ‘Brake Caliper’, page 6-3-2).
- Remove bolts (x2) and withdraw the caliper.
Support the caliper to prevent excessive strain on flexible hose. - Remove retaining screws. Withdraw the brake disc.
Parts & tools for this job For 2005 Aston Martin DB9
- PARTFront brake padsSearch: Aston Martin DB9 2005 front brake pads
- TOOLCaliper piston rewind toolSearch: brake caliper piston rewind tool
- FLUIDBrake fluidSearch: brake fluid
Links open Amazon search results in a new tab. As an Amazon Associate I earn from qualifying purchases.