
4. Rear Road Wheels Only.
- Make
- Aston Martin
- Model
- DB9 Factory Workshop Manual
- Year
- Issue 2, 2005
- Section
- Front Disc Brake › 4. Rear Road Wheels Only.
- Install the brake disc to the road wheel hub. Ensure that the surfaces of the disc and hub are clean and free from debris.
Torque screws (x2) to 10.5 Nm.
- Check brake disc ‘runout’ (Refer to ‘Specifications’, page 6-1-2).
- Install the caliper. Torque bolts (x2) to 20 Nm. + 66°-70° Nm.
4. Rear Road Wheels Only.
- Install the handbrake caliper. Torque bolts (x2) to 15 Nm. + 90°-94°.
- Install the road wheels (Refer to ‘Road Wheel Nut Torque Tightening’, page 4-5-7).
⚠ Warning
Before moving off, pump the foot brake pedal 2 or 3 times to ensure the foot brake works correctly. Brake caliper pistons may require travel to contact the brake pads and disc.
- ‘Bed-in’ the brake pads (Refer to ‘Brake Pad ‘Bedding-in’’, page 6-1-6).
⚠ Warning
Always use a vacuum brush or aqueous brake cleaner to remove the brake lining dust. Never use an air line.
- Clean the caliper area using approved brake cleaning equipment.
Installation
- Install the brake pads. Note LH and RH shims from removal. Install the pad locating pins.
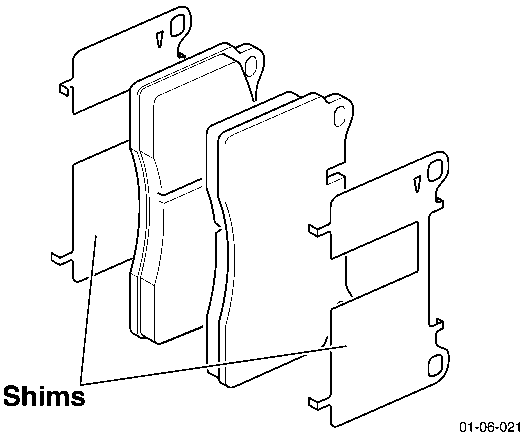
Brake Pads (Front and rear)
| Repair Operation Time (ROT) | |
|---|---|
| Item | Code |
| Brake Pads Renew | (Front) 06.03.DB (Rear) 06.04.DB |
Removal
Front calipers shown.
Place a cloth around the brake reservoir filler neck to absorb any possible brake fluid spillage.
- Raise the vehicle and make safe.
- For each affected wheel station remove the road wheel(s).
Retract the caliper pistons (allowing easier removal of caliper). Retracting the caliper pistons may cause the brake fluid reservoir to overflow.
- Disconnect the brake pad wear sensor.
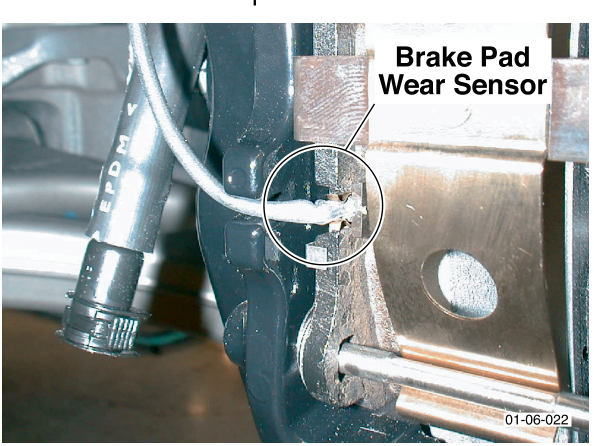
- Remove the brake pads. Note LH and RH shims for installation.
When installing new brake pads, install a new brake pad wear sensor.
- Connect the brake pad wear sensor to the brake pads.
- Install the road wheels (Refer to ‘Road Wheel Nut Torque Tightening’, page 4-5-7).
⚠ Warning
Before moving off, pump the foot brake pedal 2 or 3 times to ensure the foot brake works correctly. Brake caliper pistons may require travel to contact the brake pads and disc.
- ‘Bed-in’ the brake pads (Refer to ‘Brake Pad ‘Bedding-in’’, page 6-1-6).
Parts & tools for this job For 2005 Aston Martin DB9
- PARTFront brake padsSearch: Aston Martin DB9 2005 front brake pads
- TOOLCaliper piston rewind toolSearch: brake caliper piston rewind tool
- FLUIDBrake fluidSearch: brake fluid
Links open Amazon search results in a new tab. As an Amazon Associate I earn from qualifying purchases.