
Install
- Make
- Aston Martin
- Model
- V8 Vantage Factory Workshop Manual
- Year
- 2005–2010
- Section
- Valve Train › Install
03 EngineInstall · page 1 of 2
- Release and remove the two camshaft sprockets complete with the timing chain and tensioner from the camshafts (refer to Figure 3).
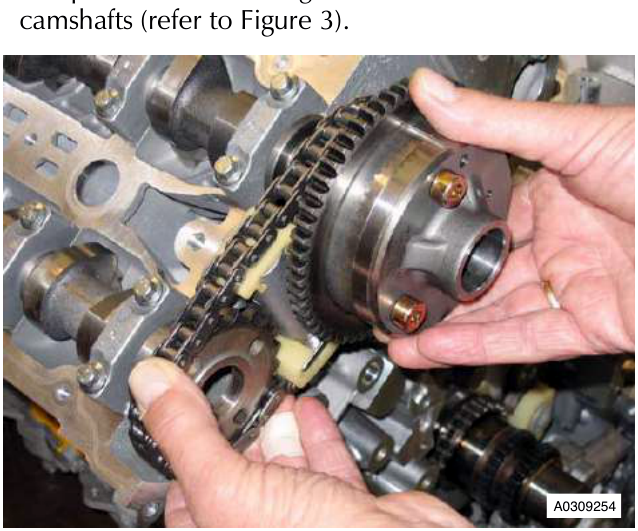
Figure 3
- Remove the intake sprocket housing assembly from the secondary timing chain (refer to Figure 4).
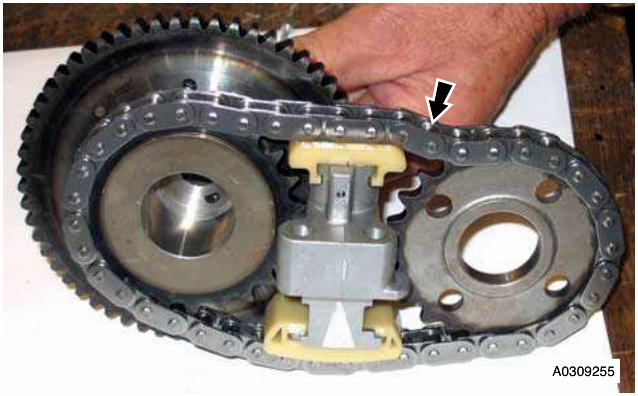
Figure 4
Install
- Clean the two camshaft sprockets and the tensioner.
- Install intake sprocket housing assembly and exhaust sprocket into secondary timing chain.
- Install secondary timing chain tensioner onto timing chain.
- Install secondary timing chain assembly onto camshafts.
- Install the spacer onto the M12 exhaust Torx bolt.
- Install the exhaust M12 Torx bolt to attach the exhaust camshaft sprocket. Do not tighten at this step.
- Install the inlet M12 Torx bolt to attach the inlet camshaft sprocket. Do not tighten at this step.
- Install and torque tighten secondary tensioner bolts (x2).
- Install RH primary timing chain guide, install and torque tighten bolt.
- Make sure that the timing chain slack is on the tensioner side of the timing chain.
- Install primary timing chain.
- Install primary timing chain tensioner blade, install and torque tighten bolt.
- Install primary timing chain tensioner assembly, install and torque tighten bolts (x2).
- Release tension on the timing chain tensioner piston, remove retaining special tool.
- Install timing chain tensioning tool (303-532) into exhaust camshaft sprocket.
Caution
Apply an opposite force to the sprockets and chain while you tighten the sprocket bolts
- Apply a force to the tool (303-532) in an anti-clockwise direction and torque tighten sprocket Torx bolts. Remove special tool.
- Install RH/LH primary timing chain (refer to Workshop Manual procedure 03.09.AN/03.09.AM/03.09.CN/ 03.09.CM Chain - Timing Primary - RH/LH - Renew).
Left Side Primary Chain - Remove and Install
| Repair Operation Time (ROT) | |
|---|---|
| Item | Code |
| Left Side Primary Chain - Remove and Install 03.09.CM |
Remove
- Remove the right side primary timing chain. (refer to procedure 03.09.CN - Right Side Primary Timing Chain)
- Remove the two bolts that attach the left side bush carrier for the Variable Camshaft Timing (VCT) to the engine.
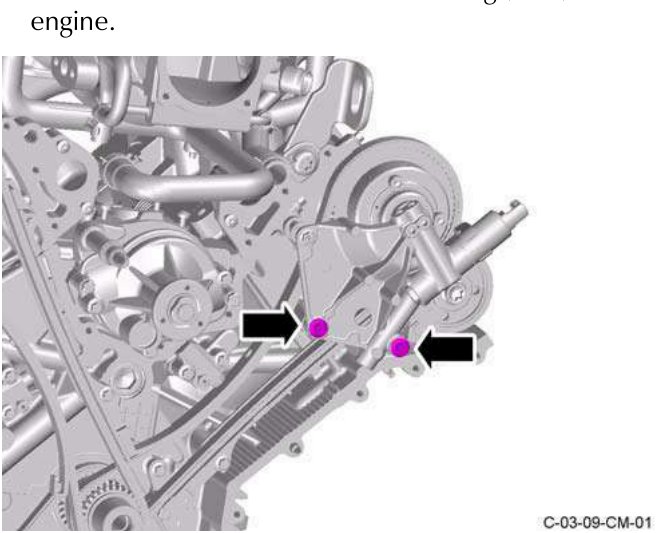
Figure 1
Parts & tools for this job For 2005 Aston Martin V8 Vantage
- PARTEngine gasket setSearch: Aston Martin V8 Vantage 2005 engine gasket set
- TOOLTorque wrenchSearch: 3/8 inch torque wrench
- TOOLFeeler gauge setSearch: feeler gauge set
Links open Amazon search results in a new tab. As an Amazon Associate I earn from qualifying purchases.