audi Workshop Repair Guides

Audi Workshop Service and Repair Manuals

Front brakes (PR 1LT) > < Electronic parking brake (EPB) - overview
Renewing front brake caliper (PR 1LA/1LJ)
Use new bolts → ETKA.
Removing
Special tools and workshop equipment required
t  Torque wrench -V.A.G 1332-
t  Ratchet -V.A.G. 1332/1-
t  Torque wrench -V.A.G 1331-
t  Ratchet -V.A.G. 1331/1-
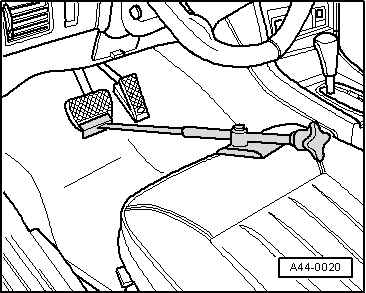
t  Brake pedal actuator -V.A.G 1869/2-
t  Piston resetting appliance -T10145-
   
–  Insert brake pedal actuator -V.A.G 1869/2- between brake pedal and driver's seat (depress brake pedal at least 60 mm). This closes the valves in the brake master cylinder and stops the brake fluid reservoir from running empty.
–  Raise the vehicle.
–  Remove wheels.
–  Connect hose of bleeder bottle to bleeder screw of front brake caliper.
–  Open bleeder screw on front brake caliper to release pressure from brake system.
–  Close bleeder screw.
  Note
Do not remove brake pedal actuator -V.A.G 1869/2-.
–  Disconnect brake pressure line from caliper.
–  Remove brake pads → Chapter.
  Note
Mark brake pads when removing them if they are to be reinstalled. Reinstall in their original position to prevent uneven braking.
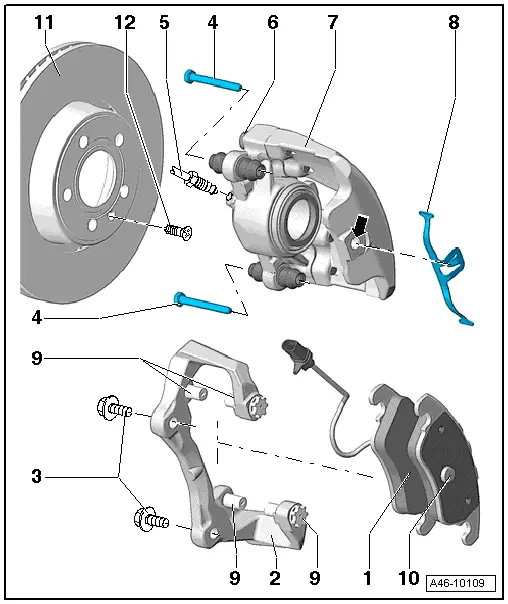
–  Remove brake caliper -7- from vehicle.
  A44-0020

  Caution
Do NOT slacken bolts -6 and 9-
–  Remove bolts -3- on brake carrier, holding brake carrier firmly.
–  Detach brake carrier.
Installing
Use new bolts → ETKA.
–  Fit brake carrier.
–  Secure brake carrier with new bolts -3-.
   

–  Install brake pads → Chapter.
  Note
After each brake pad change firmly depress brake pedal several times with vehicle stationary, so that the brake pads are properly seated in their normal operating position.
–  Connect brake pressure line -5- to caliper and tighten connection.
   

–  Remove brake pedal actuator -V.A.G 1869/2-.
–  Bleed brake system → Chapter.
–  Fit wheels.
Tightening torque for wheel bolts → Rep. gr.44
   

Front brakes (PR 1LT) > < Electronic parking brake (EPB) - overview