
Fuel supply circuit
- Make
- Fiat
- Model
- Ducato Factory Service Manual
- Year
- 2002–2006
- Section
- General › Fuel supply circuit
FUEL SUPPLY CIRCUIT
INTRODUCTION
In operational terms, the fuel supply circuit is divided into a low pressure circuit and a high pressure circuit.
The low pressure circuit consists of the tank, auxiliary electric pump submerged in the tank and a return manifold.
The high pressure circuit consists of a radialjet pressure pump, outlet manifold and injectors.
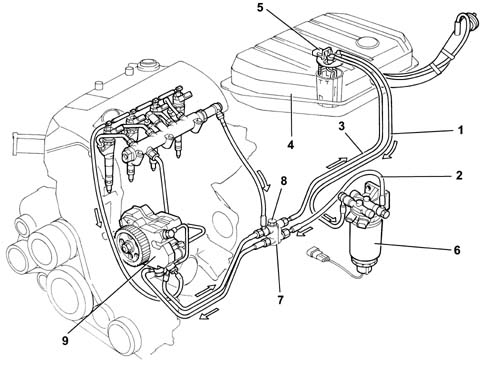
- 1 Outlet pipe from tank to fuel filter.
- 2 Delivery pipe from fuel filter to four-way fitting on engine.
- 3 Return pipe from four-way engine fitting to tank
- 4 Fuel tank.
- 5 Fuel pre-supply pump submerged in tank.
- 6 Fuel filter.
- 7 Four-way fitting on engine.
- 8 Bontaz pressure relief valve.
- 9 High pressure pump (Radialjet).
Submerged pump assembly (Auxiliary) and fuel level gauge control
The assembly consists mainly of:
- a roller-type fuel pump;
- a fuel level gauge;
- a fuel filter.
The electric pump submerged in the fuel is volumetric roller type with brush motor and permanent magnet excitation.
Impeller (1) is turned by the electric motor to create volumes (2) that migrate from intake port (3) to outlet port (4).
These volumes are delimited by rollers (5) that adhere to outer race (6) during motor rotation.
The electric pump is fitted with two valves: a check valve to prevent the fuel circuit emptying (with the pump off); a second pressure relief valve (7) that bypasses the outlet to the intake when pressure levels exceed 5 bars.
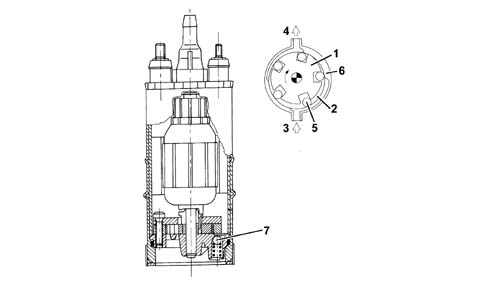
- 1 Impeller.
- 2 Volumes.
- 3 Intake port.
- 4 Outlet port.
- 5 Rollers.
- 6 Outer race.
- 7 Pressure relief valve.
Fuel filter
The fuel filter is located in the engine bay on the driver's side and secured to the passenger compartment - engine bay bulkhead.
The filter is cartridge type with a filter element. It is fitted with a fuel preheating device controlled by a thermal switch fitted to the filter. When diesel fuel temperature is lower than 6 °C, an electrical coil heats the fuel to a maximum of 15 °C before directing it to the pressure pump.
A water presence sensor screwed to the base of the fuel filter cartridge also acts as a drain.
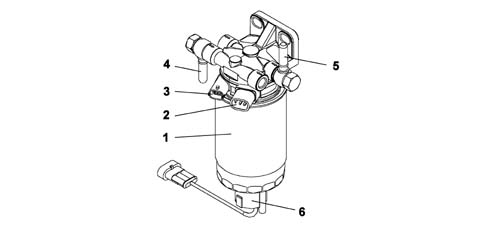
- 1 Filter cartridge.
- 2 Fuel preheating.
- 3 Fuel temperature sensor.
- 4 Fuel inlet from tank.
- 5 Fuel outlet to radialjet pump.
- 6 Cap with water presence sensor in filter.
High pressure pump CP3
Specifications
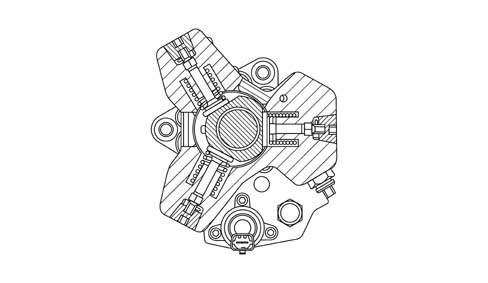
Pump CP3 is designed with 3 radial pistons controlled by the timing gear, without the need for timing adjustment, with a rotor feed pump applied to the rear side.
Delivery pressure to the rail is modulated by the electronic control unit via the pressure regulator. The pump is lubricated and cooled by the fuel.
The high pressure pump - feed pump unit cannot be serviced and must not therefore be removed. The retaining bolts must not be tampered with either. The only permitted operations are: drive gear replacement and pressure regulator replacement.
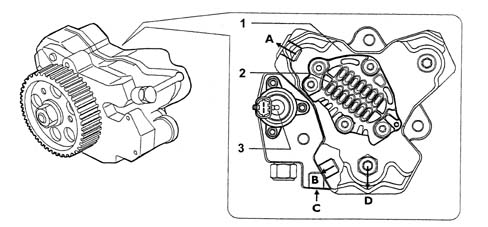
- A - Fuel return
- B - Fuel return
- C - Fuel intake from filter
- D - Fuel outlet fitting from supply pump to Rail
- 1 High pressure pump
- 2 Feed pump
- 3 Pressure regulator (NA solenoid modulated by control unit)
Operation
Pump element (3) is forced outward by a cam on the pump shaft
During intake, the compression chamber is supplied with fuel via port (5). The amount of fuel directed to the compression chamber is modulated by pressure regulator (7).
The pressure regulator is governed by the engine control unit by means of PWM (Pulse Width Modulation) signals and reduces fuel flow in the low pressure circuit by altering the passage area.
During the compression stage, the fuel reaches the pressure required to open valve (2). It is then sent to the Common Rail through outlet fitting (1).
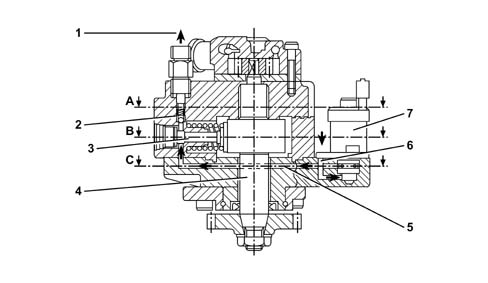
- 1 Outlet fitting.
- 2 Valve on outlet circuit
- 3 Pump element
- 4 Pump shaft
- 5 Passage of fuel toward pump element
- 6 Passage of fuel toward pressure regulator
- 7 Pressure regulator
Low pressure circuit
The pump shaft is lubricated by fuel via ports (2).
Pressure regulator (5) modulates the amount of fuel sent to the pump elements and excess fuel flows through ports (9)
Pressure relief valve (8) acts as an excess fuel collector and also maintains pressure to the regulator at a constant level of 5 bars regardless of the amount of fuel recirculation cross section restriction.
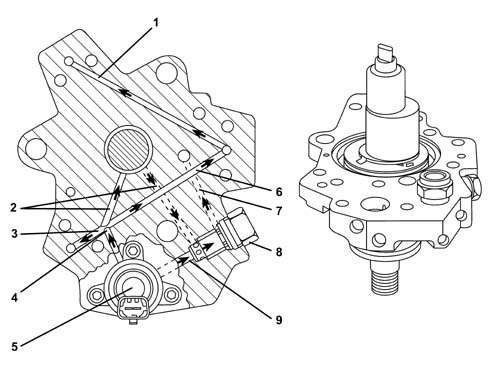
- 1 Fuel inlet channel to pump elements
- 2 Pump lubrication channel
- 3 Fuel inlet channel to pump elements
- 4 Main fuel inlet channel to pump elements
- 5 Pressure regulator
- 6 Fuel inlet channel to pump elements
- 7 Recirculation from pressure regulator
- 8 Regulator vallve on low pressure circuit (5 bars)
- 9 Recirculation from intake to pressure regulator
High pressure circuit
The following figure shows the route of the high pressure channels to the pump outlet fitting.
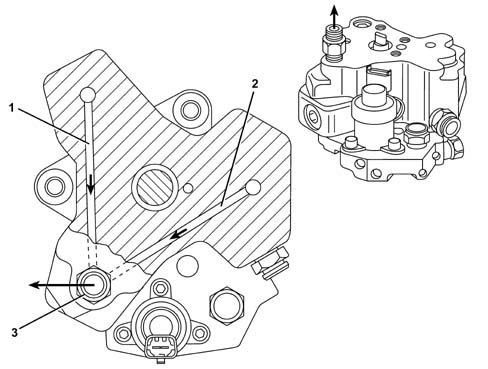
- 1 Fuel outlet channel from pump elements
- 2 Fuel outlet channel from pump elements
- 3 Fuel outlet fitting from pump to common rail
Fuel pressure regulator
The fuel pressure regulator is fitted to the low pressure circuit of pump CP3.
The pressure regulator modulates the amount of fuel sent to the high pressure circuit on the basis of commands received directly from the engine control unit.
The pressure regulator consists mainly of the following components:
- connector,
- case,
- solenoid,
- preload spring,
- plunger cylinder.
In the absence of a signal, the pressure regulator is normally open, i.e. with the pump in maximum output condition.
The engine control unit modulates fuel flow in the high pressure circuit via a PWM (Pulse Width Modulation) signal. This is achieved by partly closing or opening fuel passage cross sections in the low pressure circuit.
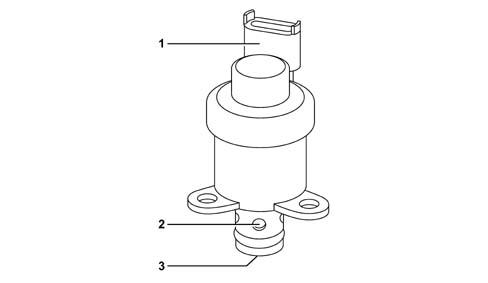
- 1 Connector
- 2 Fuel outlet ports
- 3 Fuel inlet port
Operation
When the engine control unit governs the pressure regulator (via a PWM signal), solenoid (1) is energised and generates in turn movement of magnetic core (2).
Core movement causes plunger cylinder (3) to move sideways and partially block fuel flow.
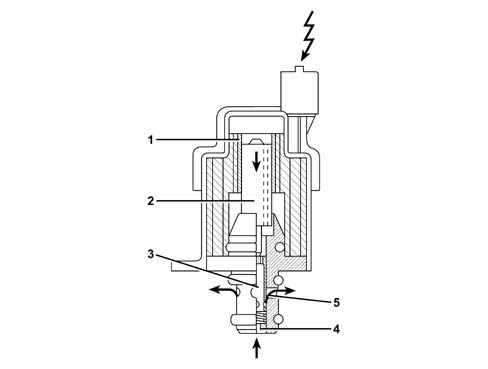
- 1 Solenoid
- 2 Magnetic core
- 3 Plunger cylinder
- 4 Fuel inlet
- 5 Fuel outlet
When solenoid (1) is not energised, the magnetic core is pushed into rest position by preload spring (3).
Under these conditions, plunger cylinder (4) takes up a position that offers the maximum fuel passage cross section.
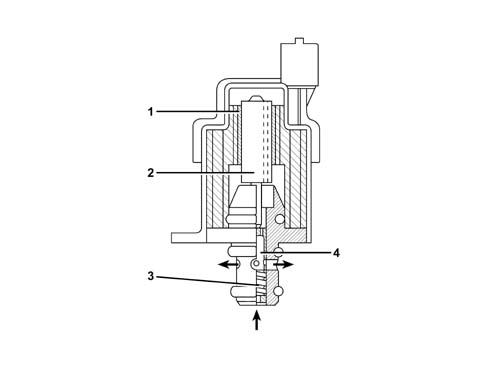
- 1 Solenoid
- 2 Magnetic core
- 3 Preload spring
- 4 Plunger cylinder
Fuel tank cap with safety valve
The following figure contains a graph showing the operation of the valve inside the fuel tank cap.
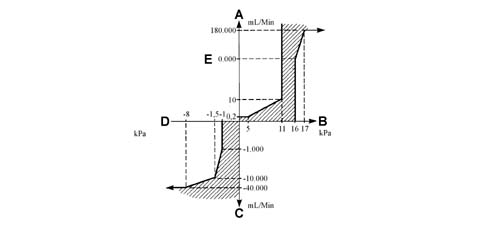
- A - Air outlet from tank.
- B - Tank pressure.
- C - Air intake to tank.
- D - Vacuum in tank
- E - Ventilation not varying from plot.
The valve is located inside the fuel tank cap and carries out the following functions:
- tank pressurisation;
- ventilation;
- seal in the case of roll-over.
Tank pressurisation is maintained by means of a valve in the tank cap. If tank pressure exceeds a specified value, it overcomes spring resistance and allows the valve to lift so that vapour can emerge. The valve recloses when the pressure is restored to within limit values.
Under specific vehicle operating conditions, a vacuum builds up in the tank. The valve allows air into the tank to restabilise pressure in the tank.
The roll-over function prevents fuel emerging from the tank if the vehicle rolls over or tilts too far to one side.
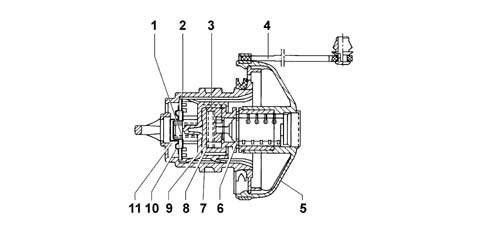
- 1 Pressure spring.
- 2 Pressure plate.
- 3 Clutch.
- 4 Cap retaining cord
- 5 Cover.
- 6 Fastening spring.
- 7 Valve mount.
- 8 Clutch spring.
- 9 Cylinder mount.
- 10 Vacuum plate
- 11 Vacuum spring.
Delivery manifold (RAIL)
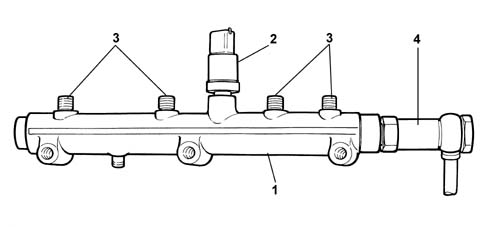
The hydraulic accumulator is fitted to the cylinder head opposite to the intake side. With a volume of 20 cm³, this damps fuel pressure fluctuations due to:
- high pressure pump operation;
- injector opening.
The upper part of hydraulic accumulator (1) is fitted with fuel pressure sensor (2) and pipes (3) connected to the injectors. A pressure relief valve (4) set to 1750 bars on the side of the accumulator cuts in to recirculate fuel to the tank when necessary.
Pressure relief valve
A pressure relief valve (1750 bars) on the rail protects system components if a flow limiter cuts in.
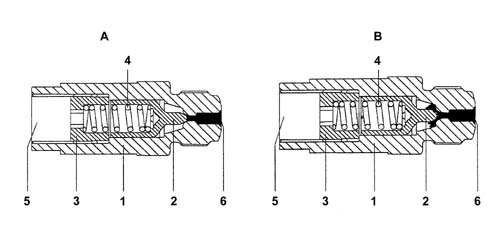
- 1 Casing
- 2 Piston
- 3 Stop
- 4 Spring
- 5 Direct outlet to tank
- 6 Seat on rail
- A - Valve closed
- B - Valve open
A - The tapered end of the piston normally keeps the outlet to the tank closed.
B - If fuel exceeds a pressure of 1750 bars in the rail, the piston moves and excess pressure is discharged into the tank.
Safety inertia switch
The vehicle is fitted with a safety inertia switch located on the engine bay on the dashboard wall near the battery to increase vehicle occupant safety during crashes.
The sensor reduces the possibility of fire (due to emerging fuel) by deactivating the axiliary pump that feeds the fuel circuit.
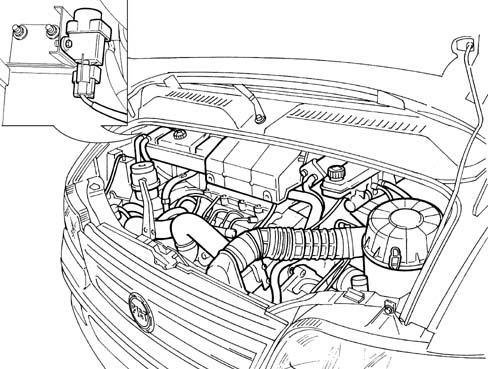
The inertia switch consists of a steel ball fitted in a housing (tapered seat) and maintained in position by the attractive force of a permanent magnet.
In the case of violent vehicle impact, the ball is released from the magnetic detent and opens the normally closed (N.C.) electrical circuit to break the auxiliary fuel pump earth connection and hence the power supply to the injection system.
Simply press the switch until it clicks home to restore the auxiliary pump earth connection.
If a smell of fuel or fuel system leaks are noted after even an apparently slight impact, do not reset the inertia switch but find and repair the fault to prevent the risk of fire.
Intertia switch components
The following figure shows the inertia switch components
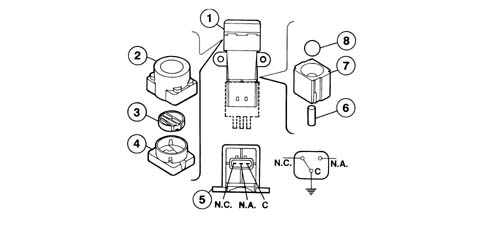
- 1 Inertia switch assembly.
- 2 Sheath.
- 3 Button.
- 4 Upper side.
- 5 Engagement side.
- 6 Permanent magnet.
- 7 Permanent magnet seat.
- 8 Steel ball.
- C - Shared terminal.
- N.C. - Normally closed contact.
- N.O. - Normally open contact.
INTRODUCTION
In operational terms, the fuel supply circuit is divided into a low pressure circuit and a high pressure circuit.
The low pressure circuit consists of the tank, auxiliary electric pump submerged in the tank, fuel cooling coil and a return manifold.
The high pressure circuit consists of a radialjet pressure pump, outlet manifold and injectors.
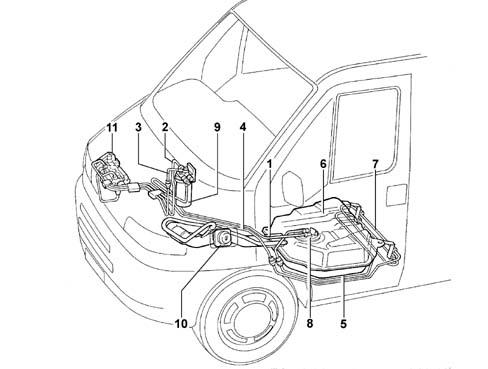
- 1 Outlet pipe from tank to fuel filter.
- 2 Supply pipe from fuel filter to high pressure pump.
- 3 Pipe connecting fuel filter excess pressure valve to low pressure recirculation connector.
- 4 Return pipe from connector to fuel cooling coil.
- 5 Pipe connecting cooling coil to fuel tank.
- 6 Fuel tank.
- 7 Fuel cooling coil.
- 8 Fuel pre-supply pump submerged in tank.
- 9 Fuel filter.
- 10 Fuel cap.
- 11 High pressure pump (Radialjet).
Submerged pump assembly (Auxiliary) and fuel level gauge control
The assembly consists mainly of:
- a roller-type fuel pump;
- a fuel level gauge;
- a fuel filter.
The electric pump submerged in the fuel is volumetric roller type with brush motor and permanent magnet excitation.
Impeller (1) is turned by the electric motor to create volumes (2) that migrate from intake port (3) to outlet port (4).
These volumes are delimited by rollers (5) that adhere to outer race (6) during motor rotation.
The electric pump is fitted with two valves: a check valve to prevent the fuel circuit emptying (with the pump off); a second pressure relief valve (7) that bypasses the outlet to the intake when pressure levels exceed 5 bars.
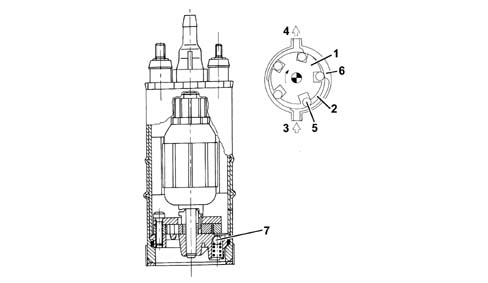
- 1 Impeller.
- 2 Volumes.
- 3 Intake port.
- 4 Outlet port.
- 5 Rollers.
- 6 Outer race.
- 7 Pressure relief valve.
Fuel filter
The fuel filter is located in the engine bay on the driver's side and secured to the passenger compartment - engine bay bulkhead.
The filter is cartridge type with a filter element. It is fitted with a fuel preheating device controlled by a thermal switch fitted to the filter. When diesel fuel temperature is lower than 6 °C, an electrical coil heats the fuel to a maximum of 15 °C before directing it to the pressure pump.
A water presence sensor screwed to the base of the fuel filter cartridge also acts as a drain.
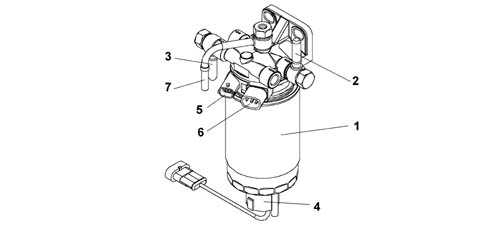
- 1 Filter cartridge.
- 2 Fuel inlet from tank.
- 3 Fuel outlet to radialjet pump.
- 4 Cap with water presence sensor in filter.
- 5 Fuel temperature sensor.
- 6 Fuel preheating.
- 7 Pipe from high pressure pump to fuel filter.
High-pressure pump
The radial jet type pressure pump has three radial pistons (total capacity 0.657 cc) and is operated by the timing belt.
Each pumping unit consists of:
- a piston (5) operated by a cam (2) in one piece with the pump shaft (6);
- an intake valve (3);
- a ball delivery valve (4);
The pump supply pressure should be at least 0.5 bar and, for this reason, the fuel system is equipped with an auxiliary pump submerged in the tank. The supply pressure is controlled by a pressure regulation valve fitted on the pressure pump.
The pressure pump is lubricated and cooled by the actual diesel fuel by means of suitable ducts and can supply a maximum pressure of 1350 bar. The 3rd pumping exclusion device consists of a solenoid valve (1) which, by means of the push rod (2), keeps the intake alve (3) open during the 3rd pumping delivery stroke (5). It is activated by the control unit when the engine power does not increase at a speed of above 4200 rpm. The fuel dischraged in this way (~ ? of the capacity) is introduced into the high pressure pump recirculation circuit.
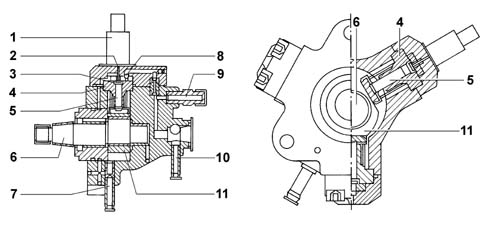
- 1 3rd pump element cut-out solenoid.
- 2 Push rod.
- 3 Intake valve.
- 4 Cylinder.
- 5 Pump.
- 6 Pump shaft
- 7 Inlet (low pressure, from the filter).
- 8 Ball delivery valve.
- 9 Supply (high pressure, rail).
- 10 Supply (low pressure, recirculation).
- 11 Cam.
Fuel pressure regulator
The fuel pressure sensor is fitted on the pressure pump and is operated directly by the injection control unit; it regulates the fuel supply pressure to the injectors. The pressure regulator consists mainly of the following components:
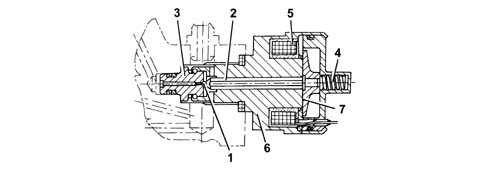
- 1 Ball plunger.
- 2 Pin.
- 3 Valve.
- 4 Preloading spring
- 5 Coil.
- 6 Casing
- 7 Keeper.
Fuel tank cap with safety valve
The following figure contains a graph showing the operation of the valve inside the fuel tank cap.
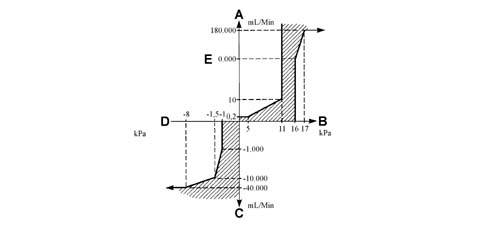
- A - Air outlet from tank.
- B - Tank pressure.
- C - Air intake to tank.
- D - Vacuum in tank.
- E - Ventilation not varying from plot.
The valve is located inside the fuel tank cap and carries out the following functions:
- tank pressurisation;
- ventilation;
- seal in the case of roll-over.
Tank pressurisation is maintained by means of a valve in the tank cap. The tank pressure exceeds a specified value, overcomes spring resistance and allows the valve to lift so that vapour can emerge. The valve recloses when the pressure is restored to within limit values.
Under specific vehicle operating conditions, a vacuum builds up in the tank. The valve allows air into the tank to restabilise pressure in the tank.
The roll-over function prevents fuel emerging from the tank if the vehicle rolls over or tilts too far to one side.
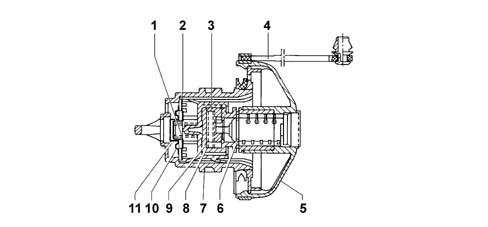
- 1 Pressure spring.
- 2 Pressure plate.
- 3 Clutch.
- 4 Cap retaining cord
- 5 Cover.
- 6 Fastening spring.
- 7 Valve mount.
- 8 Clutch spring.
- 9 Cylinder mount.
- 10 Vacuum plate.
- 11 Vacuum spring.
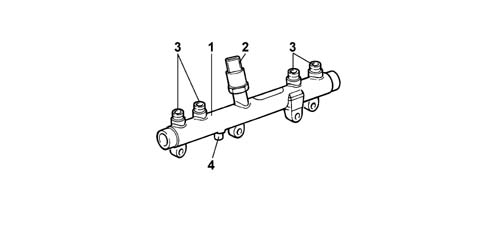
Delivery manifold (rail)
The hydraulic accumulator is fitted to the cylinder head opposite to the intake side. With a volume of around 29 cm³, this damps fuel pressure fluctuations due to:
- high pressure pump operation;
- injector opening.
The fuel pressure sensor (2) and the pipes (3) connected to the injectors are fitted on the upper part of the hydraulic accumulator (1), whilst the low pressure fuel drain pipe (4) is fitted on the lower part.
Safety inertia switch
The vehicle is fitted with a safety inertia switch located on the engine bay on the dashboard wall near the battery to increase vehicle occupant safety during crashes.
The sensor reduces the possibility of fire (due to emerging fuel) by deactivating the axiliary pump that feeds the injection circuit.
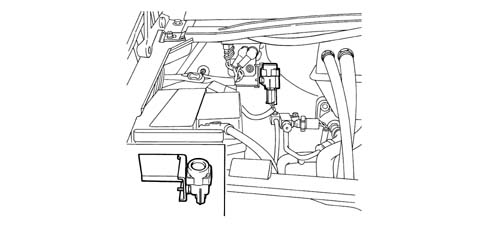
The inertia switch consists of a steel ball fitted in a housing (tapered seat) and maintained in position by the attractive force of a permanent magnet.
In the case of violent vehicle impact, the ball is released from the magnetic detent and opens the normally closed (N.C.) electrical circuit to break the auxiliary fuel pump earth connection and hence the power supply to the injection system.
Simply press the switch until it clicks home to restore the auxiliary pump earth connection.
If a smell of fuel or fuel system leaks are noted after even an apparently slight impact, do not reset the inertia switch but find and repair the fault to prevent the risk of fire.
Intertia switch components
The following figure shows the inertia switch components
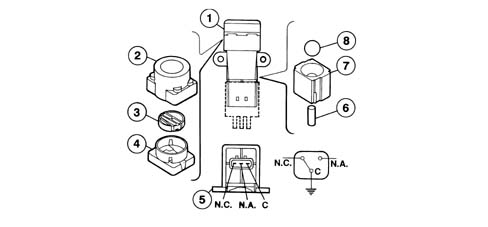
- 1 Inertia switch assembly.
- 2 Sheath.
- 3 Button.
- 4 Upper side.
- 5 Engagement side.
- 6 Permanent magnet.
- C - Shared terminal
- 7 Permanent magnet seat.
- 8 Steel ball.
- N.C. - Normally closed contact.
- N.O. - Normally open contact.
Parts & tools for this job For 2002 Fiat Ducato
- TOOLDigital multimeterSearch: automotive digital multimeter
- PARTAssorted fuse kitSearch: car fuse assortment kit
- TOOLWire crimper and connector kitSearch: wire crimper connector kit
Links open Amazon search results in a new tab. As an Amazon Associate I earn from qualifying purchases.