
Engind front cover - r r
- Make
- Fiat
- Model
- Multipla Factory Service Manual
- Year
- 1998–2010
- Section
- Crankcase sump and covers › Engind front cover - r r
Engind front cover - r r
Removing
- 1004D40 engine - position on stand and remove
- 1084C10 engine oil heat exchanger - r + r
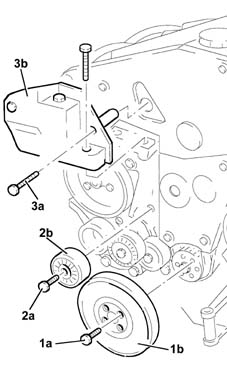
1. Undo the bolts (1a) and remove the crankshaft pulley (1b).
2. Undo the bolt (2a) and remove the single drive belt fixed guide pulley (2b).
3. Undo the bolts (2a) and remove the power unit reaction rod attachment bracket (2b).
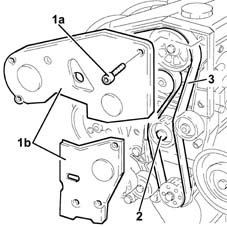
1. Undo the bolts (1a) and remove the timing drive belt guard (1b).
2. Loosen the timing belt tensioner nut.
3. Remove the toothed timing drive belt.
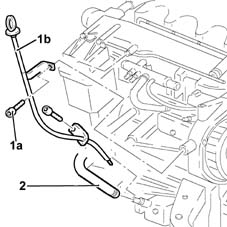
1. Undo the bolts (1a) and remove the complete oil dipstick (1b).
2. Disconnect the condensation oil return pipe to the sump.
Rotate the engine through 180° on the overhauling stand.
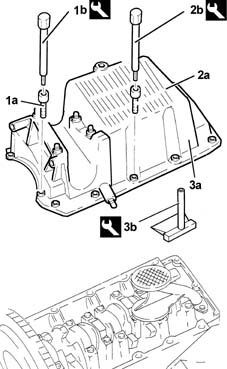
1. Undo the front and rear bolts (1a) for the crankcase sump using tool (1b).
| Name | Country | |
|---|---|---|
| 1b | Key | 1.860.833.000 |
2. Undo the side bolts (2a) for the crankcase sump using tool (2b).
| Name | Country | |
|---|---|---|
| 2b | Key | 1.860.834.000 |
3. Remove the crankcase sump (3a).
To loosen the sump from the crankcase, insert tool (3b) between both components using a mallet, then use a screwdriver for leverage in the special projections at the side of the crankcase sump.
| Name | Country | |
|---|---|---|
| 3b | Blade | 1.870.718.000 |
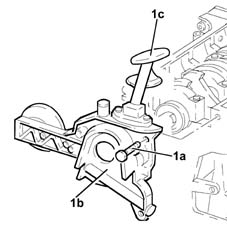
1. Undo the bolts (1a) and remove the crankcase front cover with built in oil pump (1b) and intake housing.
Remove the crankshaft front oil seal.
Refitting
Fit the engine block front cover complete with oil pump and intake housing without tightening the bolts.
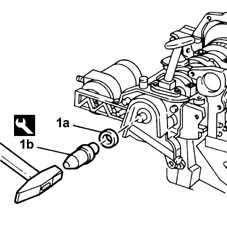
1. Fit a new crankshaft front oil seal (1a) using the tool (1b).
| Name | Country | |
|---|---|---|
| 1b | Fitting tool | 1.860.816.000 |
Tighten the bolts for the crankcase front cover to torque.
| Fastening | Component | Ø | Value (daNm) | |
|---|---|---|---|---|
| Bolt | CRANKSHAFT FRONT COVER | M6 | 0.8 - 1.0 |
Fit the water - oil heat exchanger and fix it using the pin.
Fit the oil filter.
Apply sealant to the entire perimeter of the crankcase sump.
| Type | Component | Name | Qty. | |
|---|---|---|---|---|
| Silicon sealant | OIL SUMP |
Fit the crankcase sump.
Tighten the side bolts for the crankcase sump to torque using the tool.
| Fastening | Component | Ø | Value (daNm) | |
|---|---|---|---|---|
| Side bolts | OIL SUMP | M8 | 2.1 - 2.6 |
| Name | Country | |
|---|---|---|
| Key | 1.860.834.000 |
Tighten the front and rear bolts for the crankcase sump to torque using the tool.
| Fastening | Component | Ø | Value (daNm) | |
|---|---|---|---|---|
| Front and rear bolts | OIL SUMP | M6 | 0.7 - 0.9 |
| Name | Country | |
|---|---|---|
| Key | 1.860.833.000 |
Rotate the engine through 180° on the overhauling stand.
Connect the condensate oil return pipe to the crankcase sump and secure using a collar.
Fit the engine oil dipstick assembly and fix it using the bolts.
Fit the auxiliary shaft belt tensioner and fix it using the relevant bolt.
Fit the fixed timing belt tensioner and fix it using the relevant bolt.
Connect the water inlet and outlet pipes from the water - oil heat exchanger and secure using relevant collars.
Fit the power unit support, timing gear side, and fix it using the bolts.
1. Fit toothed drive pulley (1a) and tighten the bolt (anticlockwise) (b) to torque.
| Fastening | Component | Ø | Value (daNm) | |
|---|---|---|---|---|
| Bolt | TOOTHED DRIVE PULLEY | M16 | 30.6 - 37.8 |
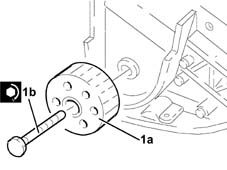
Remove the tool.
| Name | Country | |
|---|---|---|
| Counter-torque | 1.860.846.000 |
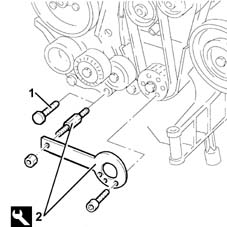
1. Remove the bolt for the oil pump shown.
Temporarily fit the single toothed timing drive belt to the drive pulley.
2. Fit the tool.
To allow the engagement of the locating dowel on the timing drive belt drive pulley in the opening in the tool, rotate the crankshaft using small movements.
| Name | Country | |
|---|---|---|
| Template | 1.860.905.000 |
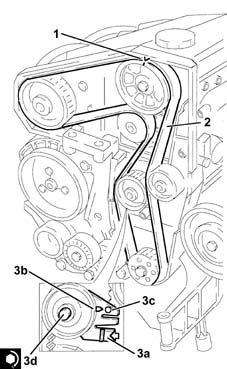
1. Rotate the driven pulley so that the timing references line up.
2. Completely fit the timing belt.
3. Use a screwdriver to lever in the hole (3a) until the reference on the tensioner (3b) lines up with the reference hole (3c) and, in this position, tighten the belt tensioner nut (3d) to torque.
| Fastening | Component | Ø | Value (daNm) | |
|---|---|---|---|---|
| 3d | Nut | MOBILE TIMING TENSIONER | M10 | 4.2 - 5.2 |
Remove the tool.
| Name | Country | |
|---|---|---|
| Template | 1.860.905.000 |
Rotate the crankshaft through two revolutions.
Check once again that the timing references and the tensioning references on the timing belt tensioner coincide.
Fit the timing drive belt guards and fix them using the bolts.
Fit the power unit reaction rod attachment bracket and fix it using the bolts.
Fit the engine component single drive belt guide pulley and fix it using the bolt.
Fit the crankshaft pulley.
Fit the single engine component belt by adjusting the automatic belt tensioner using a wrench.
Parts & tools for this job For 1998 Fiat Multipla
- PARTEngine gasket setSearch: Fiat Multipla 1998 engine gasket set
- TOOLTorque wrenchSearch: 3/8 inch torque wrench
- TOOLFeeler gauge setSearch: feeler gauge set
Links open Amazon search results in a new tab. As an Amazon Associate I earn from qualifying purchases.