| Removal Special Tool(s) | | Wrench, Steering Gear 211-202 (13-013) | | | Support Bar, Engine 303-290A (21-140A) | | | Adaptor for 303-290A 303-290-01 (21-140-01) | | | Adaptor for 303-290A 303-290-02 (21-140-02) | | | Adaptor for 303-290A 303-290-03A (21-140-03A) | | | Remover, Halfshaft 308-192 (16-057) | General Equipment Transmission jack Retaining straps Removal All vehicles | | -
Remove the intake air cleaner. - Loosen the clamp.
- Disconnect the connectors.
- Disconnect the vent hose.
- Remove the retaining rubber.
- Disconnect the inlet tube.
| | | -
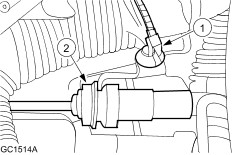
NOTE:Use an Allen socket to stop the piston rod from turning. On both sides loosen the suspension strut locknut five turns (right-hand side shown). | | | -
Use wire or tie strap to secure the radiator. | | | -
Disconnect the ground cable and position it to one side. - Remove the bolt.
- Position the ground cable to one side.
| | | -
Disconnect the reversing lamp switch electrical connector. | | | -
CAUTION:If brake fluid is spilt on the paintwork, the affected area must be immediately washed down with cold water. Remove the clip and disconnect the clutch slave cylinder hydraulic line. | | | -
CAUTION:If brake fluid is spilt on the paintwork, the affected area must be immediately washed down with cold water. Disconnect the clutch slave cylinder hydraulic line from the bracket and remove the push pin. - Remove the push pin.
- Disconnect the line from the bracket and position to one side.
| | | -
Remove the upper bellhousing and upper starter motor bolts. - Remove the upper bellhousing bolts.
- Remove the upper starter motor bolts.
- Position the ground cable to one side.
| | | -
Install the special tools. - Raise the engine approximately 10 mm.
| | | -
NOTE:Mark up the position. Remove the rear support insulator. - Remove the nuts.
- Remove the bolts.
| | | -
Remove both front wheels. | | | -
Remove the fender splash shields (right-hand side shown). | | | -
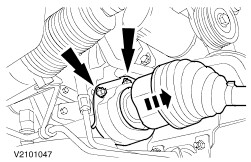
CAUTION:Do not damage boot and ABS sensor ring Disconnect the lower suspension arm ball joints and the stabilizer link rods (right-hand side shown). - Disconnect the ABS wiring harness bracket from the suspension strut.
| | | -
Remove the LH support insulator. - Remove the bolt.
- Remove the nuts.
- Remove the LH support insulator.
| Vehicles with air conditioning | | -
Remove the suction accumulator bracket bolts. | All vehicles | | -
Remove the radiator splash shield. - Remove the bolts.
- Remove the push pins.
| | | -
NOTE:Left-hand side shown, right-hand side similar. Remove the brackets. - Remove the bolts.
- Remove the brackets.
| | | -
Detach the starter motor. - Remove the lower starter motor bolt.
- Detach the starter motor.
- Position the starter motor to one side.
| | | -
Detach the front exhaust tube and remove it. | Vehicles built up to 08/1999 | | -
Detach the gearshift cables from the transaxle. - Detach the shifter cable from the selector lever.
- Detach the selector cable from the selector lever.
| | | -
Detach the gearshift cables from the bracket. - Detach the shifter cable from the retaining bracket, turning the abutment sleeves counterclockwise.
- Detach the selector cable from the retaining bracket, turning the abutment sleeves counterclockwise.
| Vehicles built 08/1999 onwards | | -
NOTE:Press the locking tab. Detach the gearshift cables from the transaxle. - Detach the shifter cable from the selector lever.
- Detach the selector cable from the selector lever.
| | | -
Detach the gearshift cables from the bracket. - Detach the shifter cable from the retaining bracket, turning the abutment sleeves counterclockwise.
- Detach the selector cable from the retaining bracket, turning the abutment sleeves counterclockwise.
| All vehicles | | -
Disconnect the vehicle speed sensor (VSS) electrical connector. | | | -
Remove the power steering line bracket bolt. | | | -
Remove the power steering line bracket nut. | | | -
Remove the power steering hose bracket bolt. | | | -
Remove the steering gear and the RH engine support insulator. - Using the special tool, remove the steering gear from the subframe.
- Remove the support insulator from the bracket.
- Remove the support insulator from the subframe.
| | | -
NOTE:Secure the steering gear using mechanics wire before subframe removal. Remove the subframe bolts and subframe. | | | -
CAUTION:Support the halfshaft. The inner joint must not be bent more than 18 degrees. The outer joint must not be bent more than 45 degrees. CAUTION:Cap the transaxle to prevent oil loss and dirt ingress. CAUTION:Do not damage the halfshaft seal. Detach the halfshaft together with the intermediate shaft from the transaxle. - Discard the intermediate shaft center bearing locknuts.
- Secure the halfshaft to one side.
| | | -
CAUTION:Support the halfshaft. The inner joint must not be bent more than 18 degrees. The outer joint must not be bent more than 45 degrees. CAUTION:Cap the transaxle to prevent oil loss and dirt ingress. CAUTION:Do not damage the halfshaft seal. Using the special tool, detach the left - hand halfshaft from the transaxle. - Secure the halfshaft to one side.
| | | -
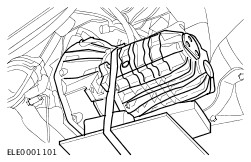
Using the special tools, lower the engine/transaxle until the transaxle is below the front side member. | | | -
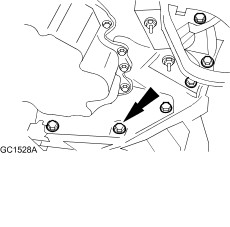
Remove the lower front bellhousing bolts (without three-way catalytic converter (TWC) shown). | | | -
Remove the remaining bellhousing bolts. | |